https://lehmansbaseball.wordpress.com/rotator-cuff/?utm_source=The+Rotater%27s+%22Top+10%22+Newsletter&utm_campaign=e4fde9fae2-The_Rotater_TOP_10_6_25_156_25_2015&utm_medium=email&utm_term=0_b069c819d0-e4fde9fae2-327172017
 If however you put your right hand behind your back then take your left hand around your back and try to dig your fingers underneath the medial border of the scapula you can get at the origin of this muscle. In this position you can palpate them through the trapezius and rhomboids that lie over top.


If you want to know a lot about the four muscles that make up the rotator cuff then you need to read these three posts
If you interested in what I think is needed to care for a healthy throwing arm then check out these two articles
Subscapularis
Subscapularis
This is the last of the rotator cuff muscles and it’s the largest and strongest.
Where is it?
This one is tough to get your hand on because of the fact that it is underneath the scapula
Subscap behind our rib cage
(hence the name) and you can’t really get at it from the front because of the rib cage.
If however you put your right hand behind your back then take your left hand around your back and try to dig your fingers underneath the medial border of the scapula you can get at the origin of this muscle. In this position you can palpate them through the trapezius and rhomboids that lie over top.
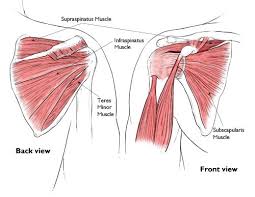
Right Subscapularis - view from the back and front (minus the rib cage)
What Does It Do?
It is the largest muscle of the rotator cuff allowing it to create 1725 N of internal rotation force at 90 degrees and 1297 at 0 degrees of abduction (Decker et al. 2003). However at zero degrees of abduction the pectoralis major, latissmus dorsi and teres major all assist in creating internal rotation while the 90 degree version didn’t recruit these bigger muscles allowing you to isolate the subscapularis.
During the throwing motion the subscapularis help depress the humeral head to prevent injury but it also contributes to the act of throwing by providing some internal rotation power for when your arm starts to rotate to deliver the ball.
What Are the Best Exercises?
The most popular exercises you will see are standing internal rotation exercises with the

Internal Rotation at Zero Degrees of Abduction
arm either tucked at the side or at 90 degrees in the field goal position.
As mentioned above the 90 degree version has the benefit of not have bigger muscles like the pecs and lats take over allowing you to target the subscapularis specifically but it this position isn’t as stable compared to when your arm is tucked in at your side.

Internal Rotation at 90 degrees of abduction
There are some other exercises that aren’t your typical “rotator cuff” exercises that have

Arms straight - sink & extend
been shown to promote some high activation from the subscapularis. The pushup plus which is most regarded as a serratus anterior exercise recruits the subscap and so does the band bear hug which is essentially the same motion as the pushup plus but with a band. (Decker et al. 2003)

Band Bear Hug - perform like a fly motion - pic from Reinold (2009)
There are some “new” exercises that have you training the subscapularis in a diagonal motion with your shoulder abducted which offers up the ability to train in a “functional pattern.”

"Functional" subscap training - Reinold et al. (2009)
Bottom Line
All of these exercises are great plus it nice to mix things up so you aren’t the same exercise every day.
Of the rotator cuff muscles it is the least likely to be weak due to its size and the fact that it gets used every time you throw – ensure that you hit the other rotator cuff muscles prior to attacking the subscapularis.
Be sure to check out the next article which will look at other areas of the body and shoulder that need to be addressed in order to promote shoulder healthy and performance.
The External Rotators – Infraspinatus & Teres Minor
Infraspinatus and Teres Minor
These muscles get worked when you do your typical rotator cuff work – you know the ones where you stand with your arm bent at about 90 degrees with your elbow kinda tucked to your side while you fling your arm back and forth into external and internal rotation. This one gets butchered a lot. Because the infraspinatus and teres minor perform similar roles I am going to attack them at the same time.
Where Are They?
Find the spine of the scapula again by placing your left hand on your shoulder-blade/scapula and poke around until you find a thin bony part that sticks out and runs horizontally. Let your fingers slide off this spine towards the ground and you will now have your fingers on the infraspinatus – to double check externally rotate your arm to feel it contract.

Infraspinatus
The teres minor is just below and it doesn’t start on the medial boarder like the infraspinatus and supraspinatus do. To find its exact location palpate your fingers between the lateral boarder of the scapula and the greater tubercule of the humerus. Externally rotate your arm to be sure you have the teres minor. If you feel a muscle contract when you internally rotate your arm you probably have your fingers on the teres minor which is just below the teres minor.

Teres Minor
What do they do?
These muscles make up the posterior cuff which enables them to produce external rotation which allows you as a thrower to get your arm into external rotation and just as importantly allows the greater tuberosity to go underneath the coracoarcromial arch which prevents subacromial impingement. They also provide compression to the glenohurmeral joint in order to resist both superior and anterior translation. The “translation” of that last sentence means that it stops the head of the humerus (the ball) from rubbing up against the top (superior) or front (anterior) of the glenoid fossa (the socket) (Sharkey et al. 1995).
What’s the Best Exercise – Zero or Ninety?
The two most common positions to work the external rotators are with your arm at your side (zero degrees of abduction) or up at shoulder height (90 degrees of abduction). Computer models predict that the infraspinatus is stronger at zero degrees of abduction allowing it to produce 909 Newtons (N) of force versus 723 N at 90 degrees. The teres minor on the other is much more constant producing 111N at 90 degrees and 159N at zero – looking back at the pictures of the individual muscles you can see why the bigger infraspinatus can put out a lot more power than its smaller neighbor to the south. (Hughes et al. 1996)
Mike Reinold’s, who both the physical therapist for the Boston Red Sox and an active researcher, decided to conduct a study to determine the best exercise for the infraspinatus and teres minor. Reinold and his team tested the many different exercises which have been reported to activate the teres minor and infraspinatus in various positions (side lying, standing, prone) to finally decide which one reigned supreme.

Mike Reinold and Kevin Youkilis
His study reported that the side lying external rotation with the arm at zero degrees of abduction did the best job. The infraspinatus and teres minor contracted at 62% and 67% of their maximal voluntary contraction respectively. Adding a towel between your rib cage and arm allows you perform the exercise with perfect technique since it provides immediate feedback. Reinold reported that the addition of the towel increased the effectiveness of this exercises by 20-25% as indicated by EMG feedback from both the infraspinatus and teres minor. (Reinold et al. 2004)

The Best Infraspinatus and Teres Minor Exercise
The version that is performed at 90 degrees of abduction was shown to increase the involvement of the deltoid and supraspinatus which isn’t good when you are trying to isolate the external rotators. I still believe that this exercise has some merit since it replicates the position of the arm during the throwing motion however it is imperative to perform it properly – I commonly see player’s shoulders shrug up their shoulders increasing the activity of not only their deltoids but the trapezius as well. If you are able to pull your shoulder blades down and back you can add this version to your arm care repertoire but if you could only pick one or if you are returning from an injury stick to the side lying ER with a towel, support your head and use a weight that you can handle for 10-15 reps.
Arm Pre-Hab – more than just Rotator Cuff exercises
Putting it all together – the Hollistic Approach
I really need to get going with some research that is in my area of thesis but I know how important arm care is which is why I wanted to throw this series together, pardon the pun. I will be doing more in the future however I will give you a great list of resources where I have got the majority of my information from:
- Eric Cressey – web site and Optimal Shoulder Performance Videos
- Mike Reinold – web site and Optimal Shoulder Performance Videos
- Shirley Sharmann – Diagnosis and Treatment of Movement Impairment Syndromes
- Jeff Cubos – web site
- Gray Cook & Brett Jones – Secrets of the Shoulder DVD
- Dr. Nikita Vizniak – Muscle Manual
What I have learnt from these incredible resources is shoulder care goes beyond the strength of the individual rotator cuff muscles – we have to look at the entire body. While it is beyond the scope of this article to look at the entire body I will dig into 4 different areas that need to be addressed to ensure overall shoulder health.
- Reflexive Rotator Cuff Training – As a group the rotator cuffs job is the reflexively stabilize the humeral head so we need to train it do this.
- Scapular Stability – The scapula must be in the right position of the rotator cuff muscles to function properly – if the scapula is misaligned then the individual strength of these muscles matters not.
- Mobility in the Thoracic Spine – imperative for optimal performance as well as avoiding injuries.
- Breathing Patterns – we do this exercise all day everyday but if we don’t do it the right we might lock up some muscles that will restrict our mobility and steal power that we could have produced.
This holistic approach respects the fact that our bodies are essential long chain and a weak link can cause a host of problems almost anywhere along this chain. If you have an injury due to throwing and focus your attention solely at the site of pain you might miss the boat in trying to figure out what caused the problem in the first place. This is why top therapists will take a look at how the body is functioning near the site of the pain to look for some usual suspects which are at the root of the problem.
Let’s use an analogy here to explain what I am talking about.
Jonny and Billy are paired up to do a project and are both assigned 50% of the work. Billy is a slacker and doesn’t do his fair share which forced Jonny to do the majority of the work all by himself. Who do you think would complain about this situation? Jonny!!! But who do you think is causing the problem? Billy!!!
If your shoulder hurts you will probably have to do some work to repair whatever damage has been done but if you want to avoid this problem from reoccurring you are going to have to find the root of the problem.
Reflexive Conditioning
This series went into great detail of what each rotator cuff muscle does individually when we concentrate on isolation which is important to ensure each muscle has the necessary strength to do its job. However as a baseball player you need the rotator cuff to dynamically stabilize the head of the humerus so that it stays in the “sweet spot” within the glenoid fossa because if it doesn’t then bad things can happen.
Throwing a baseball as fast as you can to a very specific spot with someone swinging a bat is hard enough as it is so imagine how tough it would be if you had to tell your supraspinatus to pulldown on the humerus just enough to centre the humerus within the glenoid fossa. Luckily your rotator cuff is designed to provide this stability without you having to think about which is why I refer to it as reflexive conditioning/stabilization.
Scapular Stability
Because the GH joint (a.k.a shoulder joint) is so mobile we need for the joints on either side to be stable (joint by joint approach – Boyle et al 2008 – not a real reference but it deserves mention). The joints that anchor the GH joint are the elbow and scapulothoracic joints.

Elbow Joint

Scapularthoracic Joint
It is easy to see why the elbow joint is made for stability with the bone on bone connections but the scapulothoracic joint pretty much just floats on top of the ribs with only one little bone on bone connection at the acromion-clavicular (AC) joint to provide some stability.

AC Joint - Red Arrow
The rest of the stability demands fall on the muscles that connect it to other bones in the body and must keep hanging in exactly the right place. There are 18 different muscles that have some type of connection with the scapula; some have a tendency to become tight pulling the scapula out of position causing others to become weak and allow for a misplaced scapula.

Some of the Muscles that Stabilize the Scapula
These are some common muscles that need to be massaged and stretched:
- Pec Minor
- Teres Major
- Latissimus Dorsi (only some of the fibers attach but it’s a good to stretch anyways)
- Superior Traps
- Levator Scapula
These are some of the common muscles that need to be strengthened
- Serratus Anterior
- Lower Traps
Lower Traps
When you where about the traps you think of big body builder with no neck from doing lots of shrugs. This big muscle does cause you to shrug your shoulders but only the upper part – the traps can be divided into an upper, middle and lower portion because the fibers run at different angles and do different actions. Just like the deltoids which are divided into an anterior, middle and posterior groups which each produce different actions.
- Upper portion – upward rotation and elevation (shrugging motion)
- Middle portion – retraction – pinching your shoulder blades together
- Lower portion – upward rotation and downward depression.
The lower traps are going to be the part of the traps that we are going to focus on the most because they are the most neglected and will help us keep our shoulders strong and healthy if they are working properly. The reason for this is that they help tilt our scapula posteriorly as well as external rotation during arm elevation which decreases the chances of a sub-acromial impingement injury.

Traps - 3 different sets of muscle fibers
Serratus Anterior:
This muscle holds our scapula against our rib cage. If this muscle is weak it allows the scapula to “wing off” from the rib cage. Its action along with the pec minor is to protract the scaulea – this means to pull your shoulder blades apart. Hold your arms out in front of your with your elbows locked standing nice and tall – should look like Frankenstein. Now try to reach just a little further by allowing your shoulder blades to be pulled apart – that is the action of your serratus anterior.

Serratus Anterior
The most common exercise for the serratus anterior is what’s called a pushup plus where you do what I described previously only that you do it from a pushup position. In order to make it better try elevating your feet and placing your hands in a diamond position underneath your forehead. (Lear et al. 1993).
T-Spine Mobility
As a society we have the tendency to sit down way to often and for too long which results in hunch backs rob of us mobility we could have used to generate more velocity. When we sit down most of us go into a flexed position within our T-Spine and when we throw we want to have the ability extend and rotate.

T-Spine

T-Spine Flexion
My next post will give you a couple of drills to do that will help restore some of this lost mobility but you need to avoid being in a flexed position as best you can no matter if you are sitting or standing. Thirty to Sixty minutes a week of mobility drills do not stand a chance against countless hours of poor posture.

T-Spine Extension & Rotation
Breathing Patterns
Often times you hear a coach telling their athletes to relax and breath – this is great because it will help free up this locked t-spine area. Breathing is really important and often overlooked if you think about it half of each day you are in a state of inhalation while the other half is spent in exaltation. If you do something all day everyday you need to master this movement to ensure you are doing it the right way.
Again it is well beyond the scope of this article but try this drill:
Lie on your back with your knees bent at 90 degrees so your feet are flat on the ground – place one hand on your stomach and the other on your chest. Take deep breaths pulling in lots on air then exhale about 90 percent of the air in your system – this is essentially exaggerated breathing but you should only feel the hand on your stomach moving while the one placed on your chest needs to be still. This means that you are using your diaphragm to breathe which is what is it specifically designed to do. “Chest” breathing puts undue stress on muscles like your pec minor which as a result can become tight and overactive restricting your mobility.
Practice this one as much as you can and since you need to breathe all day everyday don’t tell me you don’t have the time.
Here is a video that goes into more detail:
Bottom Line
The “new” arm care program/pre-hab must go beyond your basic rotator cuff muscles to ensure that the whole system is working.
I will try my hand doing a couple of videos to show you my favorite drills and exercises for all of these different areas that I discussed.
But in the mean time….
The Best Shoulder Exercises – video’s
This final part of the Shoulder Series will look at videos which demonstrate the best exercises and drills that you can do in order to improve performance and decrease the chances of injury.
I have broken shoulder care down into four main categories
- Rotator Cuff Strength
- Reflexive Rotator Cuff Conditioning
- Scapular Stability
- Thoracic Spine Mobility
Rotator Cuff Strength
The importance here is that we ensure that each of the individual rotator cuff muscles is strong enough independently so that they can help contribute to shoulder health. Every baseball player already does a version of the following so it shouldn’t be hard to make the adjustment to doing the best ones. And please take your time and do them properly – the times that I have seen these exercises being performed poorly highly out numbers the times that I have seen them done properly.
Side Lying External Rotation
The goal here is to simply strengthen the infraspinatus and teres minor. Try to perform this with a weight rather than a band when possible.
Full Can Exercise
Everytime you perform an exercise you must look at the risks versus the rewards. The full can offers all of the rewards with none of the risks that accompany the empty can drill so the choice is simple. The goal is to strengthen the supraspinatus.
No-Money
This is a great exercise that you will see in the scapular stability section as well. It strengthens the infraspinatus and teres minor while working on scapular stability – namely lower trap activation.
You can obviously do this one standing up and I recommend that you stand touching the corner of a wall to help you get the feeling of squeezing your shoulder blades together.
Internal Rotation at Zero Degrees
High subscauplaris recruitment but be sure not to turn on the powerful pecs and lats by using perfect form as always.
Reflexive Rotator Cuff Conditioning
I am a Strength & Conditioning coach and I consider the conditioning part of my job to help prepare the athlete for the demands of their sport. In the case of an overhead athlete it is important to condition the rotator cuff for the act of throwing. Its role during this activity is to dynamically stabilize the head of the humerus within the glenoid fossa – keep the ball inside the socket.
Here are a couple of videos that demonstrate some drills that force the rotator cuff group to perform its role to dynamically stabilize.
Screw Drivers
This one is being performed with a kettlebell bottoms up which I love – this unstable load forces the muscles of your rotator cuff to fire in order to keep the load from falling. You can substitute a med ball balancing on your palm.
Perturbations
These kinds of exercises are great but require a training partner. The training partner provides resistance in multiple directions in an unpredictable manner so that you are forced to reflexively stabilize which again is the goal here. Ensure that this does not become a game with a winner and loser – the push should be subtle, no slapping noises, and hold the force for a couple of seconds.
Scapular Stability
The scapulothoracic joint should be stable and provide our GH joint with a solid base from which it can generate and transfer extreme levels of power and velocity. The majority of this stability falls onto the hands of the musculature which must work to keep the scapula in its most optimal position on the thorax. We are going to target the serratus anterior and lower traps in particular.
Here are some of my favorite exercises to accomplish this goal.
No Money
This exercise makes the list again in another category which means that it must a really good exercise since you’re killing two birds with one stone – scapular stability and rotator cuff strengthening.
See previous No Money Video above
Hand Walk Outs
Anytime you walk on your hands you force the muscles that stabilize your scapula to contract plus you will recruit the “core” to stabilize your trunk which is obviously important to throwing a baseball as hard as you can.
Face Pulls
In this video Strength and Conditioning guru Charles Poliquin discuss a great exercise that he uses to balance out the strength of his athletes. Most people are too weak in the upper back and the face pull is a great exercise to gain this needed strength.
Standing Cable Row
This is another great exercise to increase rowing strength and the one arm standing version enhances the scapula stability demands of this already great exercise.
Wall Slides
One of my favorites and in my opinion everyone can stand to benefit from. Make sure that you do this one throughout the day and please do it the right way. Great tip from my friend Dr. Jeff Cubos is to focus on proper breathing when you reach the end of your range of motion.
Y’s and T’s
This is a great exercise that can be done before any throwing or lifting session. If you want to do it at the yard please ensure that you perform it with a nice flat back.
Pushup plus
To get a bit more benefit from this exercise try putting your feet up on a bench – this has been shown to increase the recruitment of the serratus anterior.
Thoracic Mobility
The thoracic mobility is an untapped source of potential velocity that many players miss out on because they sit in a hunched over position the majority of the day. So sit up straight or even better get up and move around a little bit – the best posture is the one that is always changing. The lack of thoracic mobility can also put you at a higher risk of sustaining an injury to your shoulder.
Thoracic Extension
We sit in thoracic flexion all day so it only makes sense to get into extension. This low cost piece of equipment – two tennis balls and hockey tape – will pay off big time.
Wall Slides
This exercise is another that falls under multiple catagories so be sure to add it into your daily routine as often as you can.
Thoracic Extension & Rotation
The next piece of the puzzle is to add rotation since you will require this to launch that 5oz baseball over 90+mph. Below are some of my favorites.
Club/Bat Swinging
Club swinging is making a resurgence back into the strength and conditioning world – I say resurgence because this type of exercise has been around for centuries but some of the smartest people in the exercise community are rediscovering this great form of exercise which really helps improve shoulder function by promoting optimal thoracic mobility.
I don’t own clubs but I have been playing around with small baseball bats and they work really well. I will be posting more club swinging in the future. I am really excited to learn about club swinging since I see some huge potential.
This video demonstrates some movements that you can try with small bats or by choking up on normal sized bat. Do not try to go heavy with this by adding a weighted doughnut onto the bat – more is not better. Become fluid with these movements and even start by doing one side at a time to make sure you can do both sides properly. You might want to wear a helmet the first couple of times you try as well.
Bottom Line
Try playing around with all of these exercises whenever you can – there is a lot of down time before and after practices. You can find some time to squeeze in some of these exercises on a regular basis. Don’t overlook the importance of breathing as well which was mentioned in the previous post.
I hope that you have enjoyed the “Shoulder Series”. There will be more info on the shoulder to come but for now this is a great start.
Most often, shoulder pain comes from heavy lifting, injuries in sports and even in not exercising your shoulders regularly. Like the rest of the body, the shoulders need exercising too to avoid it being stiff and 'frozen.'
ОтветитьУдалитьExercises for Frozen Shoulder
I really like this is determinedly goliath for everybody without a doubt for me. I had many issues about download hd videos from Facebook and YouTube and other social stages. Online Facebook video downloader is a system through that all comes up short key and these are free which would all have the choice to use with no issue.
ОтветитьУдалитьfb downloader chrome