четверг, 25 января 2018 г.

Плечевое сплетение


Плечевое сплетение (plexus brachialis) образовано передними ветвями четырех нижних шейных спинномозговых нервов (CV—CVIII), к которым присоединяются также небольшая порция передней ветви четвертого шейного спинномозгового нерва и большая часть первого грудного. Соединение ветвей ведет к формированию трех первичных стволов плечевого сплетения — верхнего, среднего и нижнего (truncus superior, medius et inferior; цветн. рис. 1). Перераспределение нервных волокон, принадлежащих разным сегментам спинного мозга (от CIV—ThI), вызывает разделение первичных стволов на передние и задние стволы второго порядка. При их слиянии возникают новые формы структурного объединения нервных волокон — пучки плечевого сплетения или вторичные стволы.
Плечевое сплетение расположено в spatium interscalenum между передней и средней лестничными мышцами (m. scalenus anterior et medius) вместе с подключичной артерией. Эта его часть называется надключичной (pars supraclavicular, цветн. рис. 2). Отсюда нервные стволы второго порядка направляются латерально и вниз в подкрыльцовую область, образуя подключичную часть плечевого сплетения (pars infraclavicularis).
В самом начале образования плечевого сплетения от него отходят мышечные ветви к лестничным мышцам (mm. scaleni) и к длинной мышце шеи (m. longus colli). Здесь же между глубокими мышцами шеи от передней ветви пятого шейного спинномозгового нерва начинается добавочный корешок диафрагмального нерва. Выше и ниже ключицы из плечевого сплетения выходят нервы, обеспечивающие движения плечевого пояса и плеча.
Тыльный нерв лопатки (n. dorsalis scapulae) происходит из CV. Иннервирует ромбовпдные мышцы (mm. rhomboidei) и мышцу, поднимающую лопатку (m. levator scapulae).

Надлопаточный нерв (n. suprascapular) происходит из CV—CVI. Проходит по переднему краю трапециевидной мышцы (m. trapezius) к надостной, а затем подостной ямкам. Иннервирует надостную и подостную мышцы (mm. supra- et infraspinatus) и капсулу плечевого сустава. Длинный нерв груди (n. thoracicus longus) происходит из СV—CVII. Проникает под малую грудную мышцу медиально от подкрыльцовой впадины. Иннервирует переднюю зубчатую мышцу (m. serratus anterior). Подключичный нерв (n. subclavius) происходит из CV. Незначительной толщины ветвь следует к подключичной мышце (m. subclavius) и ее иннервирует. Медиальные и латеральные нервы груди [nn. thoracales anteriores (BNA)] происходят из CV—ThI. Снабжают нервными волокнами большую и малую грудные мышцы (mm. pectorales major et minor). Подлопаточный нерв (n. subscapularis) происходит из CV—CVII. Иннервирует одноименную мышцу и большую круглую мышцу (m. teres major). Грудо-спинной нерв (n. thoracodorsalis) происходит из CVII—CVIII. Внедряется в широкую мышцу спины (m. latissimus dorsi) и иннервирует ее.
Три пучка подключичной части плечевого сплетения — медиальный, латеральный и задний (fasciculus medialis, lateralis et posterior) — разделяются на нервы верхней конечности, отличающиеся значительной протяженностью. Из медиального пучка в подкрыльцовой впадине начинаются локтевой нерв, медиальный кожный нерв плеча (n. cutaneus brachii medialis), медиальный кожный нерв предплечья (n. cutaneus antebrachii medialis) и медиальный корешок срединного нерва. Из латерального пучка возникают латеральный корешок срединного нерва и мышечно-кожный нерв. Задний пучок дает подкрыльцовый и лучевой нервы (цветн. рис. 3).
Локтевой нерв (n. ulnaris) генетически связан с сегментами спинного мозга от СVII до ThI. Расположен ближе к медиальной поверхности плеча и предплечья. Приближаясь к кисти, отдает кожные ветви к ее ладонной и тыльной поверхностям. Заканчивается поверхностной и глубокой ветвями, иннервирующими все мышцы кисти, за исключением отводящей и противопоставляющей мышцы большого пальца (m. adductor et opponens pollicis) и поверхностной головки короткого сгибателя большого пальца (m. flexor pollicis brevis). На предплечье этот нерв иннервирует локтевой сгибатель кисти (m. flexor carpi ulnaris) и часть глубокого сгибателя пальцев (m. flexor digitorum profundus).
 

Срединный нерв (n. medianus) происходит из CV—ThI. На плече идет вместе с плечевой артерией, посредине пересекает локтевую ямку. На предплечье иннервирует переднюю группу мышц, кроме мышц, которые иннервирует локтевой нерв, и переходит на кисть под поперечной связкой. Иннервирует мышцы кисти, к которым не доходит локтевой нерв, а также кожу ладони.
Мышечно-кожный нерв (n. musculocutaneus) происходит из CV —CVIII, иннервирует переднюю группу мышц плеча и заканчивается как кожный нерв латеральной поверхности предплечья (n. cutaneus antebrachii lateralis).
Лучевой нерв (n. radialis) происходит из CV—CVIII. По плечемышечному каналу достигает локтевого сгиба, где делится на глубокую и поверхностную ветви. Иннервирует m. triceps brachii и заднюю группу мышц предплечья, а также кожу тыльной поверхности плеча, предплечья и частично кисти.
Подкрыльцовый нерв (n. axillaris) происходит из CV—CVII. Короткий и толстый ствол его идет через четырехстороннее отверстие к шейке плечевой кости, где делится на ветви к дельтовидной и малой круглой мышцам (m. deltoideus et teres minor) и к латеральной поверхности кожи плеча (цветн. рис. 4).
В состав плечевого сплетения входят (через серые соединительные ветви от звездчатого и двух верхних грудных симпатических узлов) вегетативные проводники, распространяющиеся вместе с соматическими двигательными и чувствительными волокнами по всем ветвям плечевого сплетения.
Патология плечевого сплетения — см. Невралгия, Невриты, Плексит.
плечевое сплетение
Рис. 1. Нервы плечевого сплетения: 1 — fasc. lat. plexus brachialis; 2 — fasc. post, plexus brachialis; 3 — fasc med. plexus brachialis; 4 — n. radialis; 5 — n. medianus; 6 — n. cutaneus brachii med.; 7 — n. ulnaris; 8 — n. cutaneus antebrachii med.; 9 — r. superficialis n. ulnaris; 10 — r. profundus n. ulnaris; 11 — nn. digitales palmares proprii; 12 — nn. digitales dorsales; 13 — nn. digitales palmares communes; 14 — n. cutaneus antebrachii lat. 15 — 1. superficialis n. radialis; 16 —I. profundus n. radialis; 17 — n. cutaneus brachii lat.; 18 — a. axillaris 19 — n. musculocutaneus; 20 — nn. supraclaviculares.
Рис. 2. Надключичный отдел плечевого сплетения: 1 — n. phrenicus; 2—m. anterior n. thoracici I; 3 — n. thoracicus longus; 4 — n. thoracodorsalis; 5 —n. intercostobrachialis 5 — n. medianus; 7 — n. cutaneus antebrachii med.; 8 — n. radialis; 9 — n. ulnaris; 10 —a. axillaris; 11 —a. muscu locutaneus; 12 — n. suprascapularis; 13 — nn. supraclaviculares; 14 — plexus cervicalis.
Рис. 3. Схема строения плечевого сплетения: 1 — n. culaneus brachii med.; 2 — n. cutaneus antebrachii medialis; 3 — n. ulnaris; 4 — n. radialis; 5 — n. medianus; 6 — n. axillaris; 7 — n. musculocutaneus; 8 — fasciculus lat.; 9 — n. suprascapularis; 10 — fasciculus post.; 11 — n. thoracicus longus; 12 — fasciculus med.
Рис. 4. Проекции иннервационных сегментов на кожу верхней конечности.
среда, 24 января 2018 г.

Connect Your Feet to Your Shoulders in Side Forearm Plank Pose


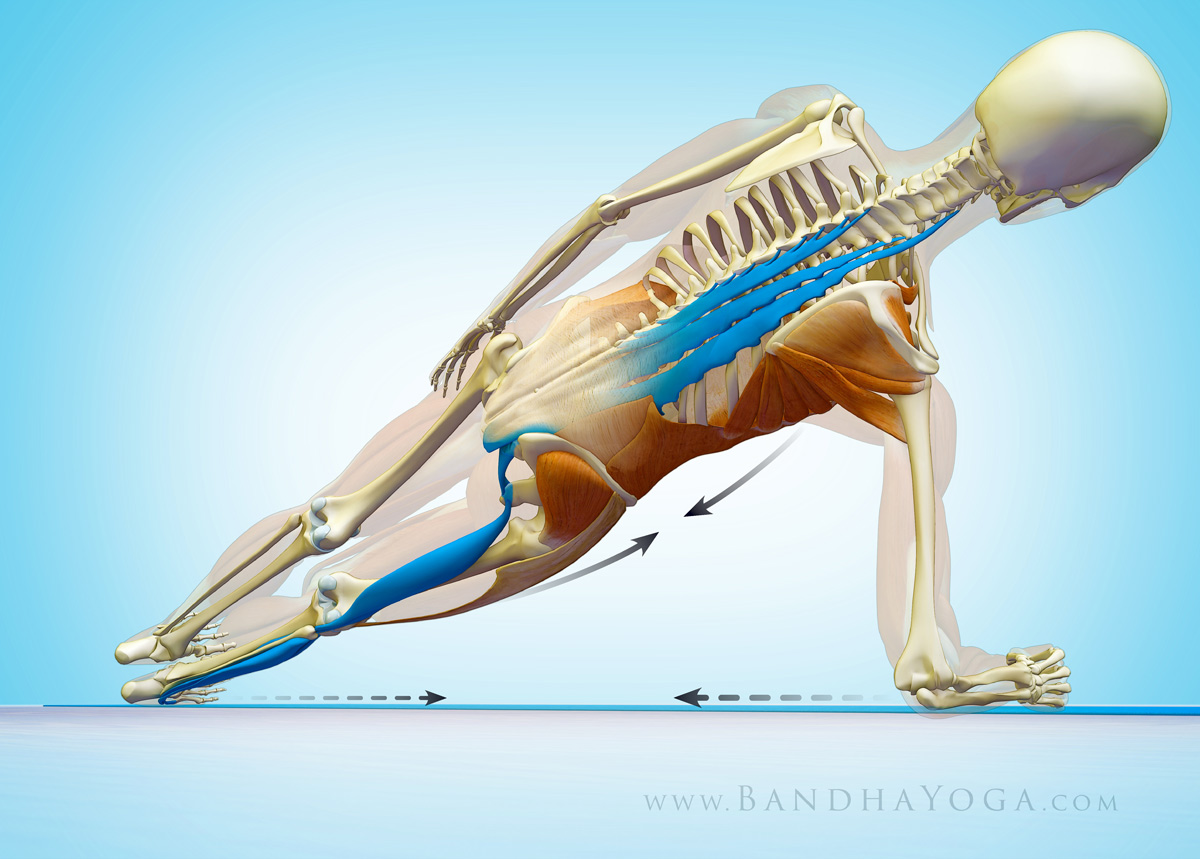
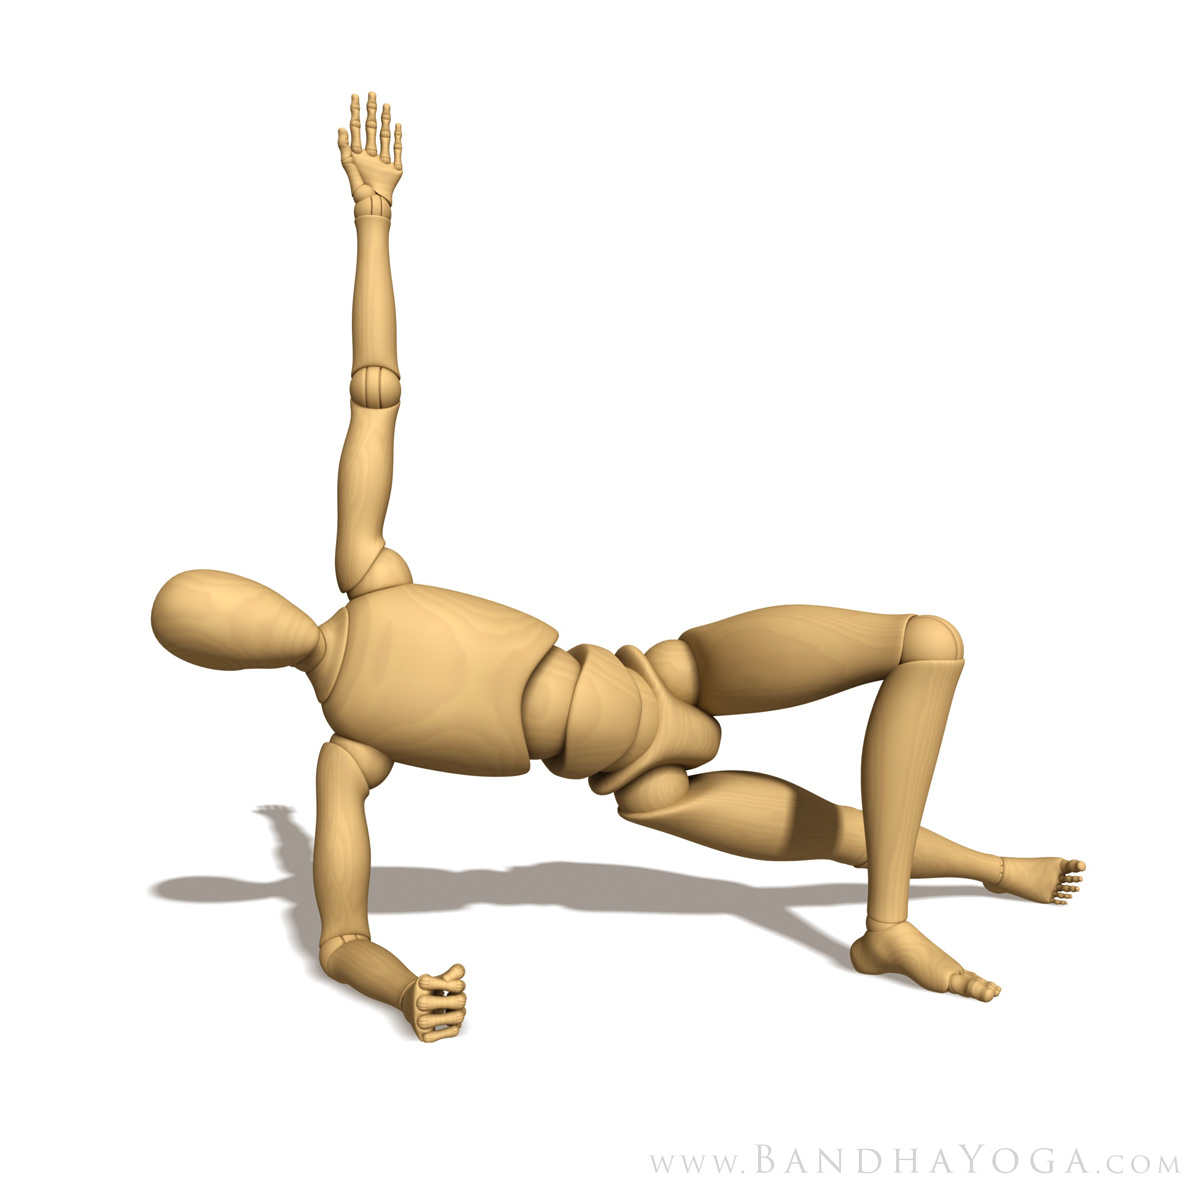
We recently covered the some key poses to strengthen your core, along with biomechanical cues to refine your work in Forearm Plank pose and Bird Dog pose. Side Forearm Plank is another awesome pose to strengthen your core while protecting your wrists. You do this one by placing your forearm on the mat and attempting to drag it towards your feet, while engaging the core muscles on your sides to stabilize the lumbar pelvic complex. Keep your supporting arm (the humerus bone) straight up and down (at a right angle to the floor). This way the passive strength of the bone aids to support your body weight. Click here for more on this concept in Vasisthasana.

Figure 1: Side Forearm Plank Preparatory Pose

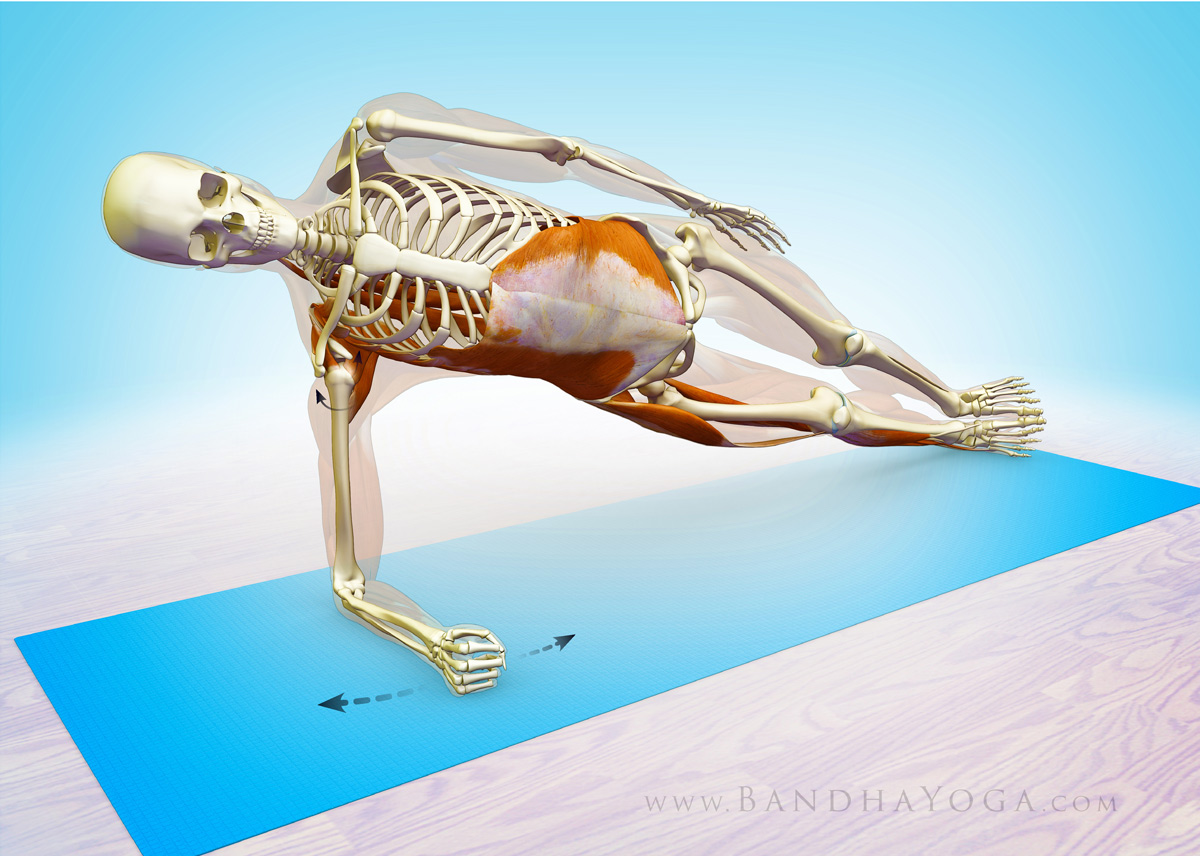
Begin by stabilizing the shoulders. Do this by attempting to externally rotate your forearm on the mat. At the same time, attempt to internally rotate your forearm on the mat as well. It’s a bit like a windshield wiper that’s fixed in place. This cue “co-activates” the infraspinatus and teres minor (external rotation) and the subscapularis (internal rotation) muscles of your rotator cuff. Feel how this stabilizes your shoulder. Folks that are new to this pose can use the preparatory version to work with this cue. Figure 1 shows the prep pose and Figure 2 illustrates the action of the forearms.

Figure 2: This illustrates the cue for co-activating the external and internal shoulder rotators (the infraspinatus, teres minor and subscapularis of the rotator cuff).

Next, press the edge of your lower side foot into the mat and gently draw it upwards toward the shin to “evert” your foot. These cues activate a series of muscles—including the “lateral subsystem”--to connect your shoulders and legs to your core. Figure 3 shows the cue for attempting to drag the forearm and the feet towards each other (while engaging the side abs).

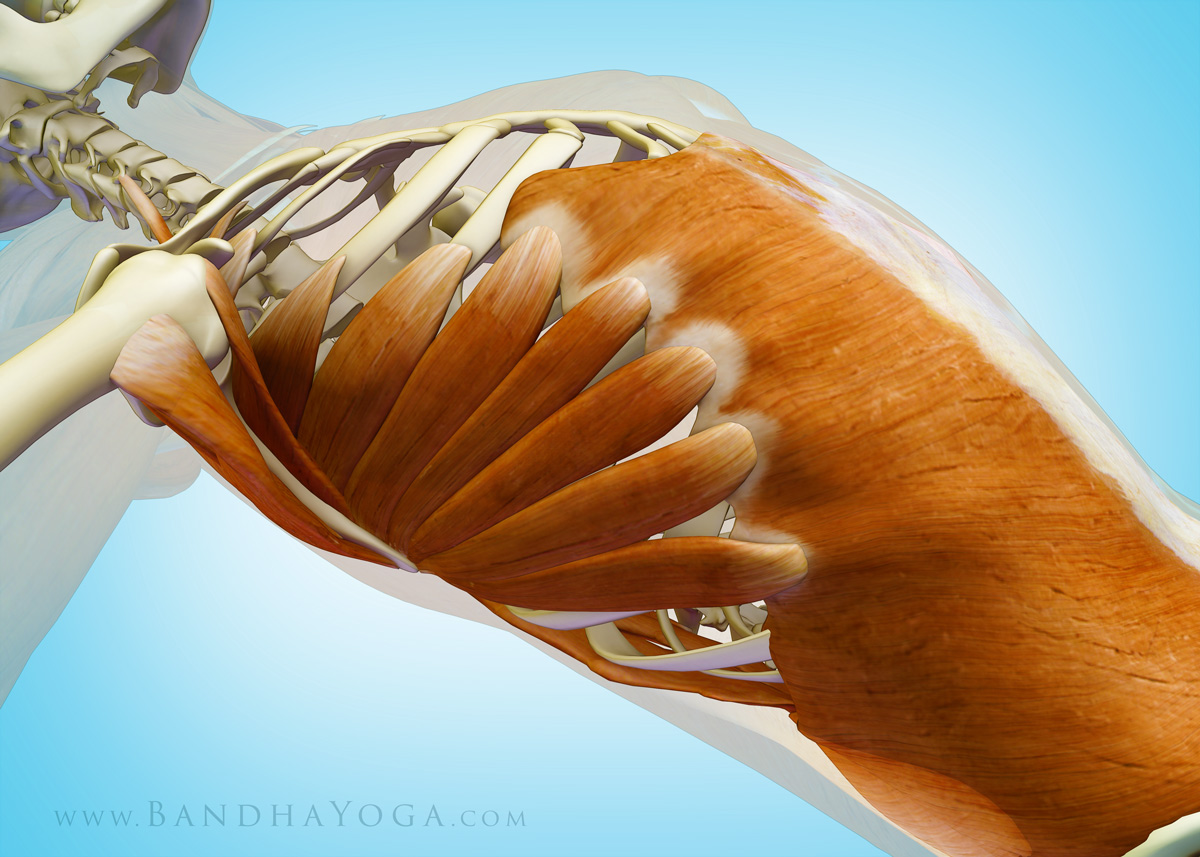
Now let’s check out the myofascial connections in side forearm plank. When you press the side of your foot into the mat, you activate the peroneus muscles as well as the abductor muscles up at your hip (the TFL and gluteus medius). These muscles have a fascial connection to your abs, specifically the external oblique (which attaches to the rim of the pelvis). The external oblique connects to your shoulders via the serratus anterior muscle. The serratus anterior is a scapular stabilizer that works in concert with the rotator cuff. So the whole operation helps to integrate your feet, legs, pelvis and lumbar--all the way up to the shoulders.

Figure 3: This illustrates the cue of everting the lower foot and dragging the elbow towards it. It also shows the deep longitudinal subsystem.

So let’s talk about the deep longitudinal subsystem…

Your deep longitudinal subsystem is made up of the peroneus longus muscle (on the outside of your lower leg), the biceps femoris of your hamstrings and your sacrotuberous ligament (up in the pelvis), the thoracolumbar fascia and the erector spinae muscles (in your back). The biceps femoris creates a link between the lower extremities and the trunk via the sacrotuberous ligament. This ligament helps to transmit force across your sacrum, and, via the thoracolumbar fascia on up the trunk to your deep back muscles. Check Figure 3 for a color coded illustration of this connection. Click here to see this connection in the lower legs in Reverse Pigeon Pose.

This subsystem is part of the global movement system and is thought to be important in force transmission between your trunk and the ground—as in walking. We’ll have more posts on the other subsystems and how to work with them in yoga soon. Click here to see how the abductor muscles of the hip work in your poses. Click here to learn more about the thoracolumbar fascia and its importance in yoga.

Figure 4 shows the myofascial connection between the external oblique muscle (of the abs) and the serratus anterior of the shoulder girdle.


Figure 4: This illustrates the myofascial connection between the external oblique muscle of the abdomen and the serratus anterior of the shoulder girdle.

Thanks for checking in! Click here to browse through our books by clicking the links on the right. These books have lots of practical cues with key info on anatomic sequencing to integrate into your practice!


Namaste’


Ray Long, MD

Stabilizing Your Shoulders In Downward Dog


Hi Folks,

In our last post, we discussed joint rhythm for the shoulders. In this blog post I want to share some of my recent investigations on the biomechanics of the shoulder joint, with some specific tips for Down Dog. Shoulder pain is one of the problems that comes up in yoga, especially with folks who are doing Vinyasa based practice. The underlying cause of the pain can be multifactorial, but it is frequently related to impingement of the rotator cuff and subsequent inflammation of the cuff tendon (specifically the supraspinatus muscle). Inflammation of the tendon, in turn, affects function of the shoulder. Weakness or instability in the shoulder can then lead to abnormal pressures at the wrist, causing pain there as well. Thus, stabilizing the shoulders has beneficial effects beyond the shoulders. is a complex process involving strengthening the core and then linking the strong core to the shoulders.

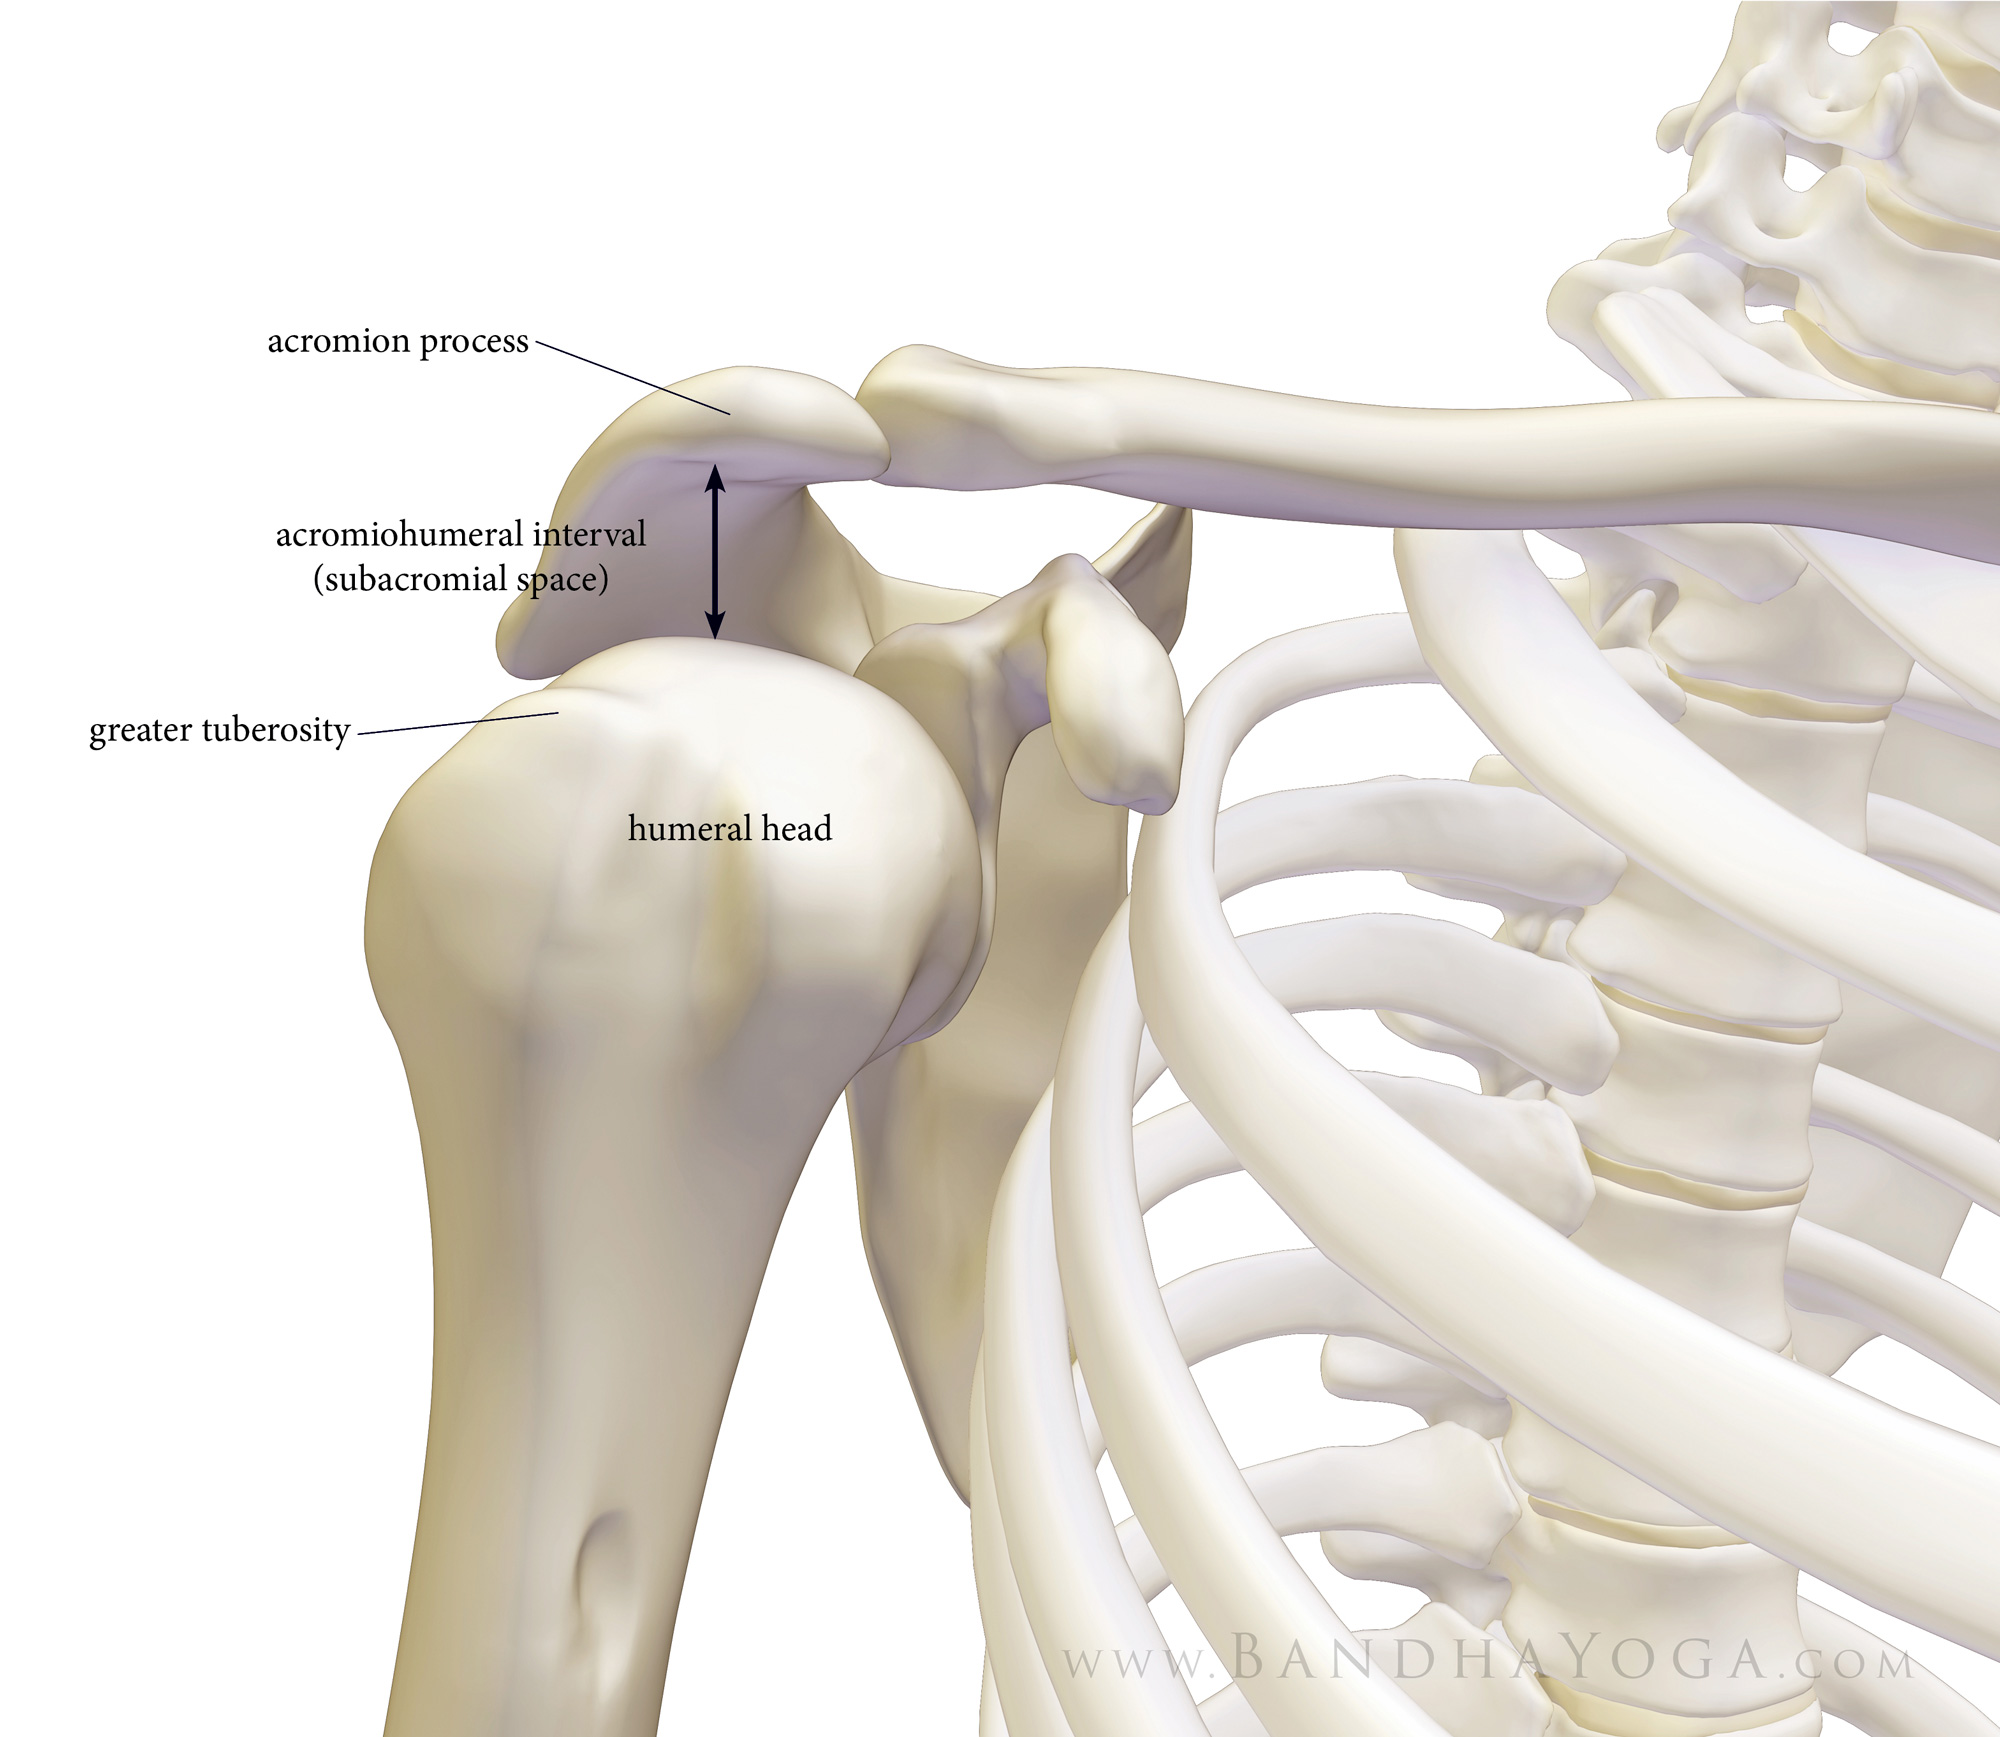
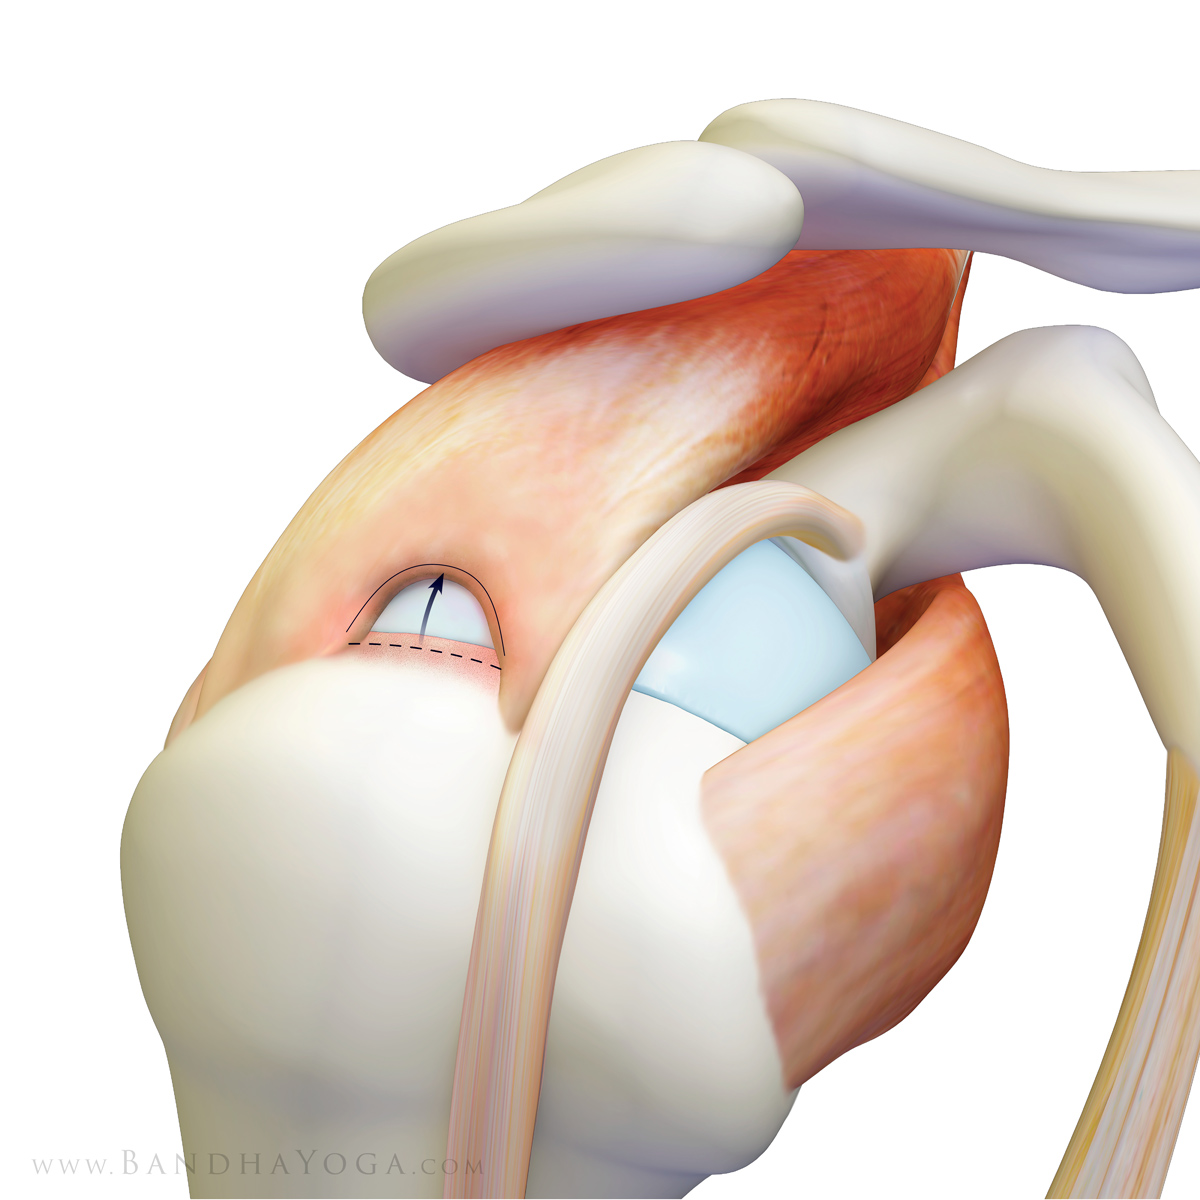
With this in mind, let’s look at one of the key factors in shoulder impingement, namely, the acromio-humeral interval. This refers to the distance between the undersurface of the acromion and the humeral head, as measured using radiology intruments (x-ray, ultrasound, mri). The acromion is a shelf of bone on the scapula, above the spine (seen in Figure 1). It serves as the attachment for the deltoid muscle. The humeral head articulates with the shoulder joint and serves as the attachment for the muscles of the rotator cuff (on the greater and lesser tuberosities). Factors that decrease the space between the acromion and humeral head can lead to inflammation of the cuff tendon due to compression between the two bones.

Figure 1: The acromio-humeral interval. 

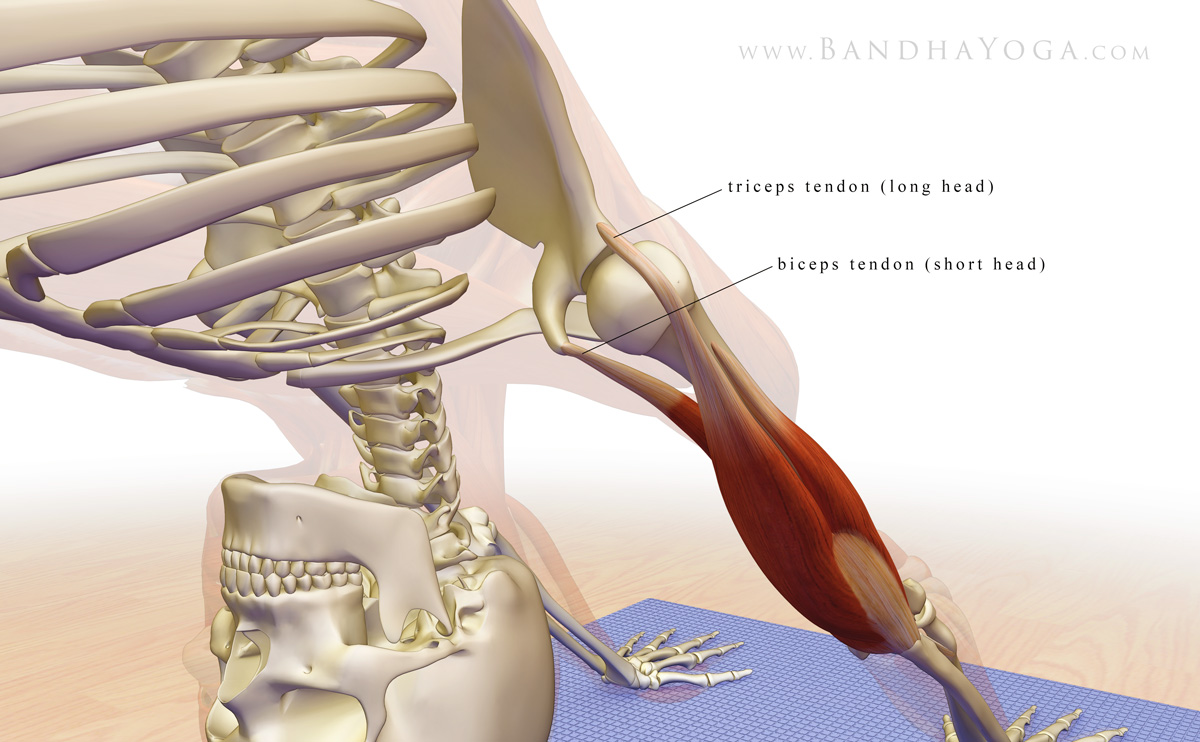
Research has shown that contracting the main adductor muscles of the shoulder serves to increase the acromio-humeral distance. These include the pectoralis major and latissimus dorsi. Co-contracting the biceps and triceps muscles when the arms are overhead can also draw the humerus away from the glenoid, as shown in Figure 2. Finally, externally rotating the shoulder humerus moves the vulnerable area of the supraspinatus tendon away from the area where it would impinge on the acromion (click here to learn more).

Figure 2: The long head of the triceps and short head of the biceps in relation to the gleno-humeral joint with the arms overhead.

Here’s the cue…

Warm up first a bit. Then, take Downward Dog pose. I use three steps for the shoulders. Go slowly and use gentle engagements.

  1. Contract the triceps to straighten your elbows. Then, press the mound at the base of your index fingers into your mat to engage the forearm pronator muscles.
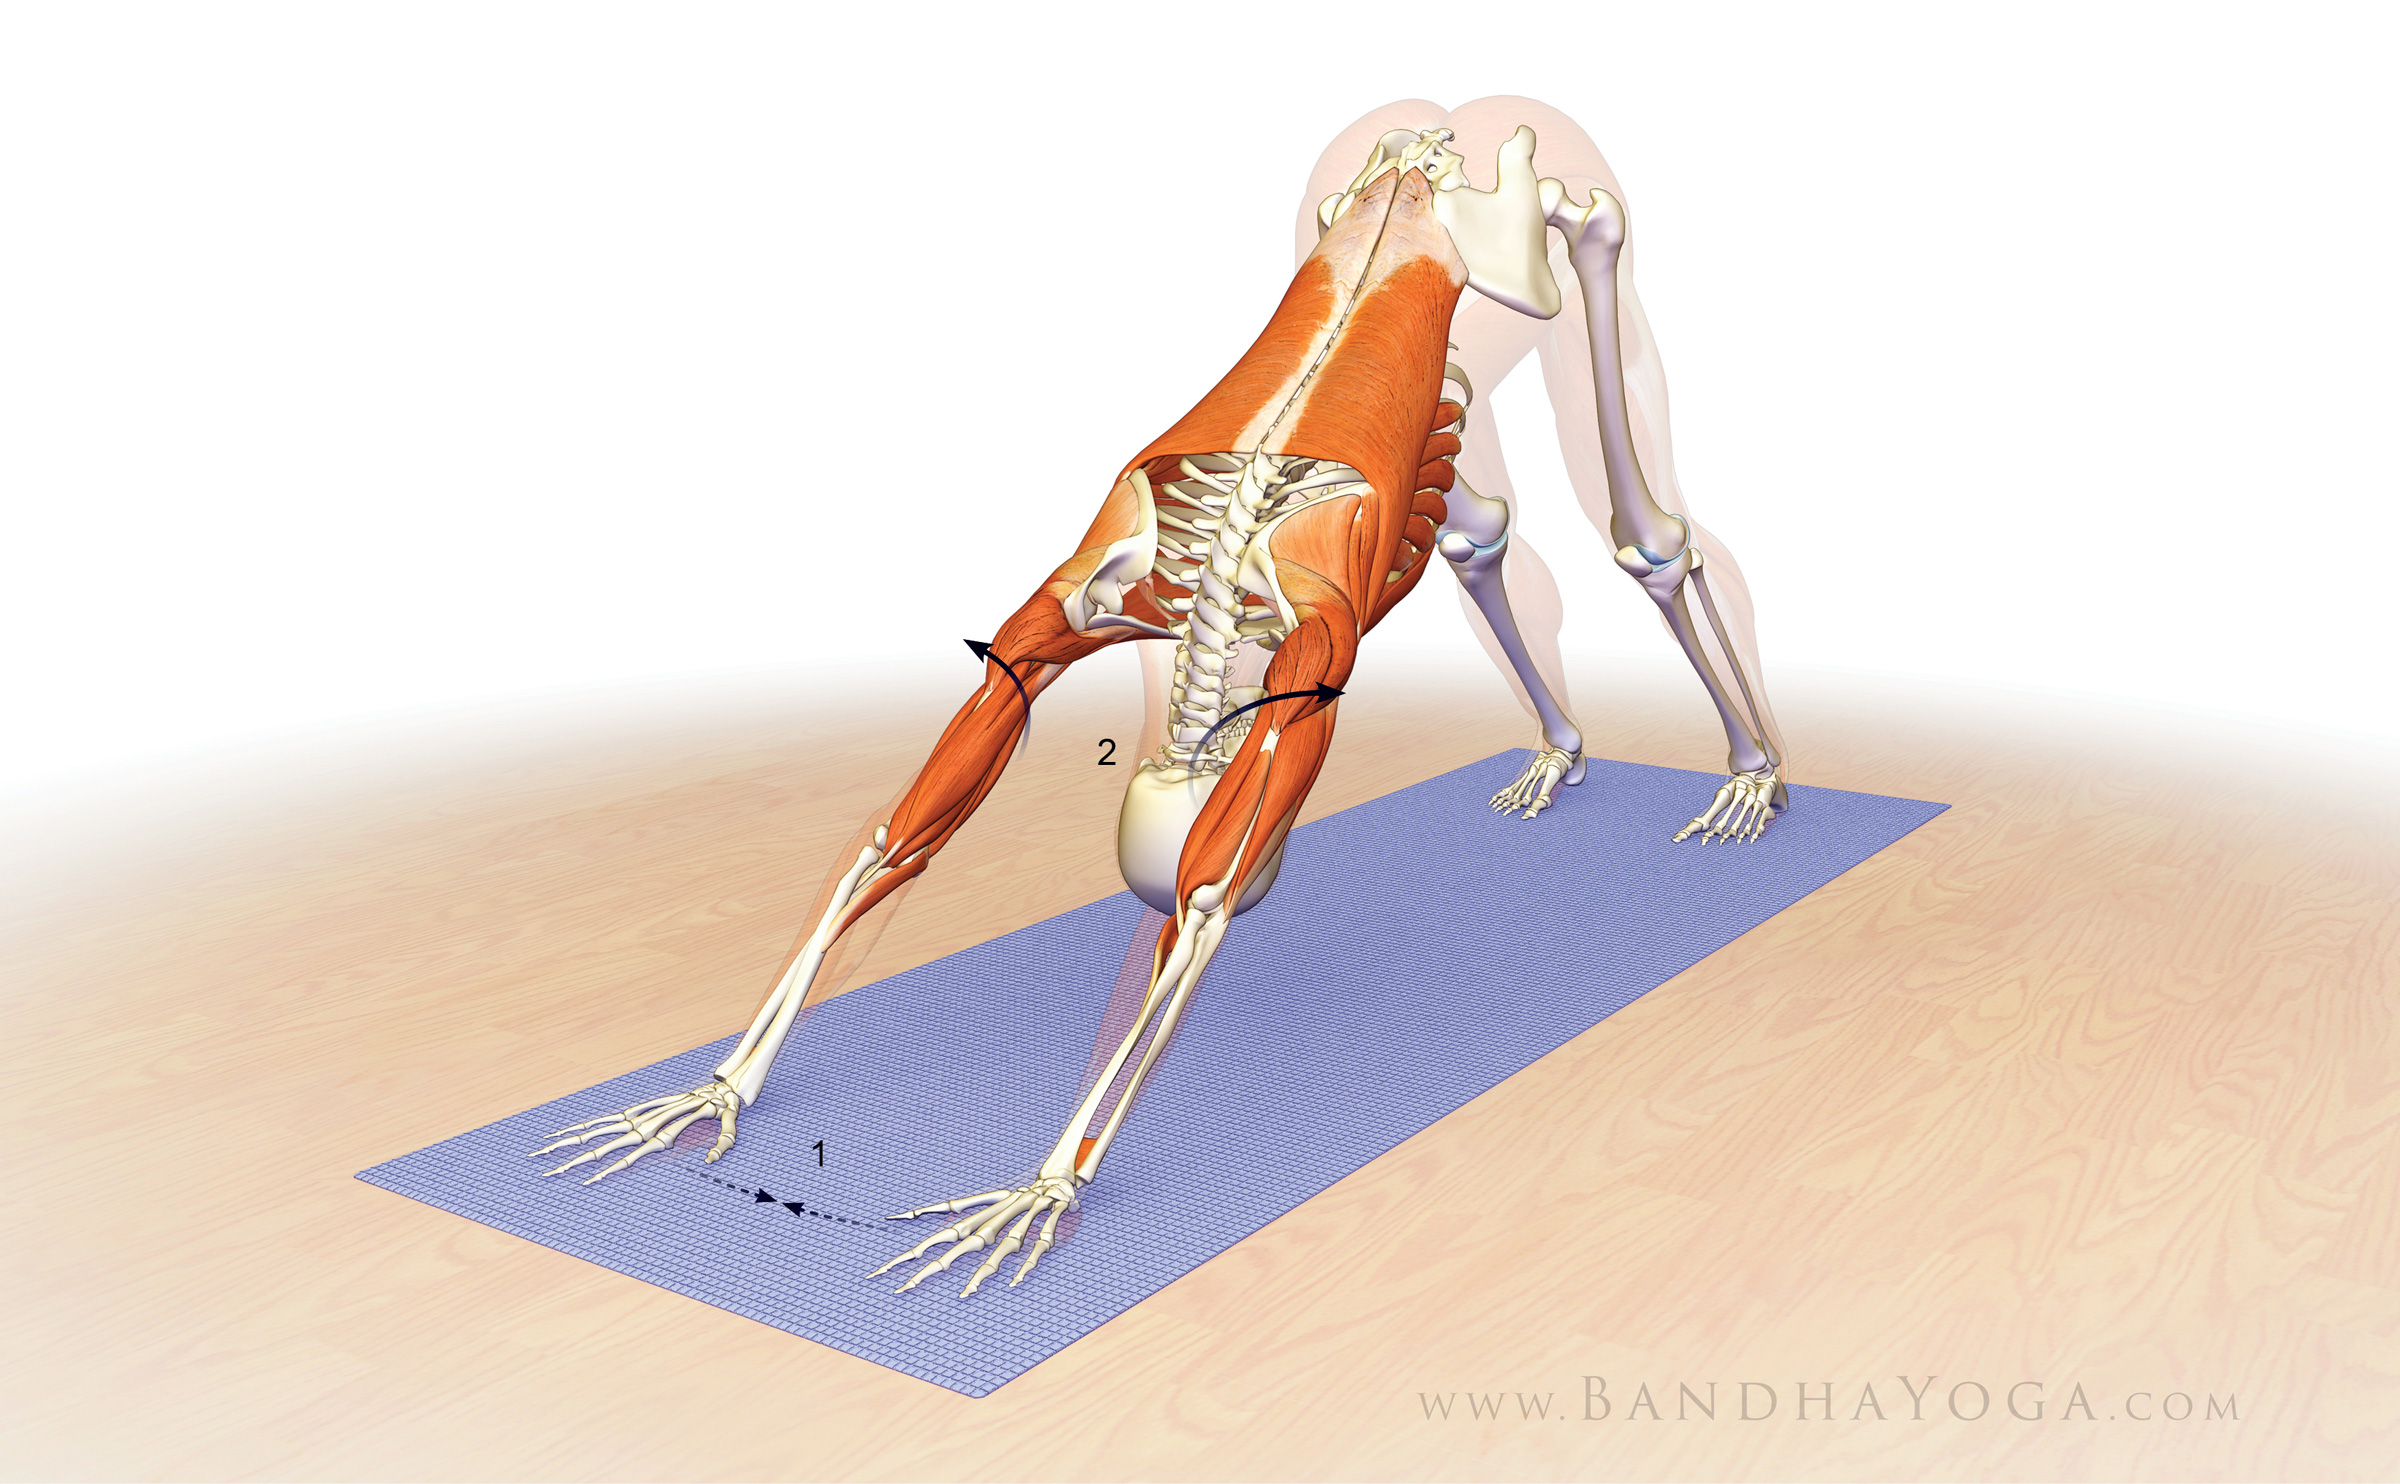
  2. Next, fix your palms into the mat and try to drag the hands towards each other. This engages the adductor muscles of the shoulders as well as the biceps.
  3. Finally, gently roll the shoulders outward. This externally rotates the humerus bone and helps to bring the greater tuberosity away from the undersurface of the acromion.

Figure 3 illustrates the various muscles involved in these cues.

Figure 3: Attempt to drag the hands towards one another. This engages the shoulder adductors. Then externally rotate the shoulders.

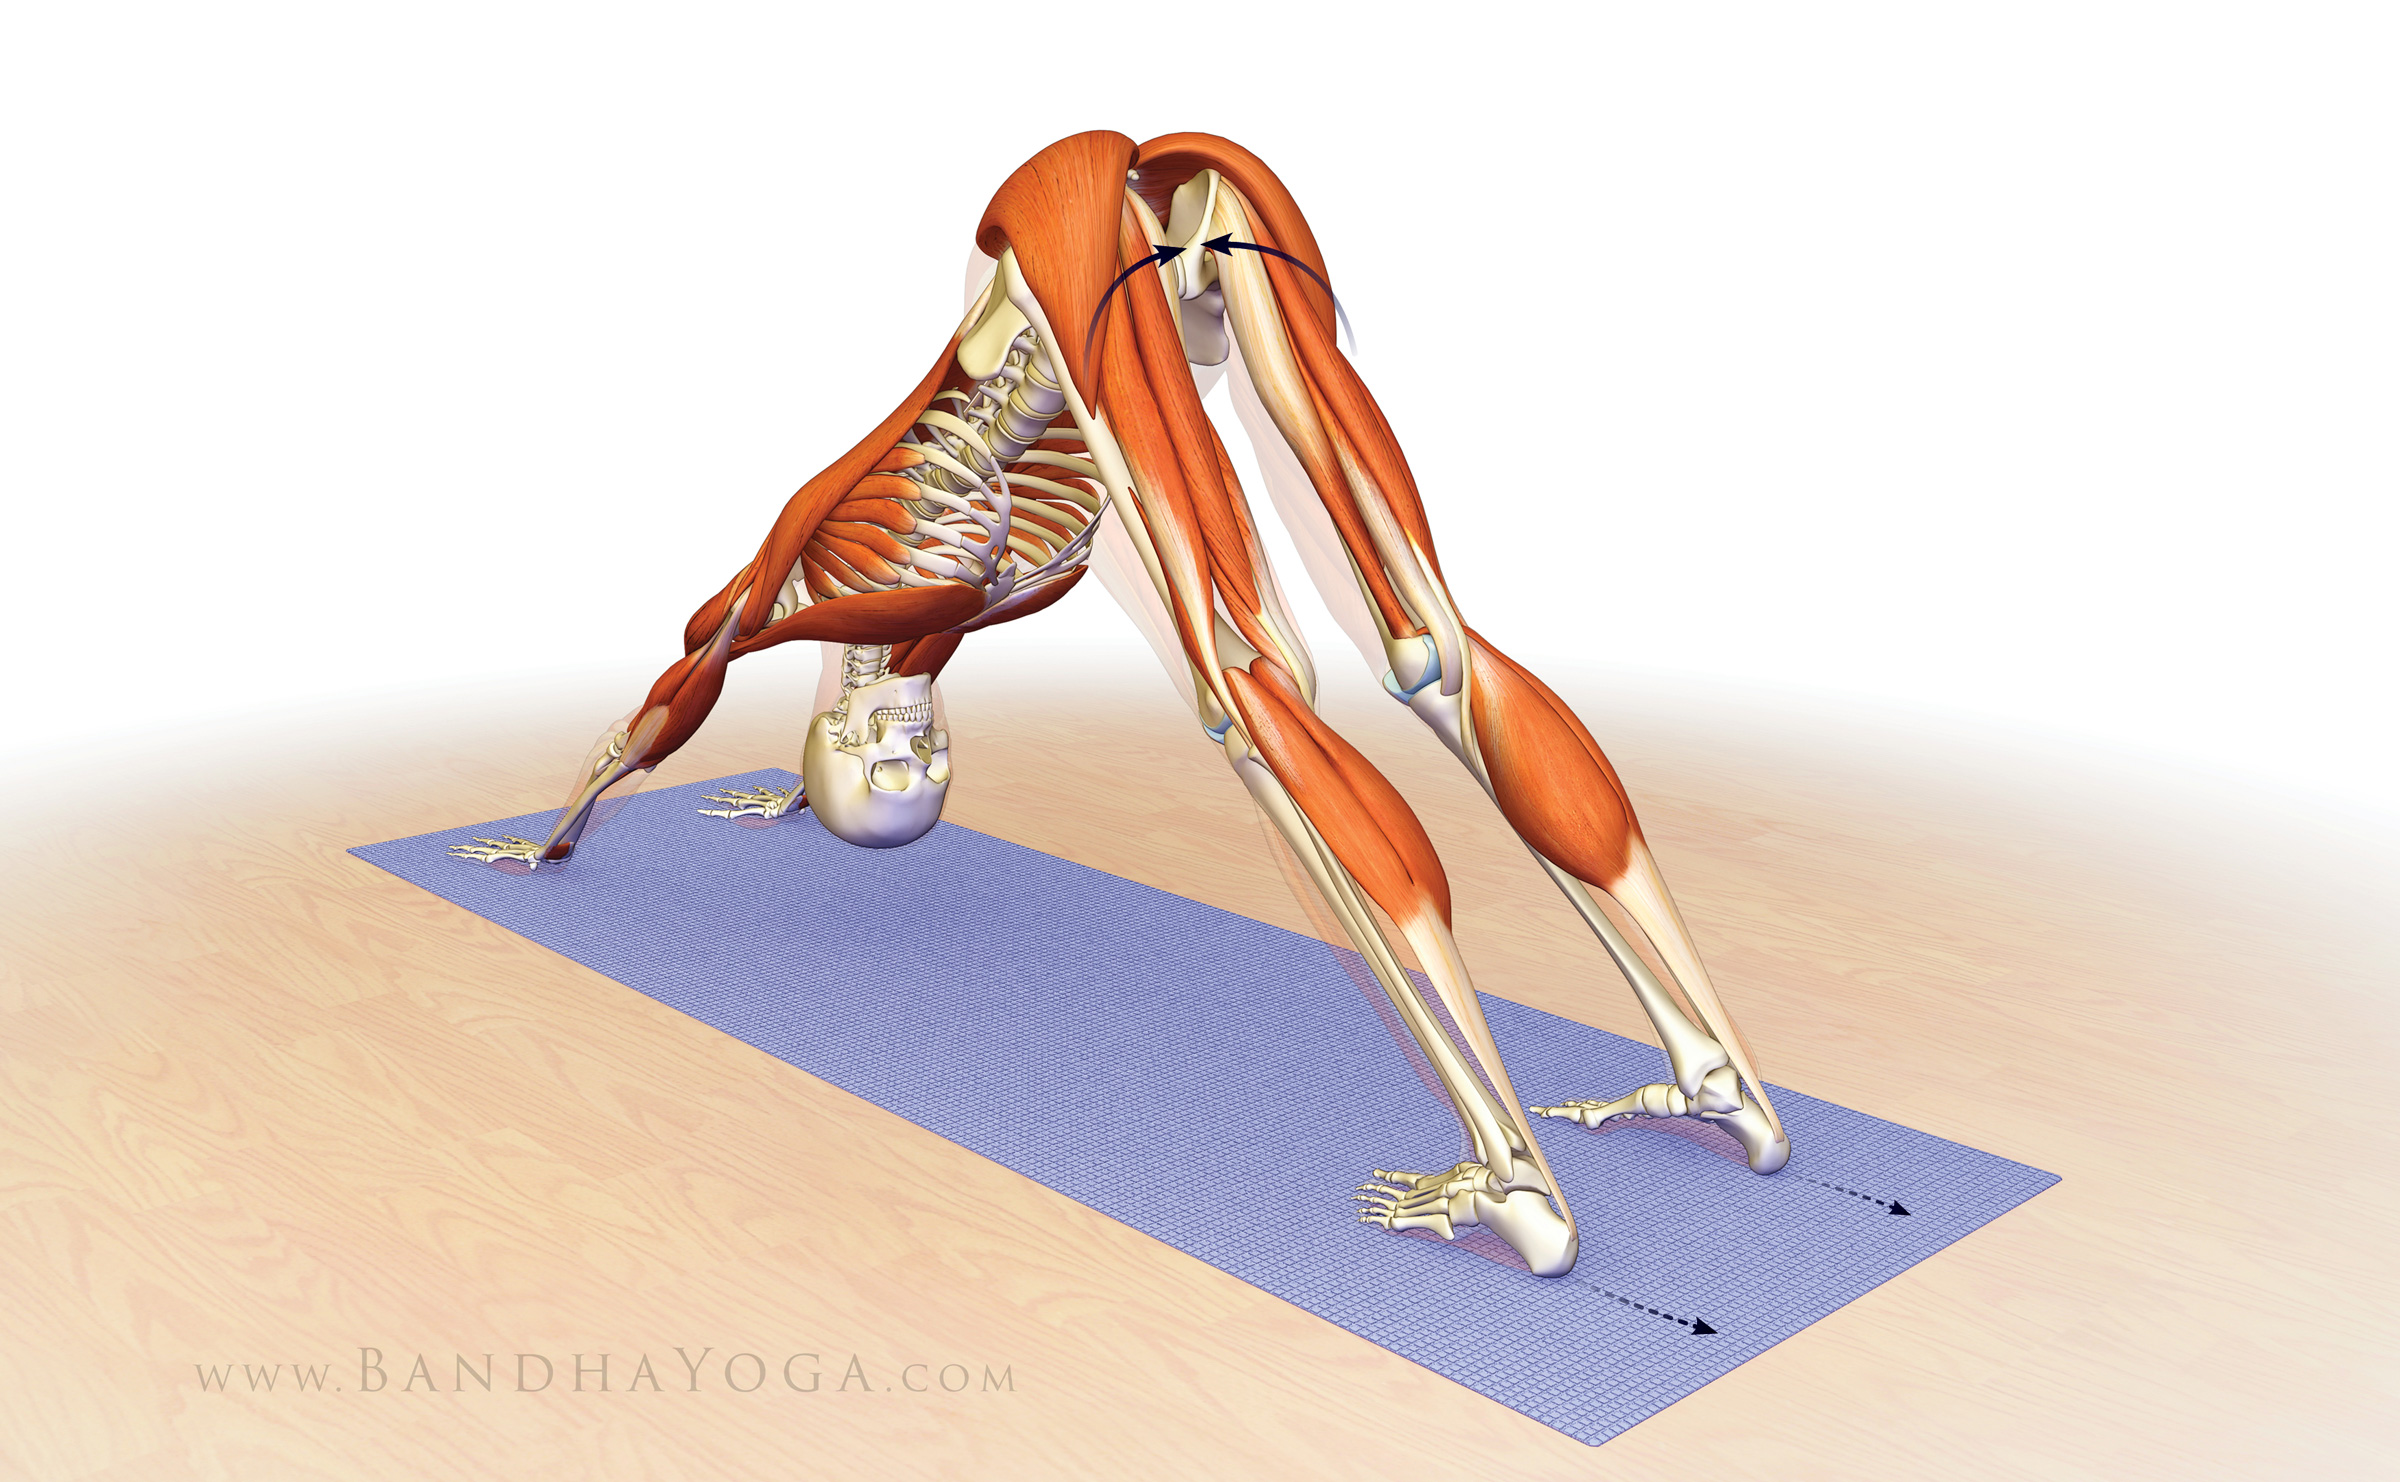
As a final adjustment, I like to link the action of the shoulders to the lower extremities. The cue for this is to engage your lower gluteus max and adductor magnus muscles by drawing in with the upper inner thighs and then attempt to drag your feet away from the hands. Feel how this stabilizes your pose. See Figure 4 for the graphics.

Figure 4: Engage the lower parts of the gluteus maximus and adductor magnus as you attempt to drag the feet away from the hands to stabilize the pose.

Bear in mind that shoulder stability is a complex process. The shoulders are linked to the core; so building a strong core leads to stable shoulders. Stable shoulders help to protect the wrists, and so on. Click here to read more on your core. If you would like to learn more anatomic sequencing to improve your poses, click here to take a tour of The Yoga Mat Companion Series.

Thanks for stopping by—see you in a couple of weeks for another post on combining anatomy, biomechanics and yoga.

All the Best,

Ray Long, MD


References:


  1. Graichen H1, Bonel H, Stammberger T, Englmeier KH, Reiser M, Eckstein F. Subacromial space width changes during abduction and rotation--a 3-D MR imaging study. Surg Radiol Anat. 1999;21(1):59-64.
  2. Hinterwimmer S1, Von Eisenhart-Rothe R, Siebert M, Putz R, Eckstein F, Vogl T, Graichen H. Influence of adducting and abducting muscle forces on the subacromial space width. Med Sci Sports Exerc. 2003 Dec;35(12):2055-9.

Shoulder Biomechanics, Part I: The Subscapularis Muscle


Hello Friends,

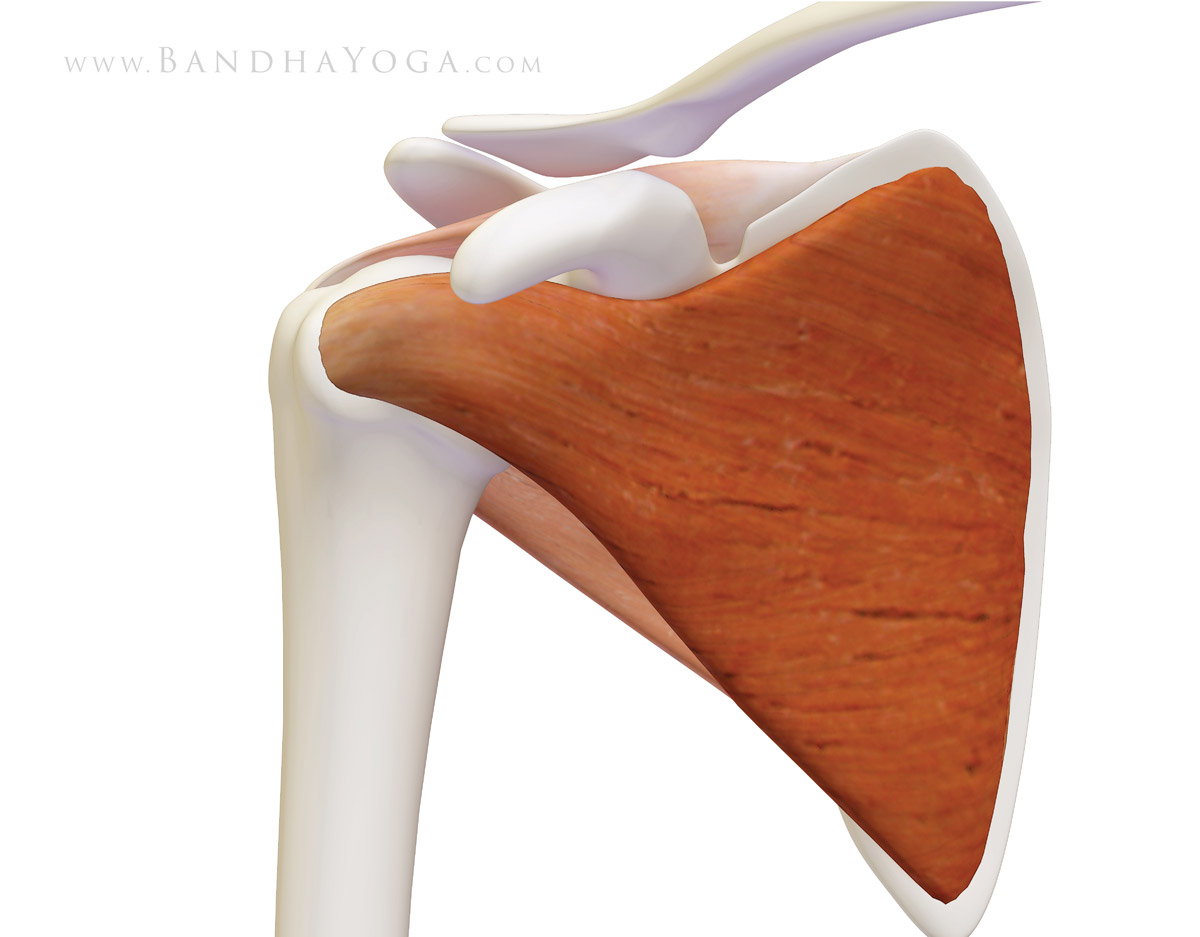
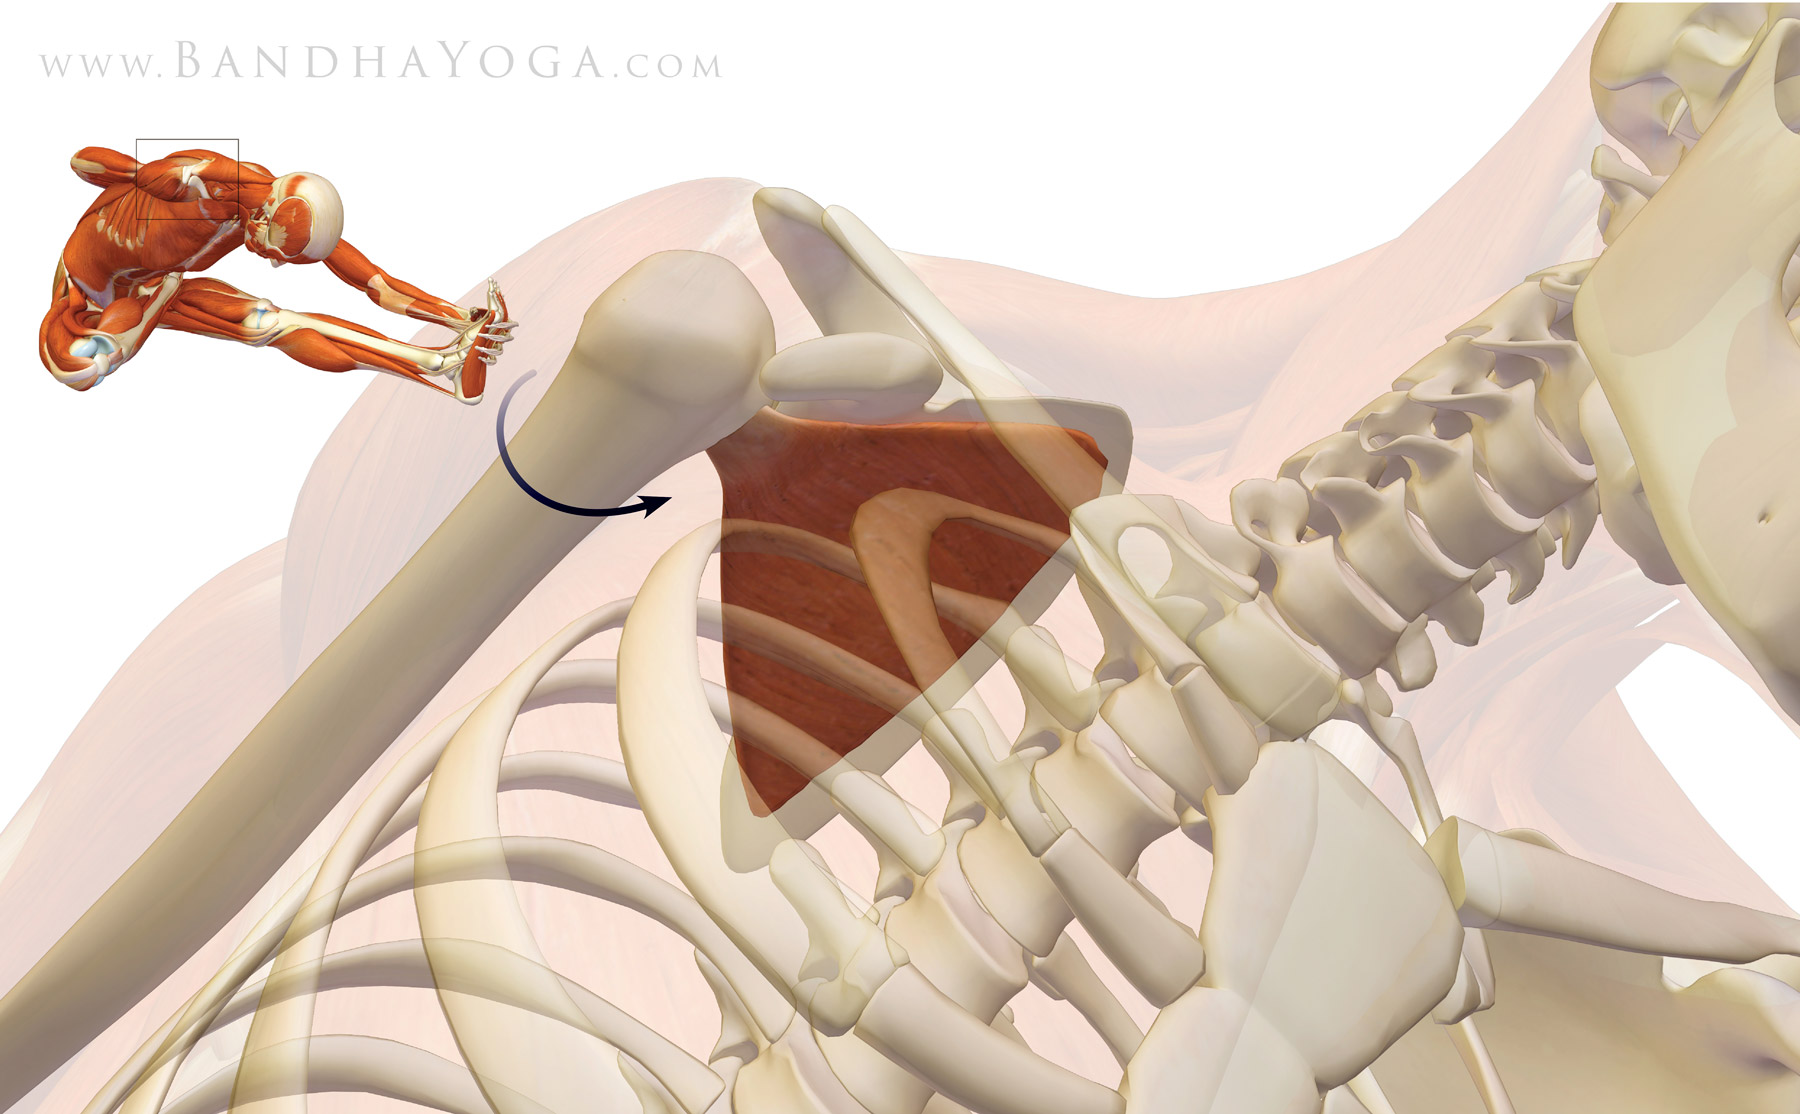
This is the first of a four-part series on the shoulder joint, focusing specifically on the rotator cuff and its biomechanical relationship with the deltoid muscle. Let's begin by looking at the muscles that comprise the rotator cuff, starting with the subscapularis. As figure 1 illustrates, the subscapularis occupies the space, or fossa, at the front of the scapula. From there it attaches to the lesser tuberosity, a knob-like structure on the humerus bone at the front of the shoulder. Concentrically contracting the subscapularis muscle (shortening the muscle on contraction) internally rotates the shoulder. The subscap also acts, in conjunction with the infraspinatus muscle, as a stabilizer of the humeral head in the socket (glenoid). We test strength and function of this muscle with the "belly press" test or the "bear hug" test. Tightness in the subscapularis can limit external rotation of the shoulder.


Figure 1: The subscapularis muscle, illustrating the origin on the inside of the scapula and the insertion on the lesser tuberosity of the humerus.


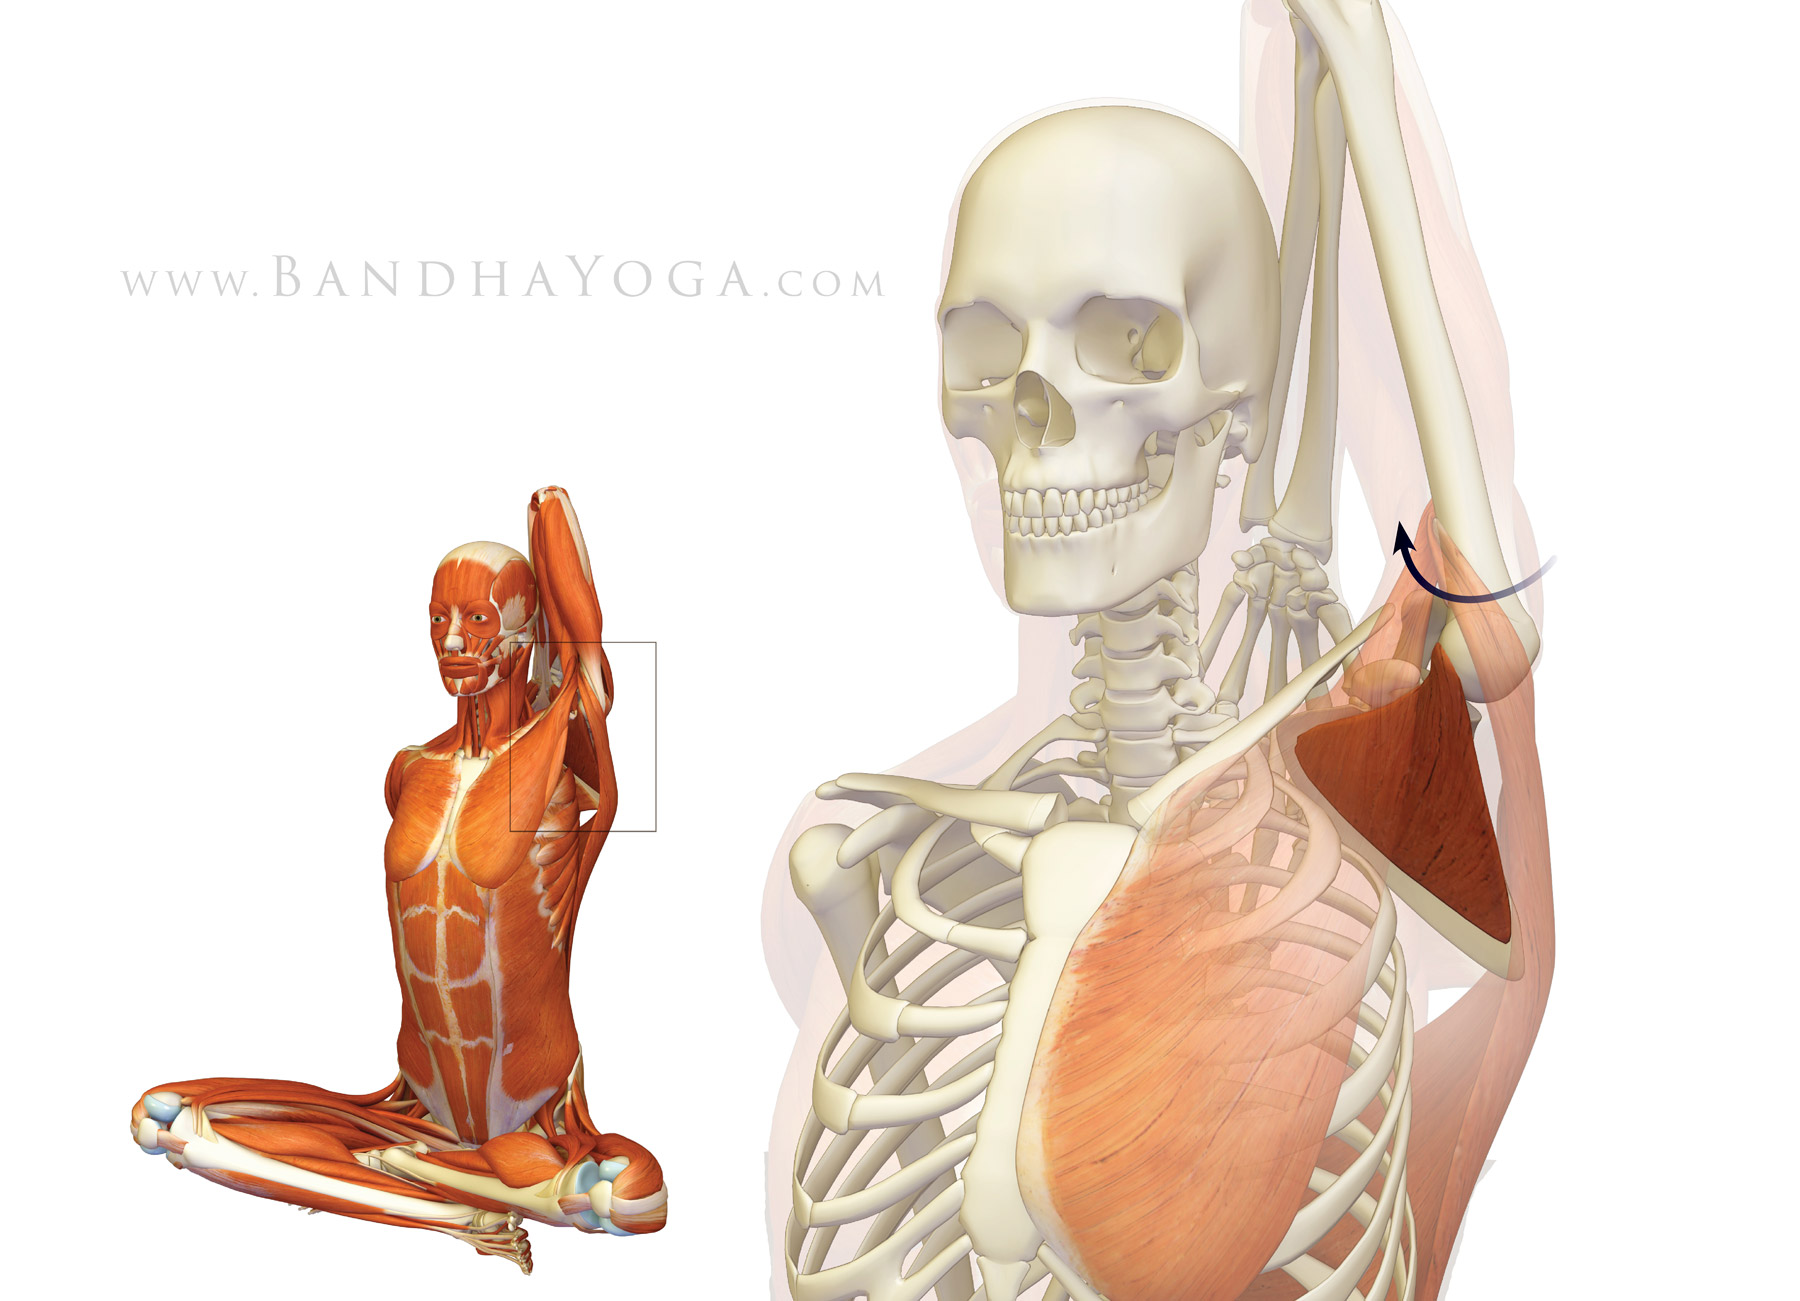
Figure 2 illustrates one of the poses that stretch the subscapularis muscle, namely, Gomukhasana. The upper side humerus externally rotates in this pose, thus stretching the muscle as shown.

Figure 2: This illustrates the effect on the subscapularis muscle of the upper arm in Gomukhasana. External rotation of the humerus stretches the muscle.


Figure 3 illustrates engaging the subscapularis muscle in Ardha Baddha Padma paschimottanasana. Advanced practitioners can attempt to lift the hand off the back to engage the muscle in this pose. This also replicates the "lift off" test, which is used in orthopedics to test the function of the subscap muscle.

Figure 3: This image illustrates contraction of the subscapularis muscle to internally rotate the humerus.


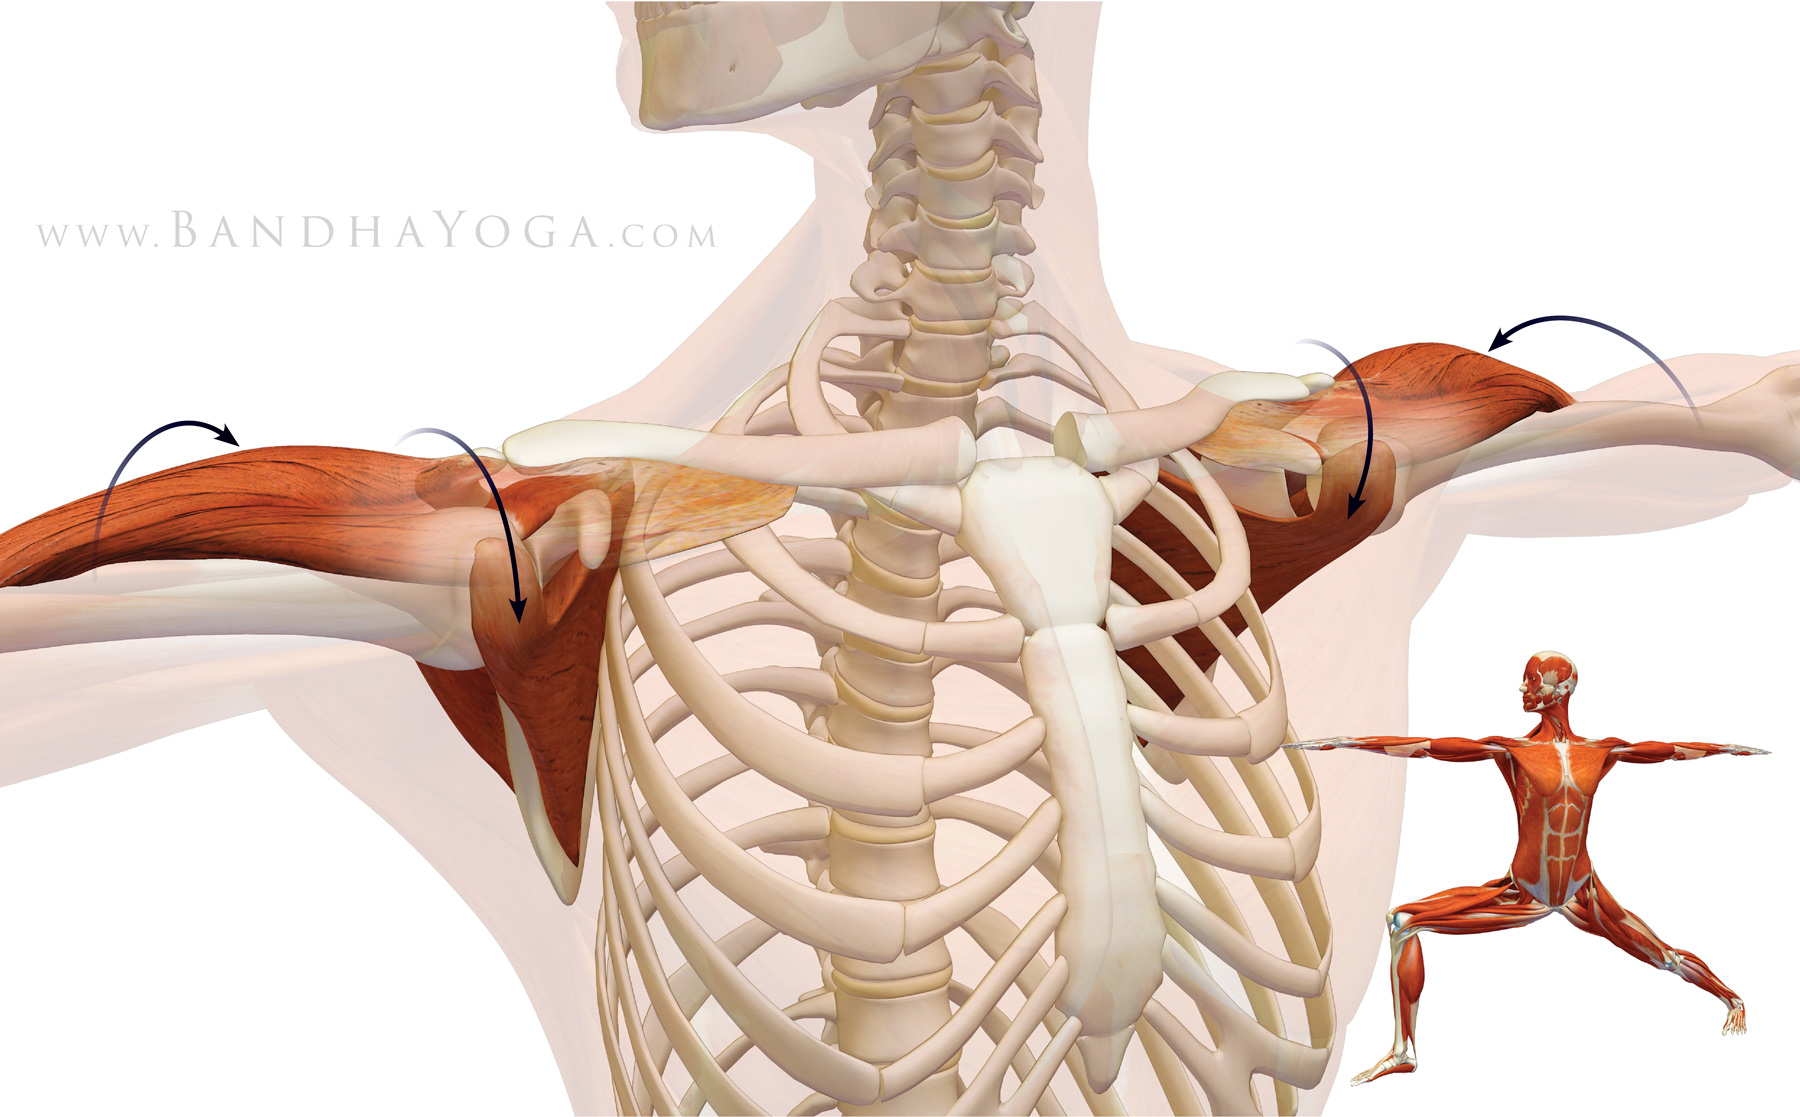
Finally, we have the subscapularis as a stabilizer during a static position in a pose. In Warrior II, attempt to internally rotate the shoulders by imagining pressing the mound at the base of the index fingers down against an object. Resist this by externally rotating the shoulders at the same time. Co-contracting opposing muscles--like the subscap and infraspinatus--stabilizes the head of the humerus in the socket while the deltoid contracts to abduct the humerus. Click here to go into a bit more depth on the subject of stabilizing your shoulders in your Downward dog pose. 


Figure 4: Co-contracting the subscapularis and the infraspinatus stabilizes the humeral head in the socket while the deltoid muscle abducts the humerus.


Click here to take the rotator cuff quiz and test your knowledge!

Thanks for stopping by. Stay tuned for the next post when I'll go over the antagonist muscle for the subscapularis. By the end of this four-post series, you'll have a good understanding of the functional anatomy and biomechanics of the shoulder joint as applied to yoga. Click here to browse through the Bandha Yoga book series on anatomy, biomechanics and physiology for yoga.

All the Best!

Ray Long, MD

Shoulder Biomechanics, Part II: The Infraspinatus & Teres Minor Muscles


Hello Friends,

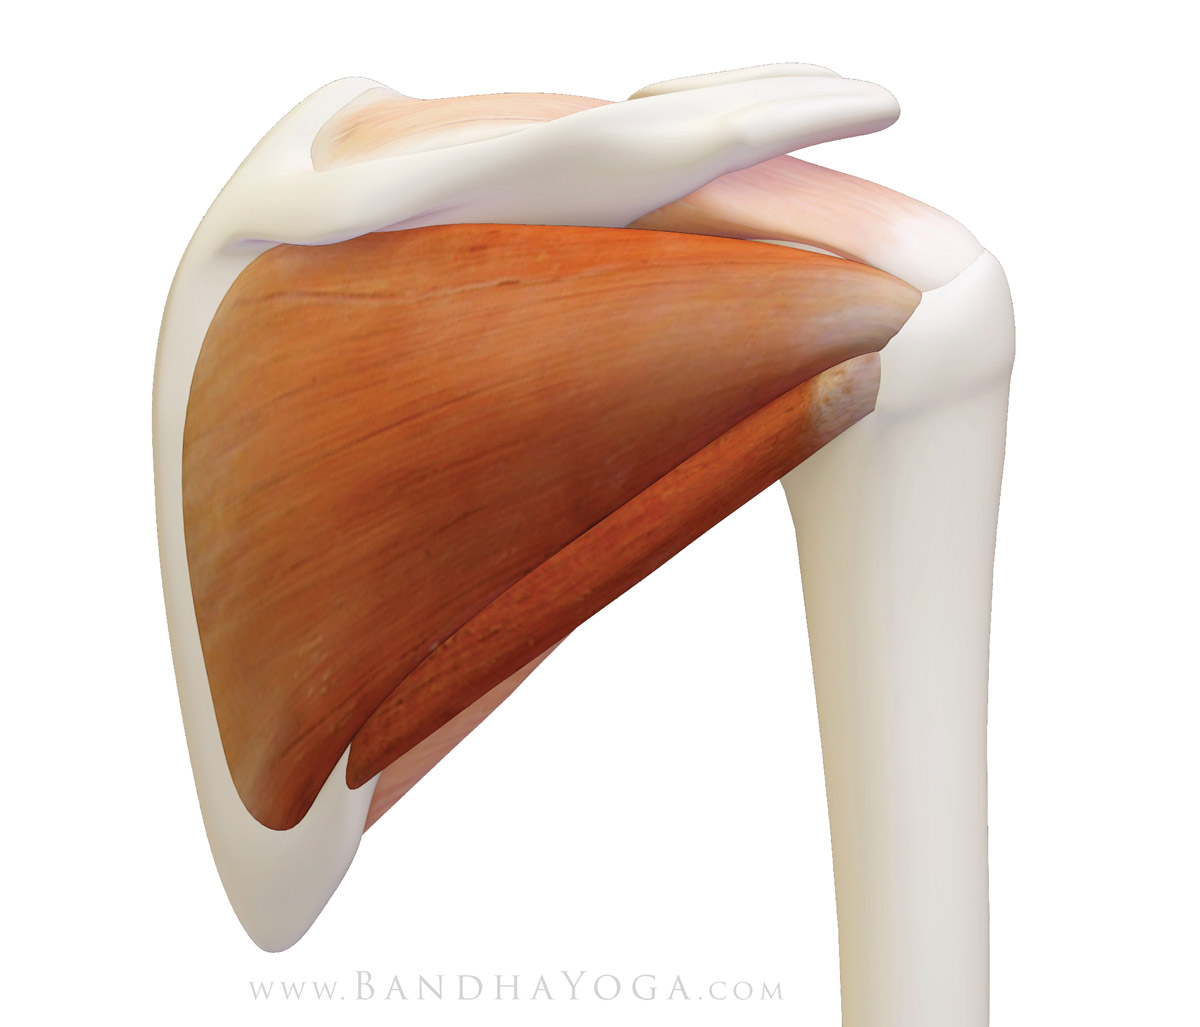
Welcome to the second of the four-part series on the shoulder joint. Last week I discussed the subscapularismuscle, which is the main shoulder internal rotator. Now we’re on to the antagonist muscles of the subscap, namely, the infraspinatus and teres minor. The infraspinatus arises in a trough below the scapular spine, hence its name (“infra” means below). The teres minor arises back part (dorsum) of the scapula along its outer (lateral) border. The infraspinatus and teres minor insert onto the back part of the greater tuberosity of the humerus, as shown in Figure 1. 

These muscles externally rotate the humerus, with the infraspinatus being the strongest external rotator of the joint. The infraspinatus and teres minor also function to stabilize the humeral head in the socket (glenoid).


Figure 1: The infraspinatus and teres minor muscles of the rotator cuff (the supraspinatus is the faded muscle on top).


The Force Couple

These muscles combine with the subscapularis at the front of the joint to form a “force couple”. In this manner, antagonist muscles (for rotation) become synergists (for stability). Therapy (and surgery) for rotator cuff pathology is directed towards restoring this force couple. Click here to read about concept of antagonist/ synergist combinations for the hip muscles in yoga. Click here for some cues to use this in Dandasana.
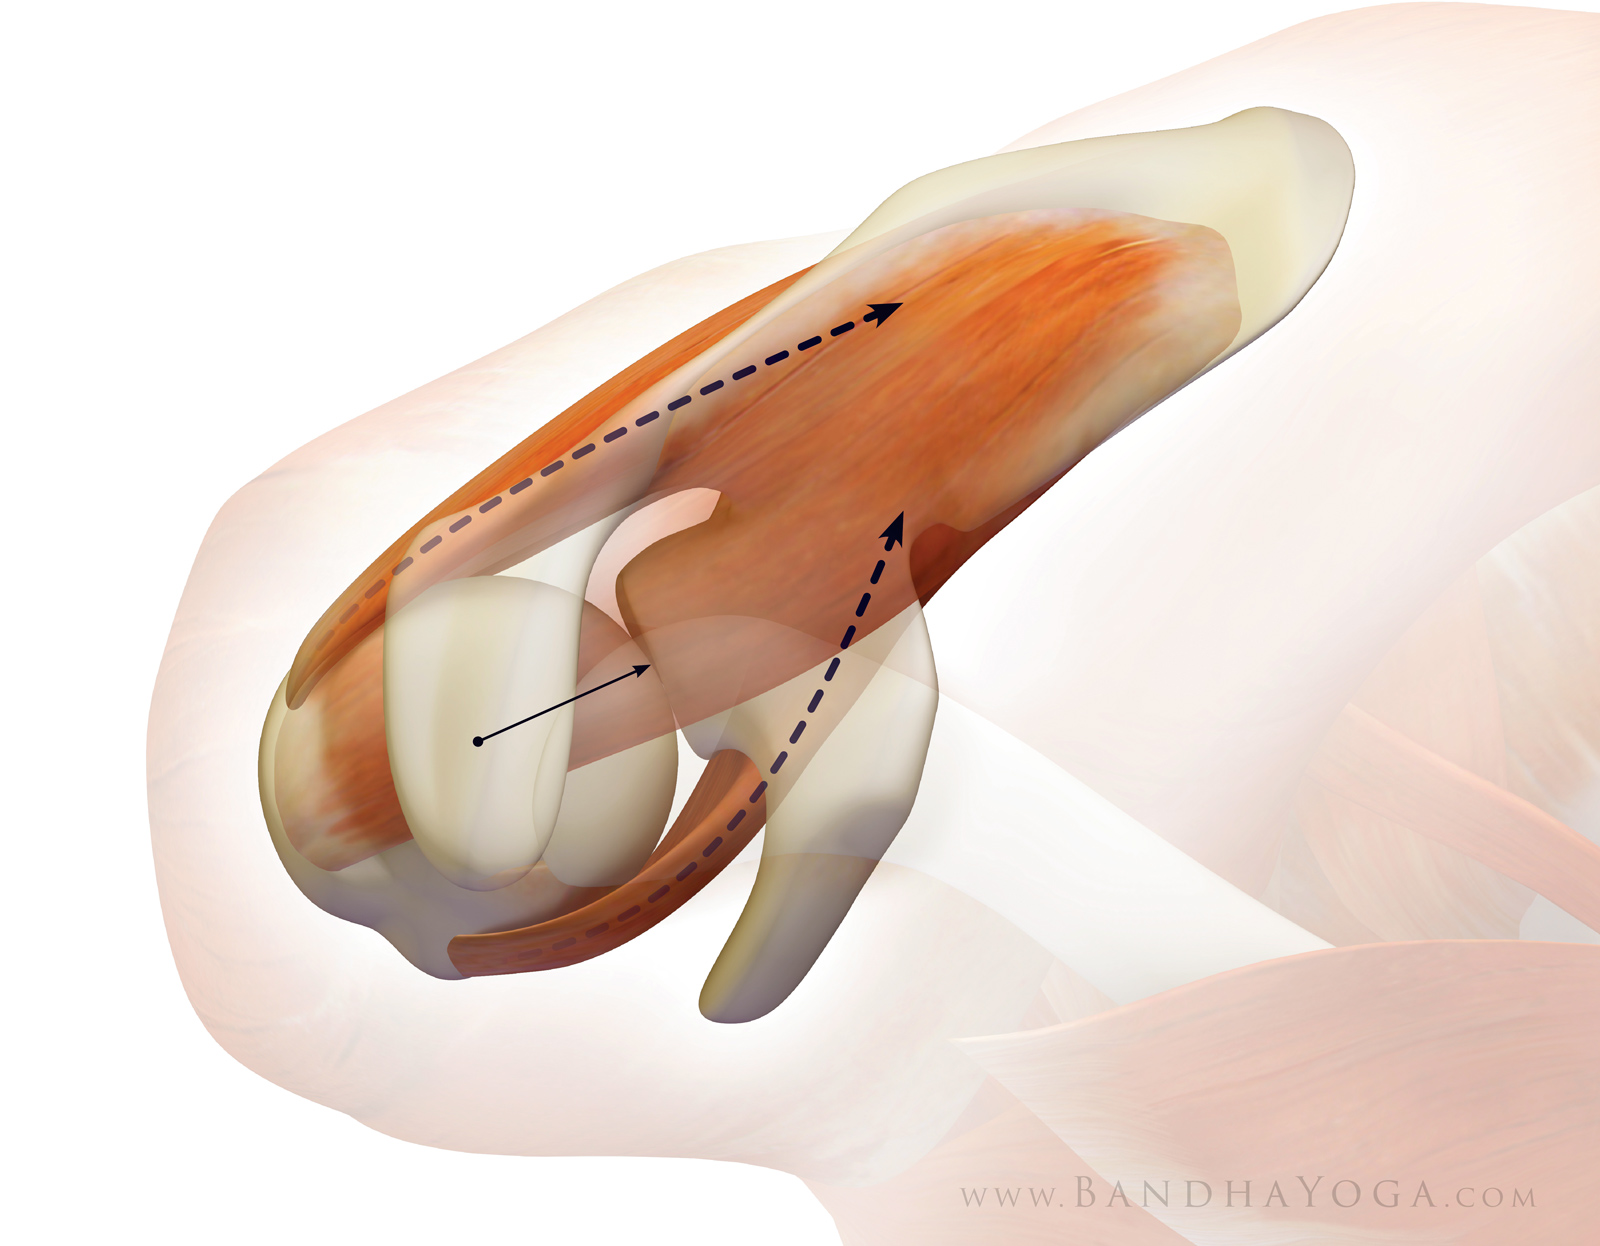
Figure 2 illustrates this biomechanical process. This view is looking down on the shoulder with the front of the joint towards the bottom of the page


Figure 2: The force couple between the infraspinatus and subscapularis muscles. This view is looking down on the shoulder with the front of the joint towards the bottom of the page.

Poses with the arms in reverse Namaste' stretch the infraspinatus and teres minor, as does Gomukhasana. Those of you who are more flexible may gently press the knife edge of the hand into the back to "load" the external rotators. Folks who are tighter may simply grasp the elbows or hands behind the back. Click here for more details and an animation of Gomukhasana stretching these muscles as well as a not so obvious cue for loading and using PNF for this stretch.

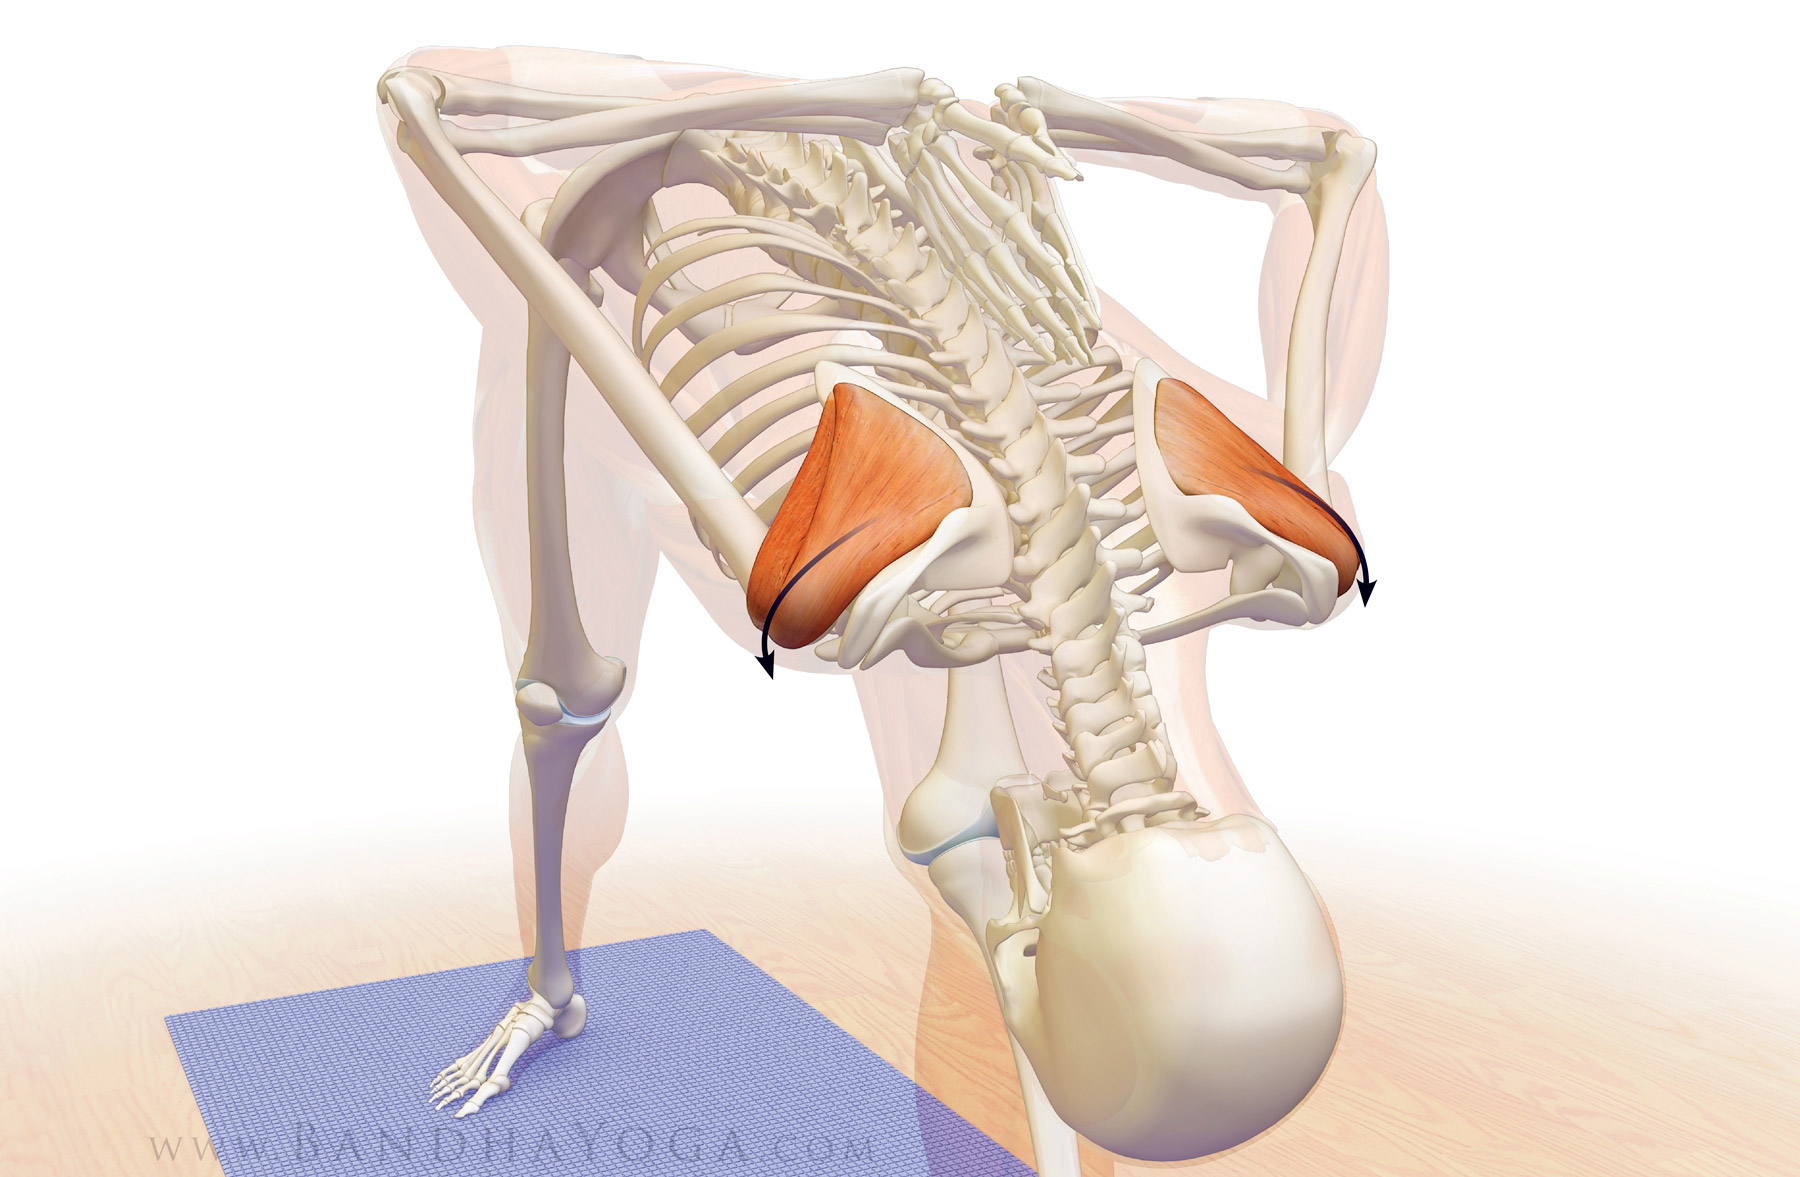
Figure 3: Stretching the infraspinatus and teres minor by internally rotating the shoulders in Parsvottanasana.


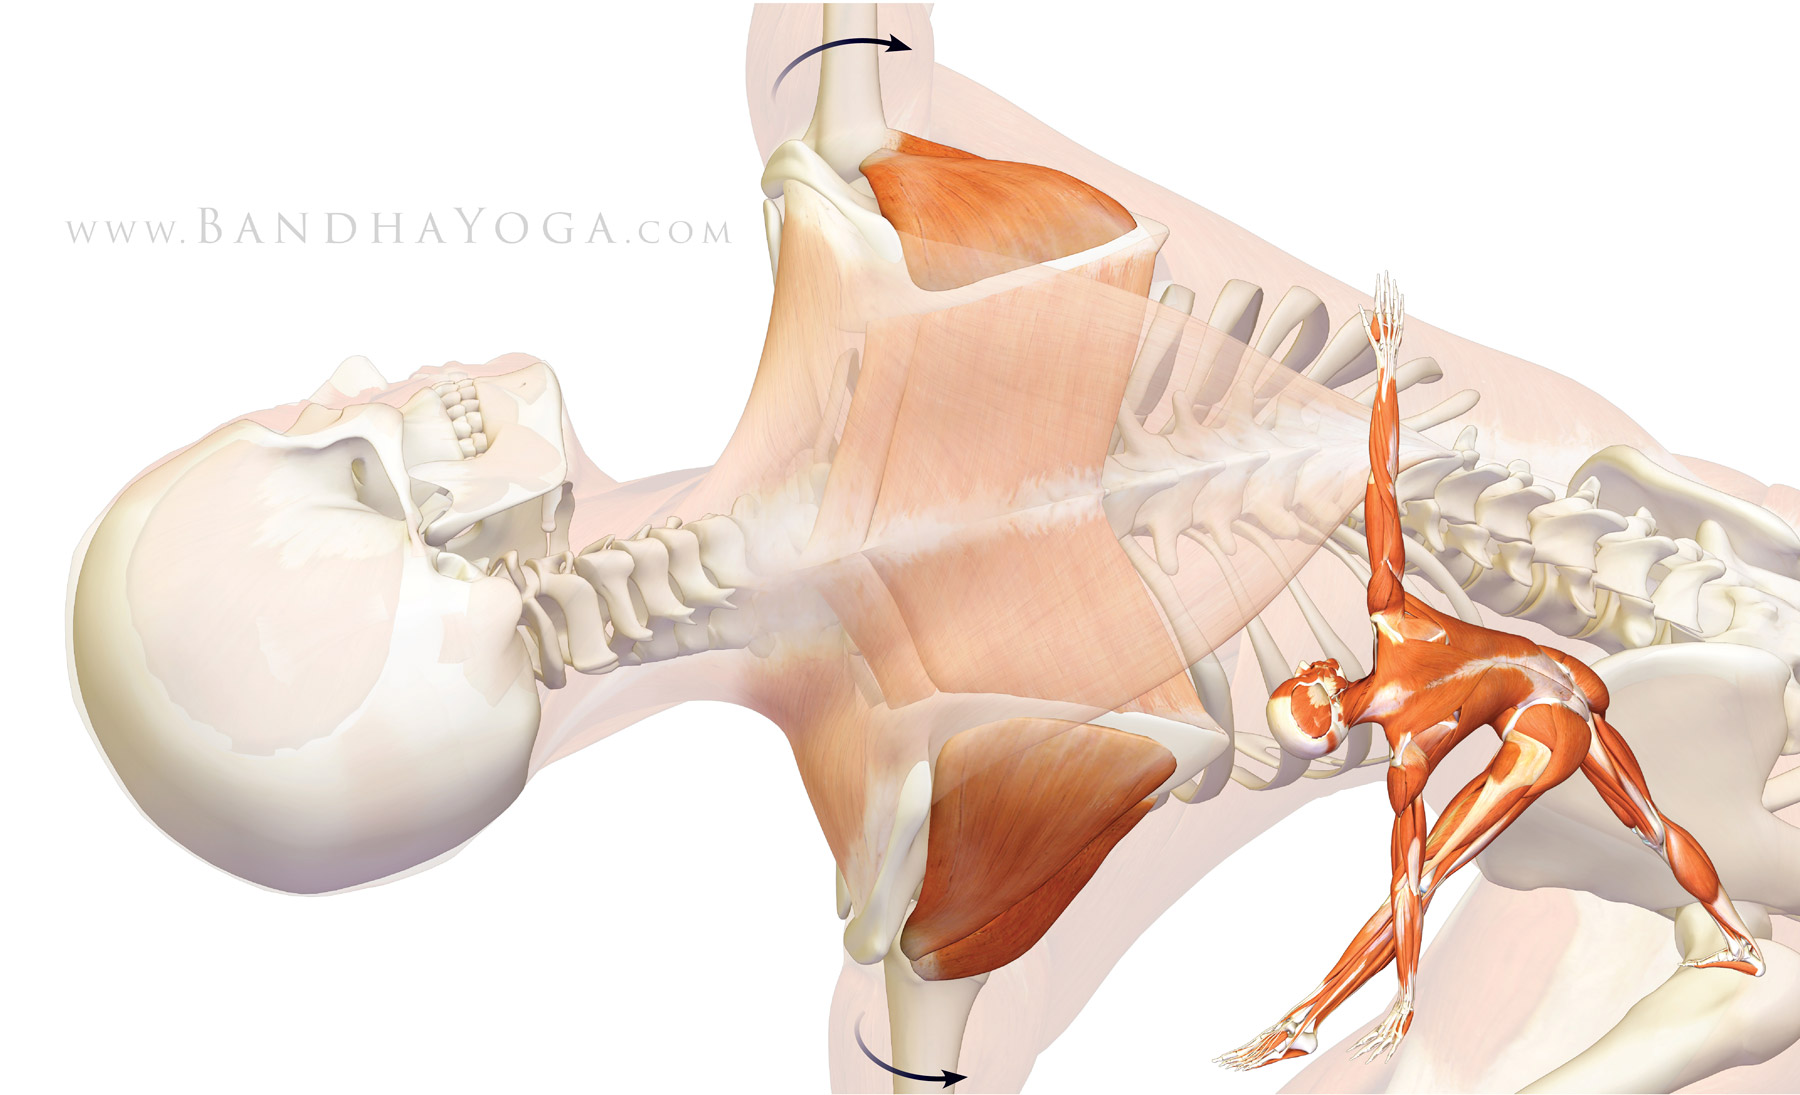
Externally rotating the shoulders in poses like Trikonasana (Triangle) can be used to activate the infraspinatus and teres minor. Figure 4 illustrates this, as well as the myofascial connection between these muscles and the muscles that retract the scapula, namely the trapezius and rhomboids.


Click here to take the rotator cuff quiz and test your knowledge!

Thanks for stopping by--I hope you're enjoying learning about biomechanical concepts like the force couple. Stay tuned for the next post when I'll go over the last muscle of the rotator cuff, the supraspinatus. Then I'll finish up with the relationship between the rotator cuff and the deltoids. By the end of this four-post series, you'll have a good understanding of the functional anatomy and biomechanics of the shoulder joint as applied to yoga. Click here to browse through the Bandha Yoga book series on anatomy, biomechanics and physiology for yoga.


All the Best,

Ray Long, MD

Shoulder Biomechanics, Part III: The Supraspinatus Muscle


Hello Friends,

Let’s cap off the muscles of your rotator cuff with the supraspinatus. This muscle originates in a trough-like area above the scapular spine, hence its name supra, which means “above”. The supraspinatus then inserts onto the greater tuberosity just behind where the long head of the biceps enters the shoulder (figure 1).

(We’ve covered the subscapularisinfraspinatus and teres minor muscles along with some key biomechanical points about each muscle—click to review.)


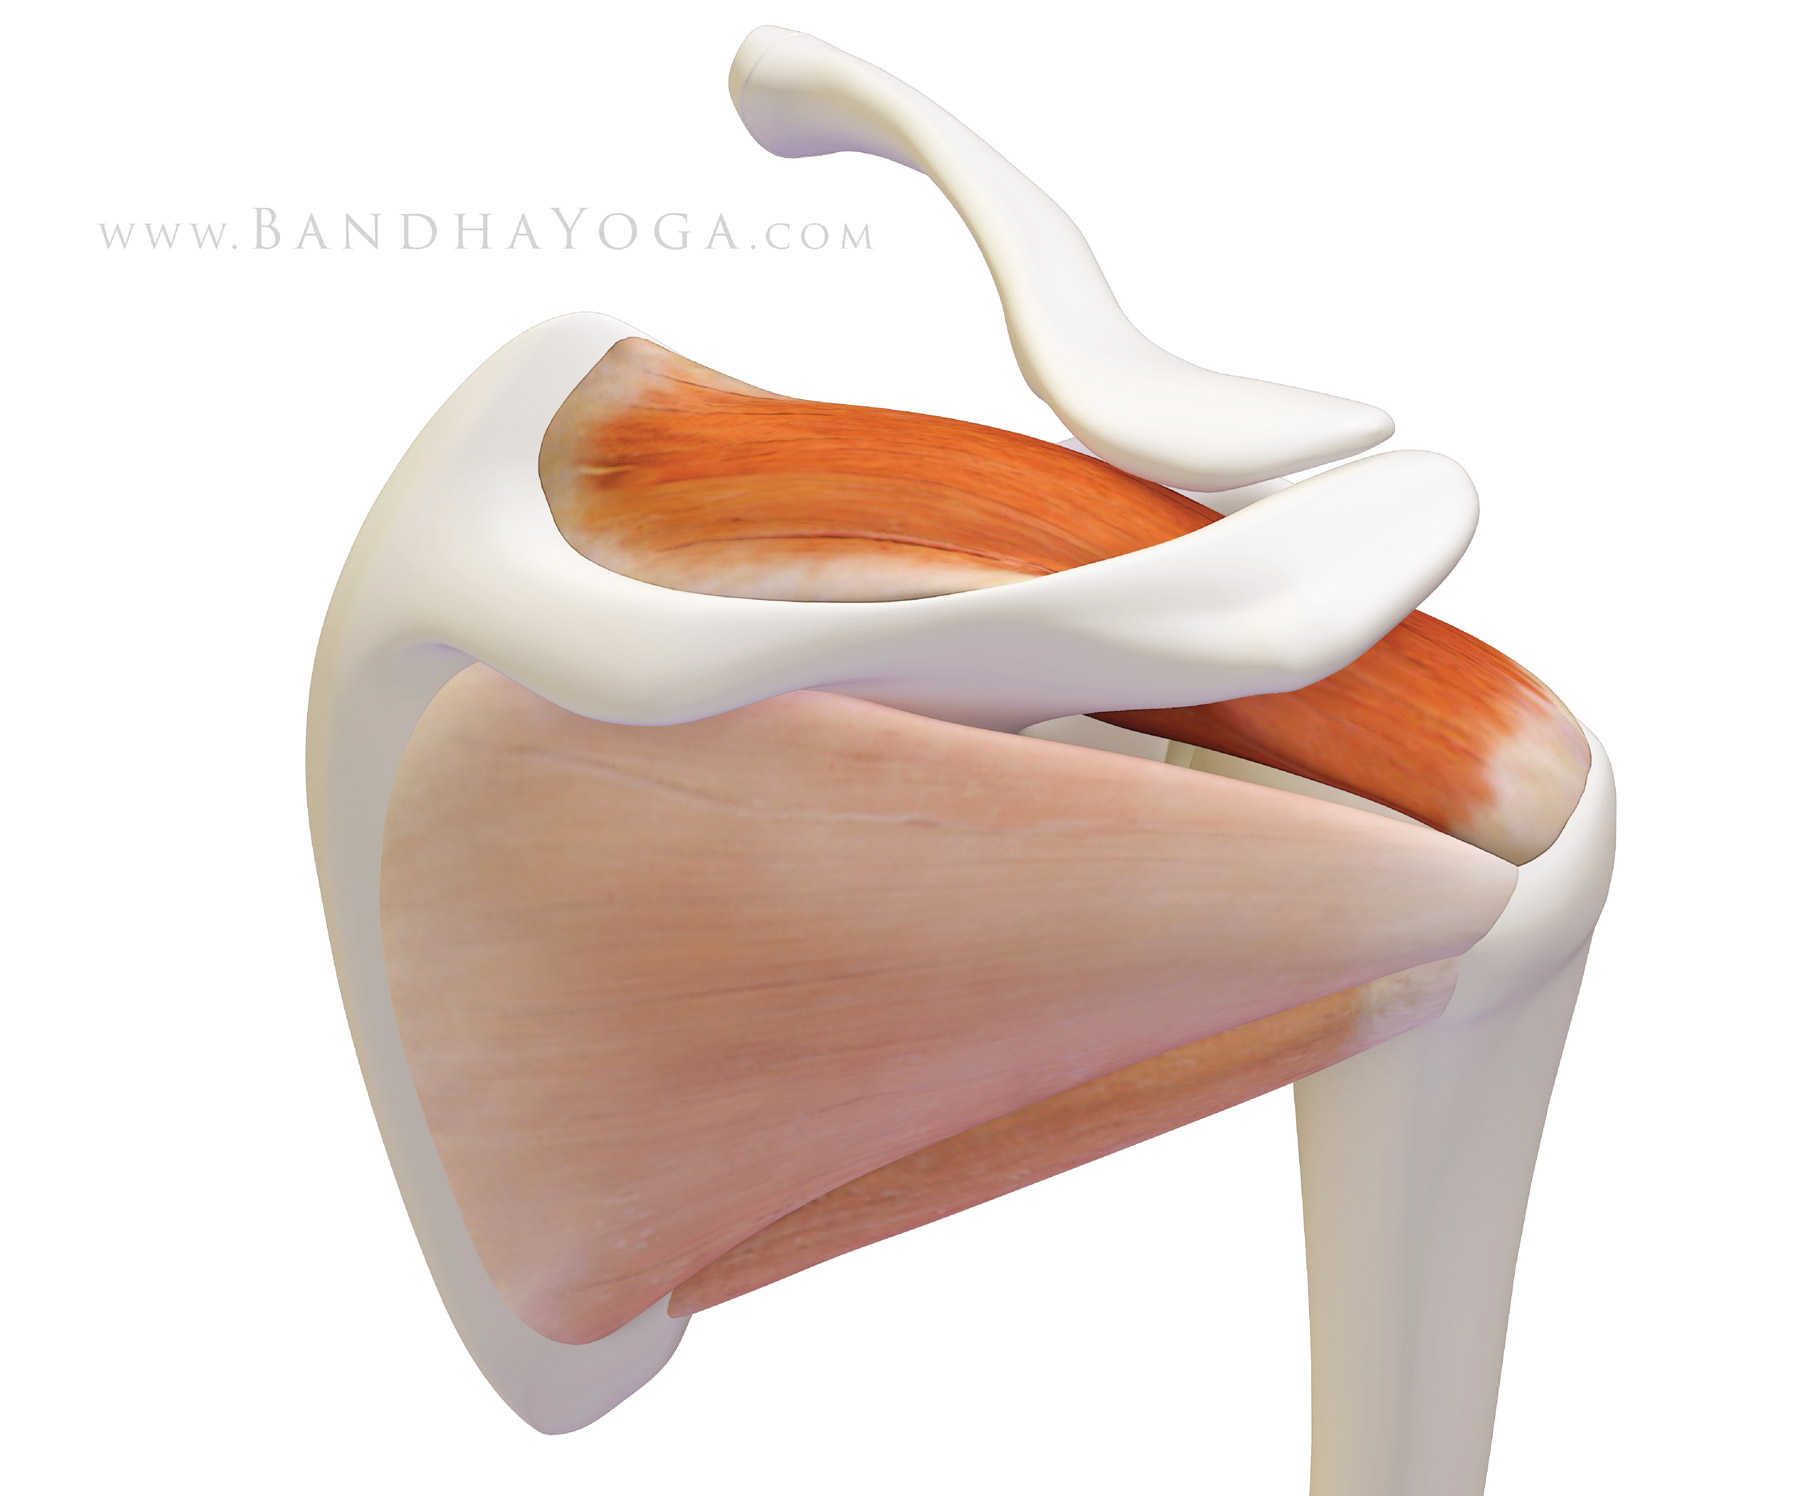
Figure 1: The supraspinatus muscle of the rotator cuff (with the infraspinatus and teres minor faded).


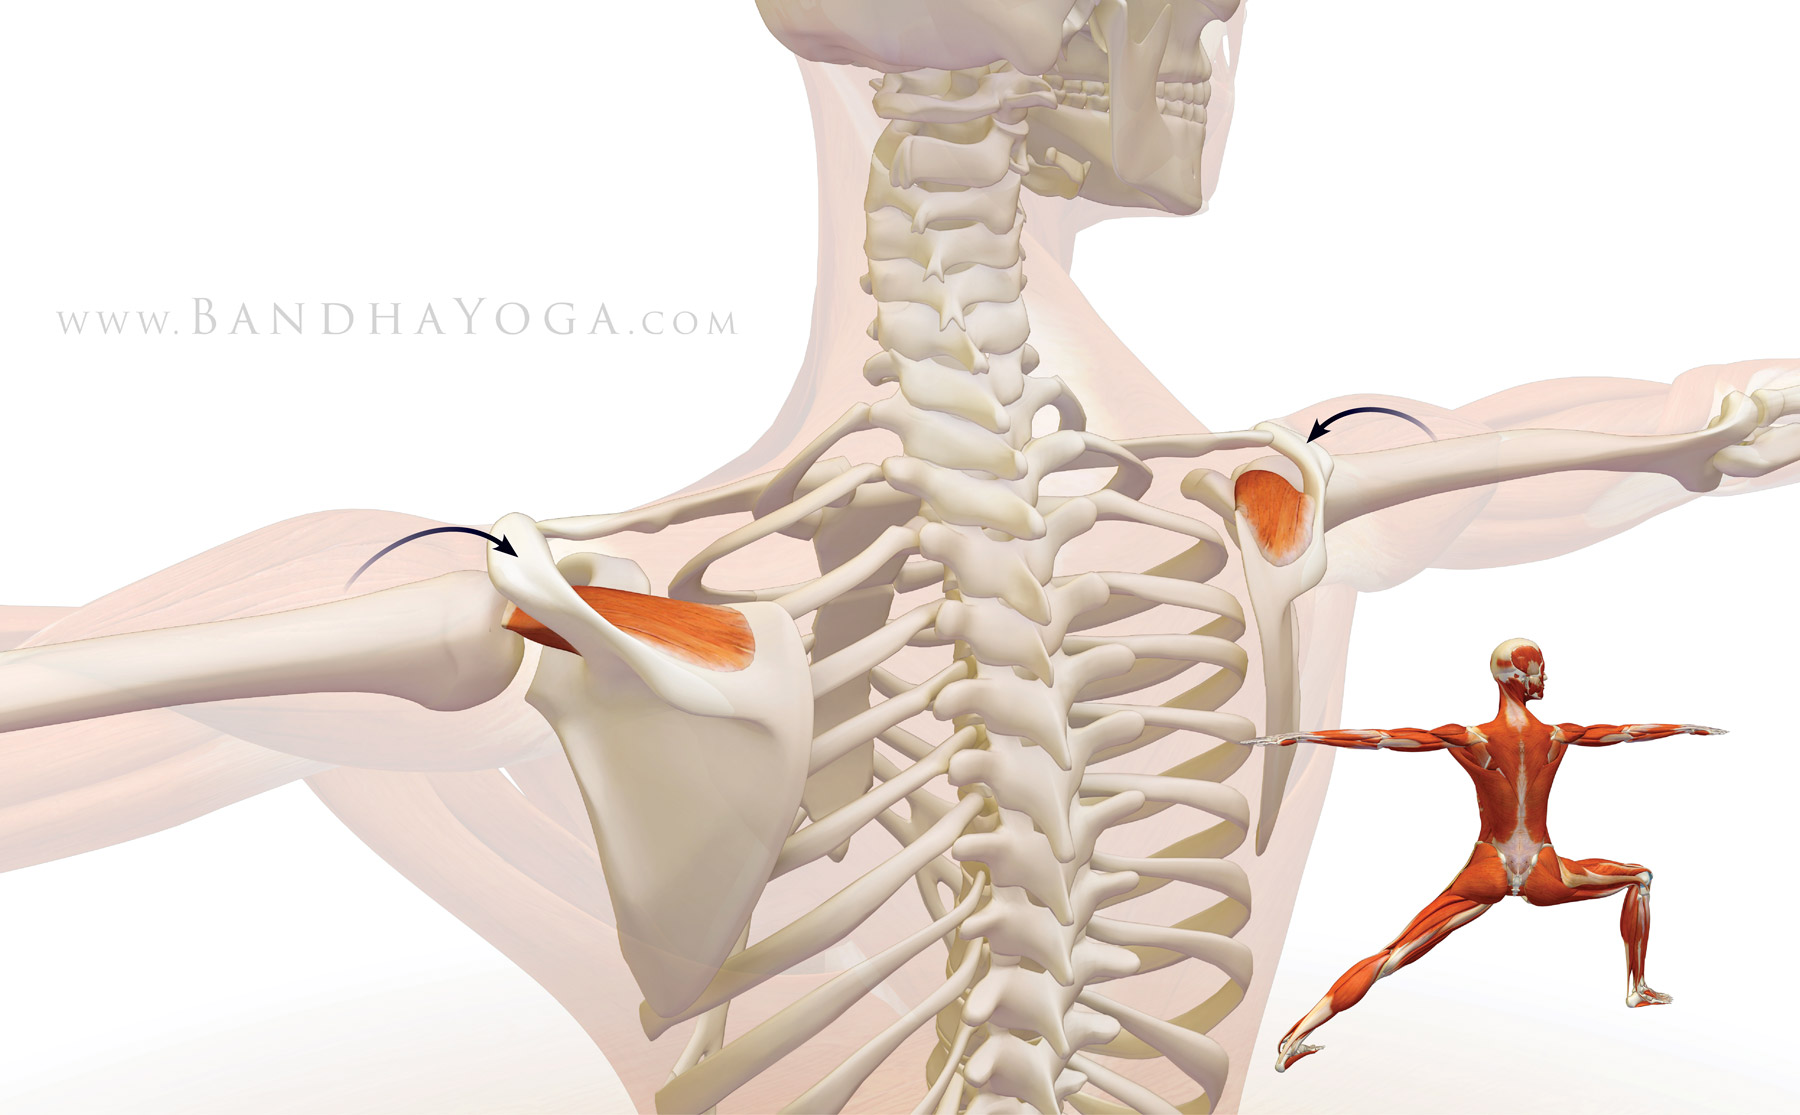
Contracting the supraspinatus abducts the humerus at the glenoid socket (takes the arm out to the side) for the first 15 degrees. After that, it becomes a synergist of the deltoid for abduction. As with the other muscles of the cuff, the supraspinatus also stabilizes the humeral head in the socket. Figure 2 illustrates this in Warrior II. 


Figure 2: The supraspinatus contracting to synergize the deltoid in abducting the shoulders in Warrior II.


The supraspinatus is the rotator cuff muscle that is most frequently torn. Tears start to become common beyond the age of forty, with an increased incidence in each decade of life. Figure 3 illustrates a supraspinatus rotator cuff tear.


Figure 3: Full thickness tear of the supraspinatus muscle (with the long head of the biceps shown in front of the supraspinatus).

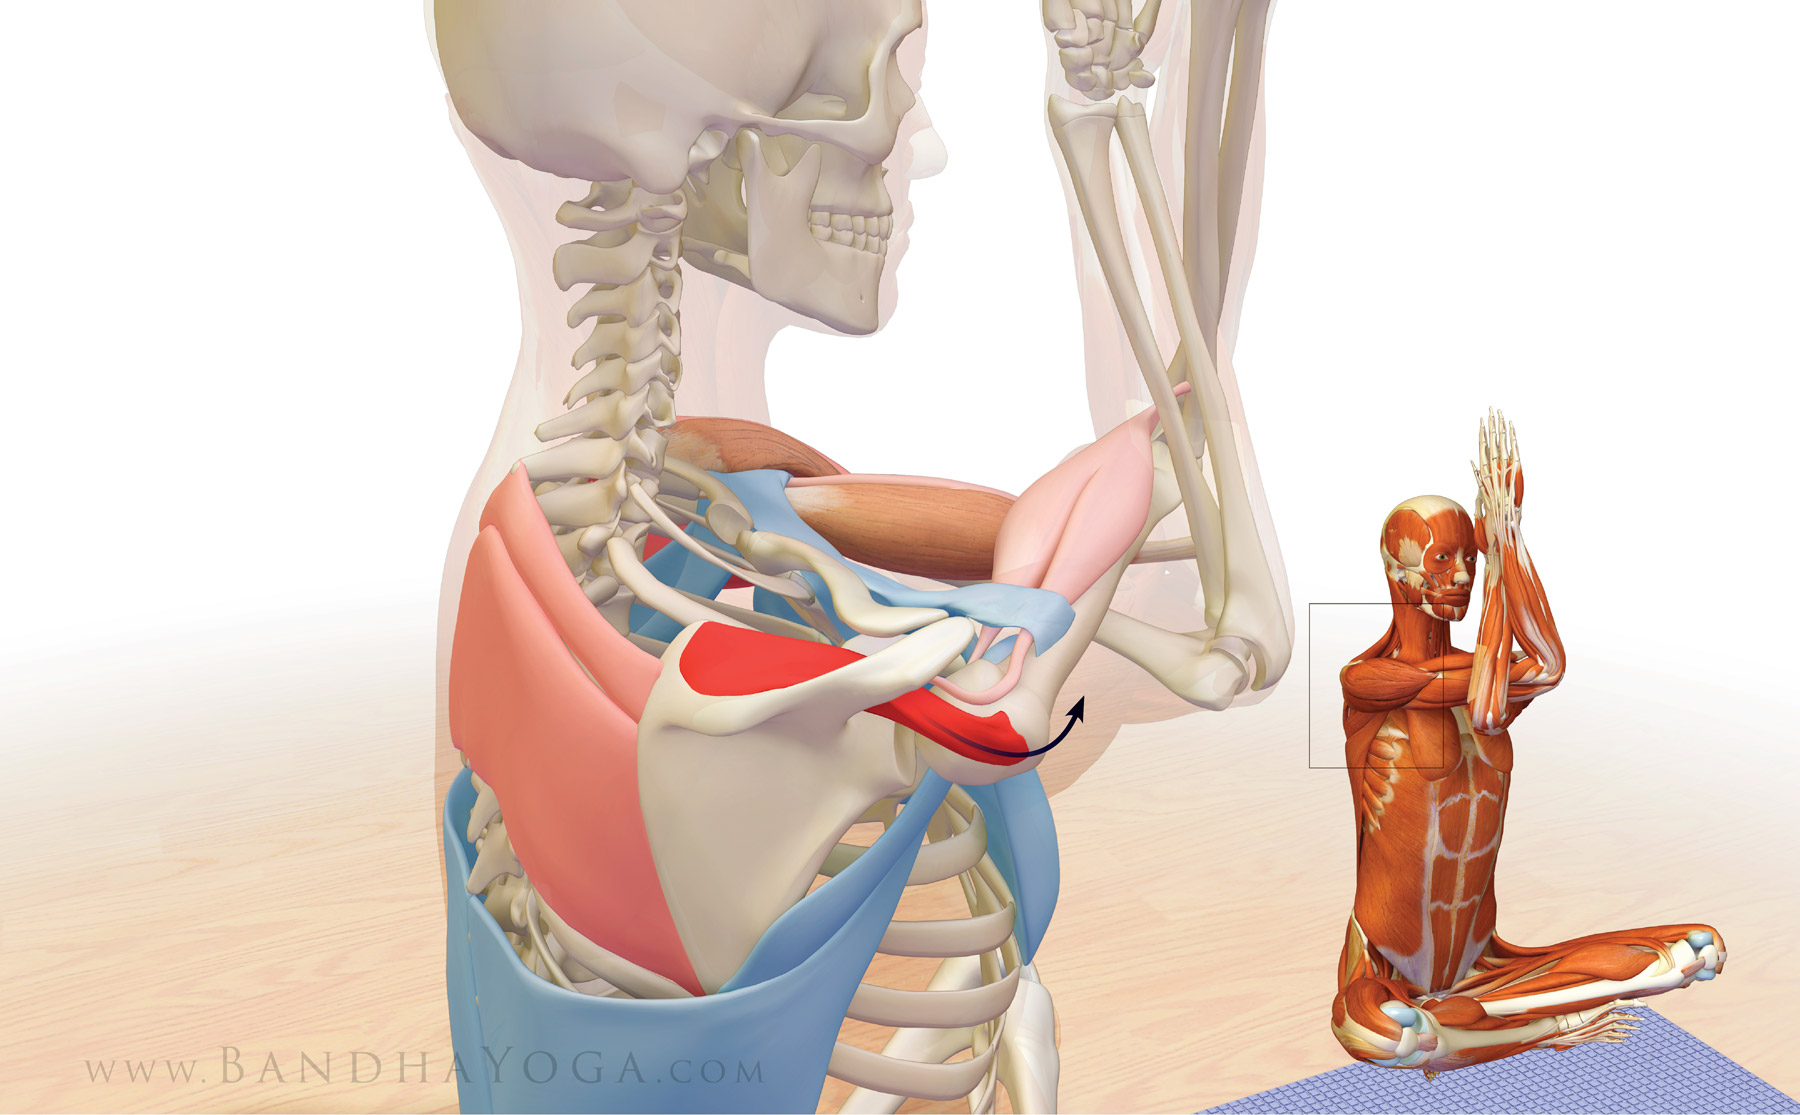
Drawing your arm across the chest (adducting it) stretches the supraspinatus, as well as the capsule of the shoulder and the deltoid muscle. Figure 4 illustrates this action in Garudasana. Note the muscles (colored blue) that contract to stretch the supraspinatus and the muscles that also stretch in this pose (colored red). 


Figure 4: The supraspinatus muscle stretching in Garudasana. The muscles in red are stretching and those in blue are contracting.


Click here to take the rotator cuff quiz to test your knowledge!

Thanks for stopping by. Stay tuned for the next post when I'll go over the interaction between the deltoid muscle and the rotator cuff. By the end of this four-post series, you'll have a good understanding of the functional anatomy and biomechanics of the shoulder joint as applied to yoga. Click here to browse through the Bandha Yoga book series on anatomy, biomechanics and physiology for yoga.


All the Best,


Ray Long, MD

Shoulder Biomechanics Part IV: The Deltoid--Rotator Cuff Connection


Foundational knowledge gives you power that you can translate into applications for your practice and teaching.

In this blog post, I explore some of the essential biomechanics of the shoulder joint, especially the “force couple” between your deltoid muscle and the rotator cuff. Understanding this relationship helps build your fund of knowledge regarding this complex articulation, which can help you later on in developing cues for your practice as well as well as for therapeutics in yoga.

The “force couple” is a biomechanical concept whereby groups of muscles work together around a joint to produce coordinated movement. The force couple between the rotator cuff and the deltoid muscle works in concert with other muscles around the scapula to produce movements such as raising the arm overhead.

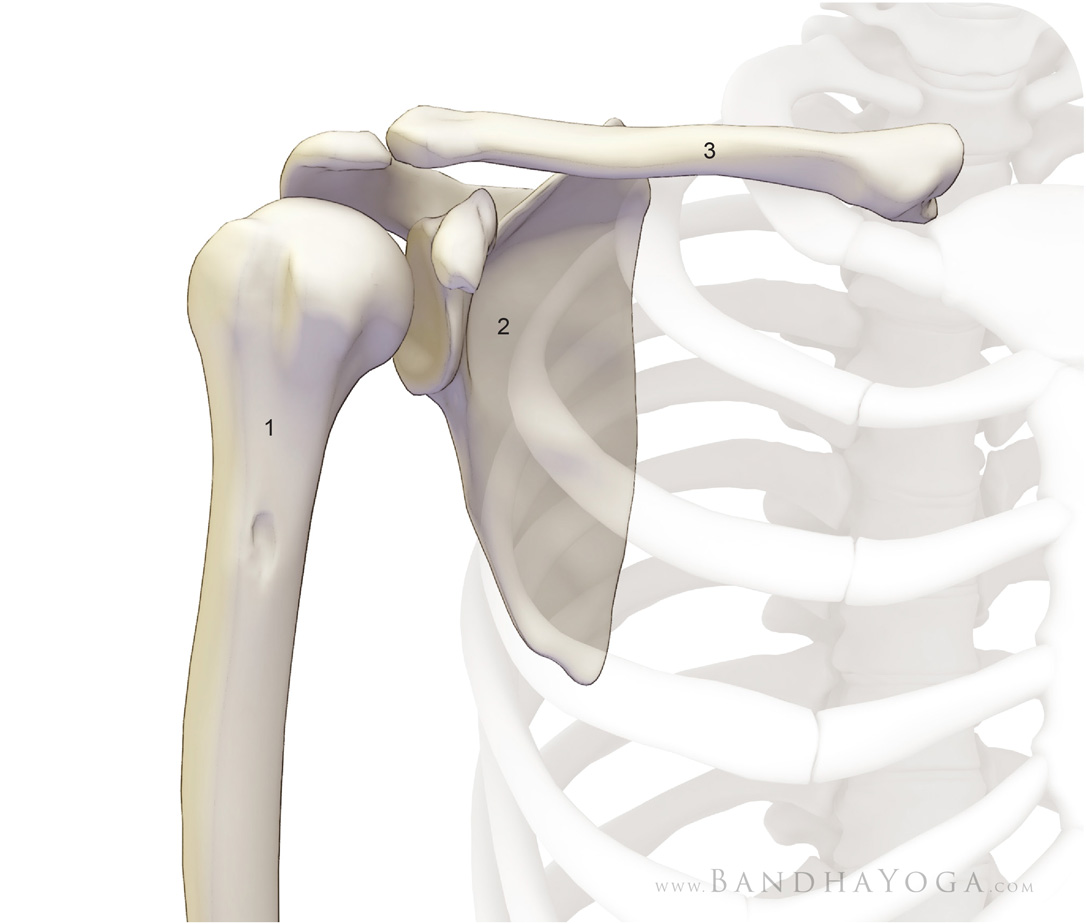
The shoulder joint proper is a ball and socket joint comprised of the humeral head which articulates with the shallow glenoid fossa (socket) of the scapula. The bone shapes of the shoulder joint allow for a high degree of motion. Contrast this with the hip joint, where the socket is much deeper and constraining on motion. In addition to the bony stabilizers, there are also soft tissue stabilizers such as ligaments and the labrum and muscular dynamic stabilizers. Figure 1 illustrates the bones of the shoulder. Click here for more on this in relation to your Down Dog.

Figure 1 - (1) humerus. (2) scapula. (3) clavicle.

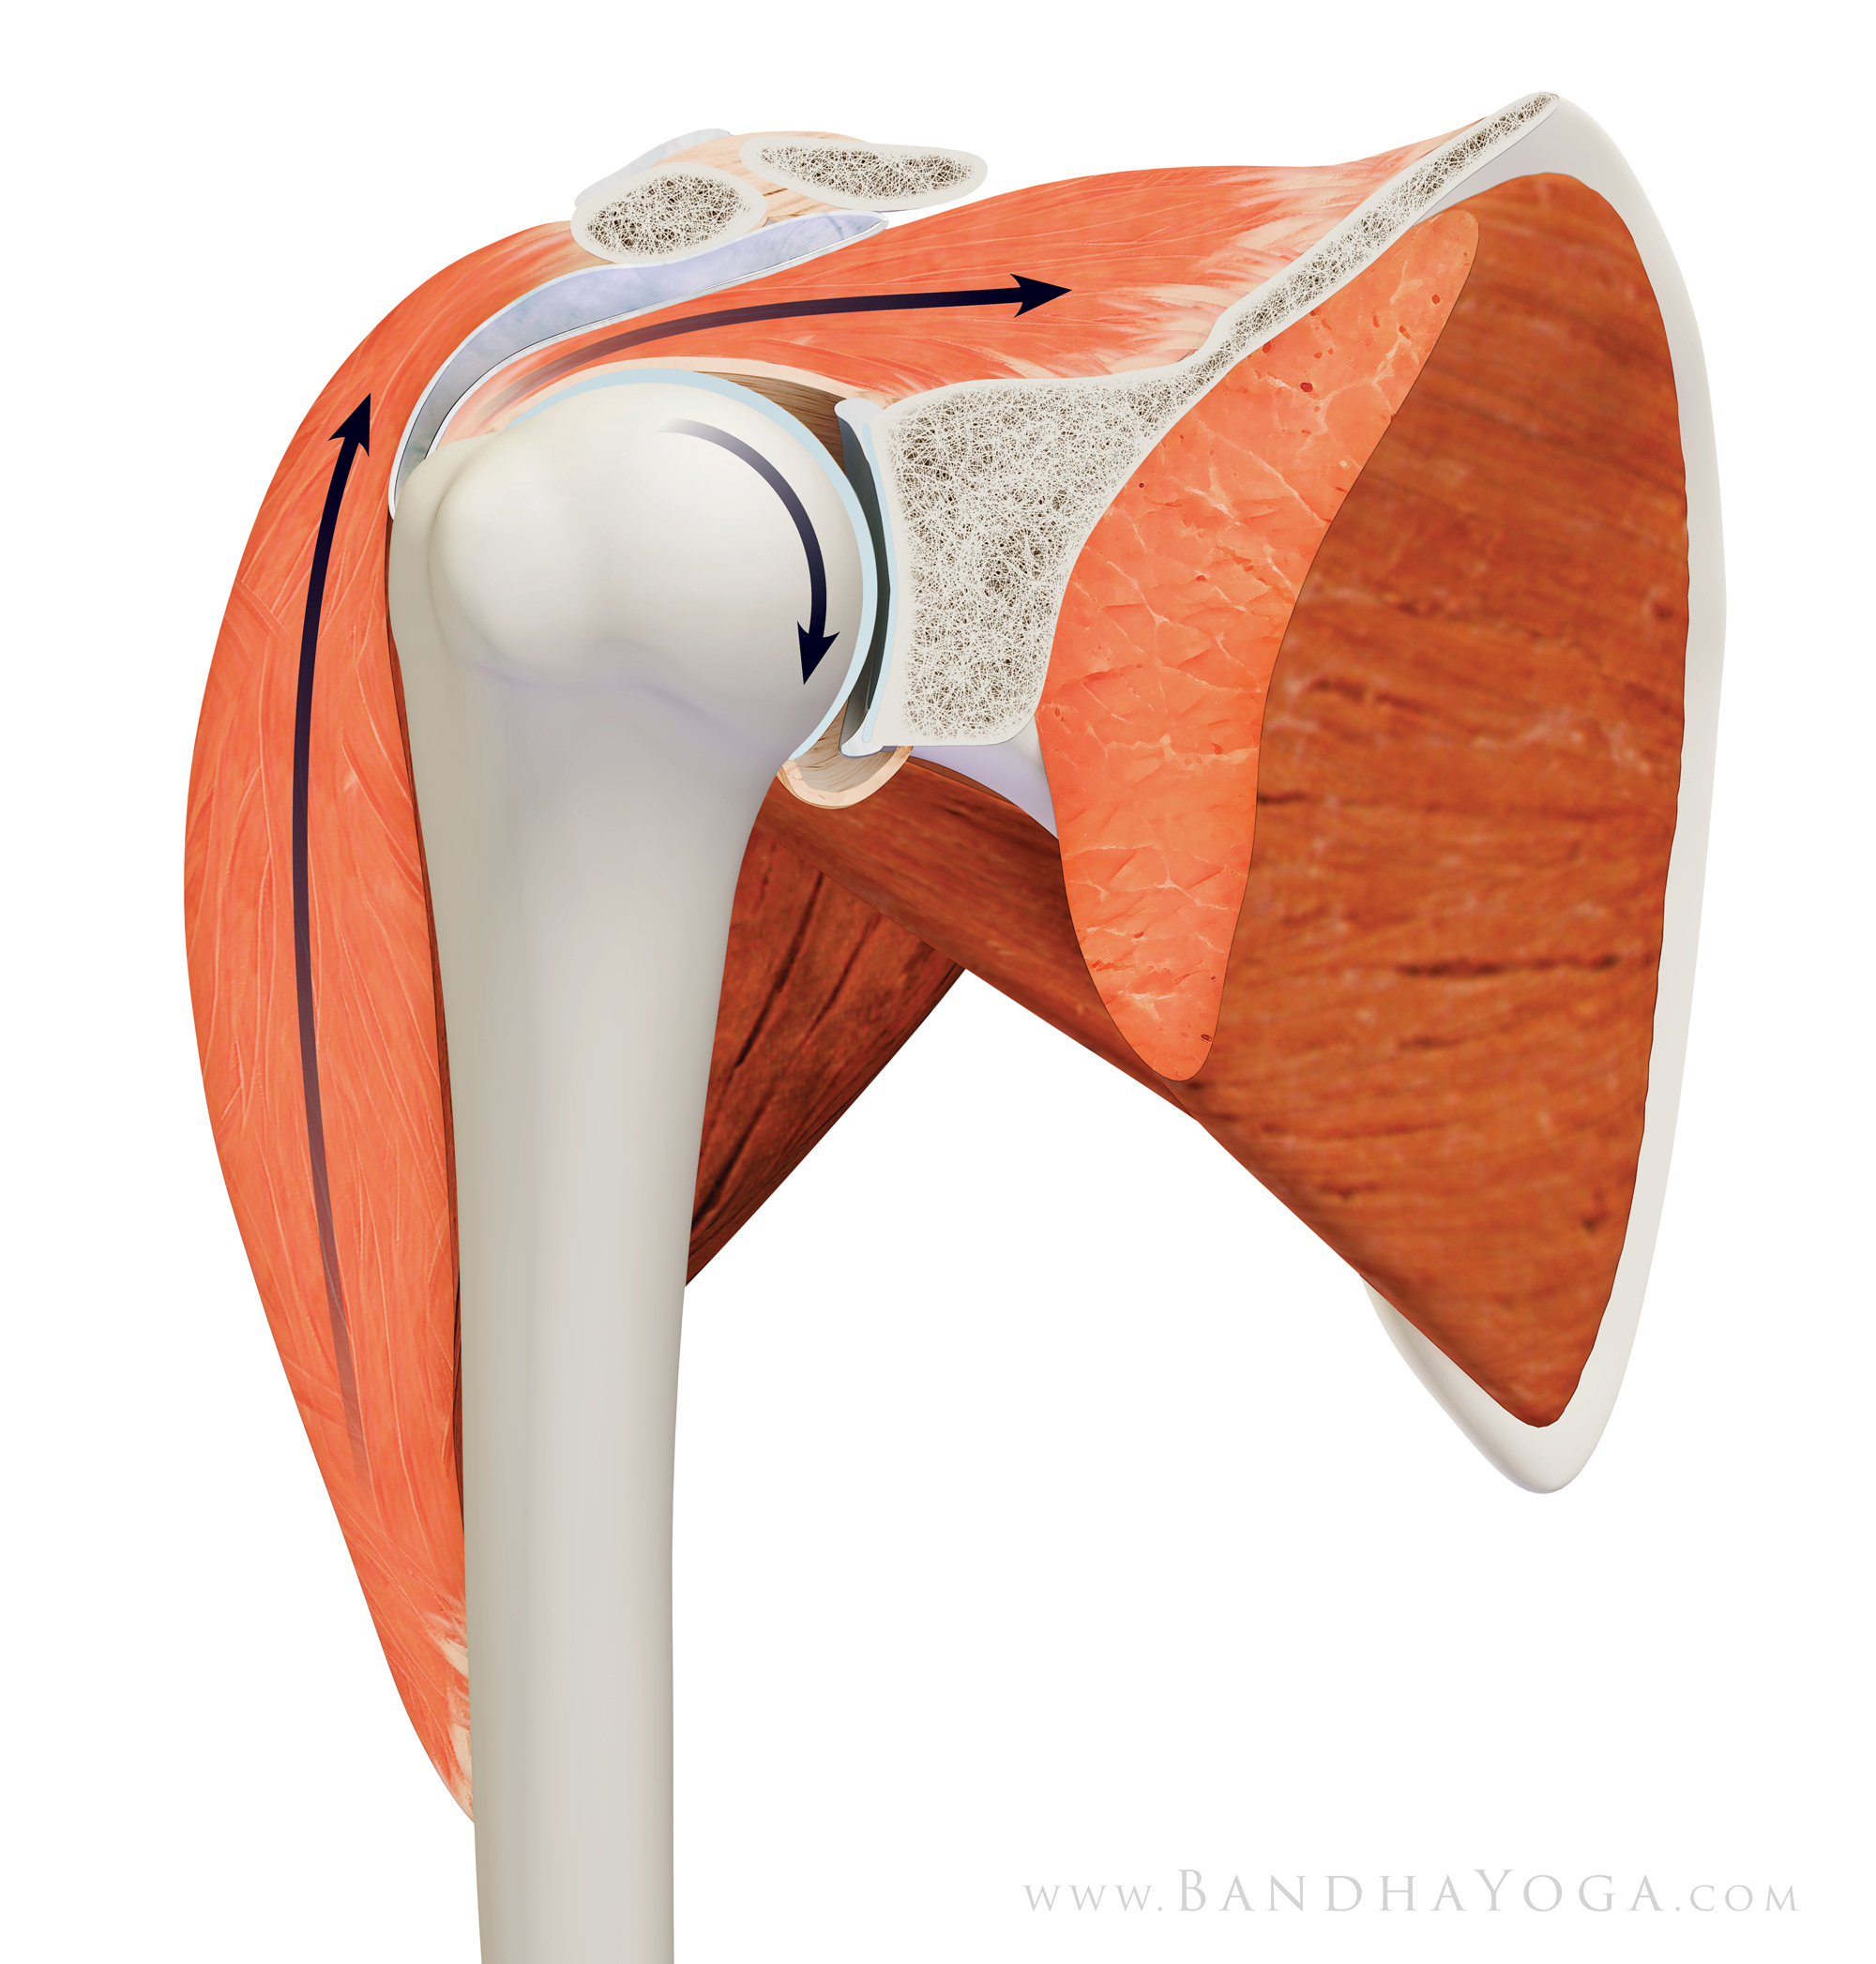
In the force couple between the deltoid muscle and the rotator cuff, the rotator cuff stabilizes the humeral head against the glenoid fossa. The deltoid muscle then levers the humeral head off the glenoid fossa to raise the arm. At the same time, the scapula and clavicle rotate to aid in producing movement, a process known as scapulohumeral rhythm (click here for more on this subject).


Figure 2 illustrates the subscapularis and infraspinatus muscles acting together to stabilize the humeral head in the glenoid fossa. Click here for more information on the these muscles of the rotator cuff.


Figure 2 - The Subscapularis / Infraspinatus force couple.

Figure 3 illustrates the force couple between the rotator cuff and the deltoid muscle. Click here to learn about the supraspinatus muscle of the rotator cuff. As the deltoid contracts to raise the arm, the rotator cuff contracts to stabilize the humeral head in the socket. All of this happens automatically--the brain is hard wired for this force couple.

Figure 3 - The Deltoid / Supraspinatus force couple.

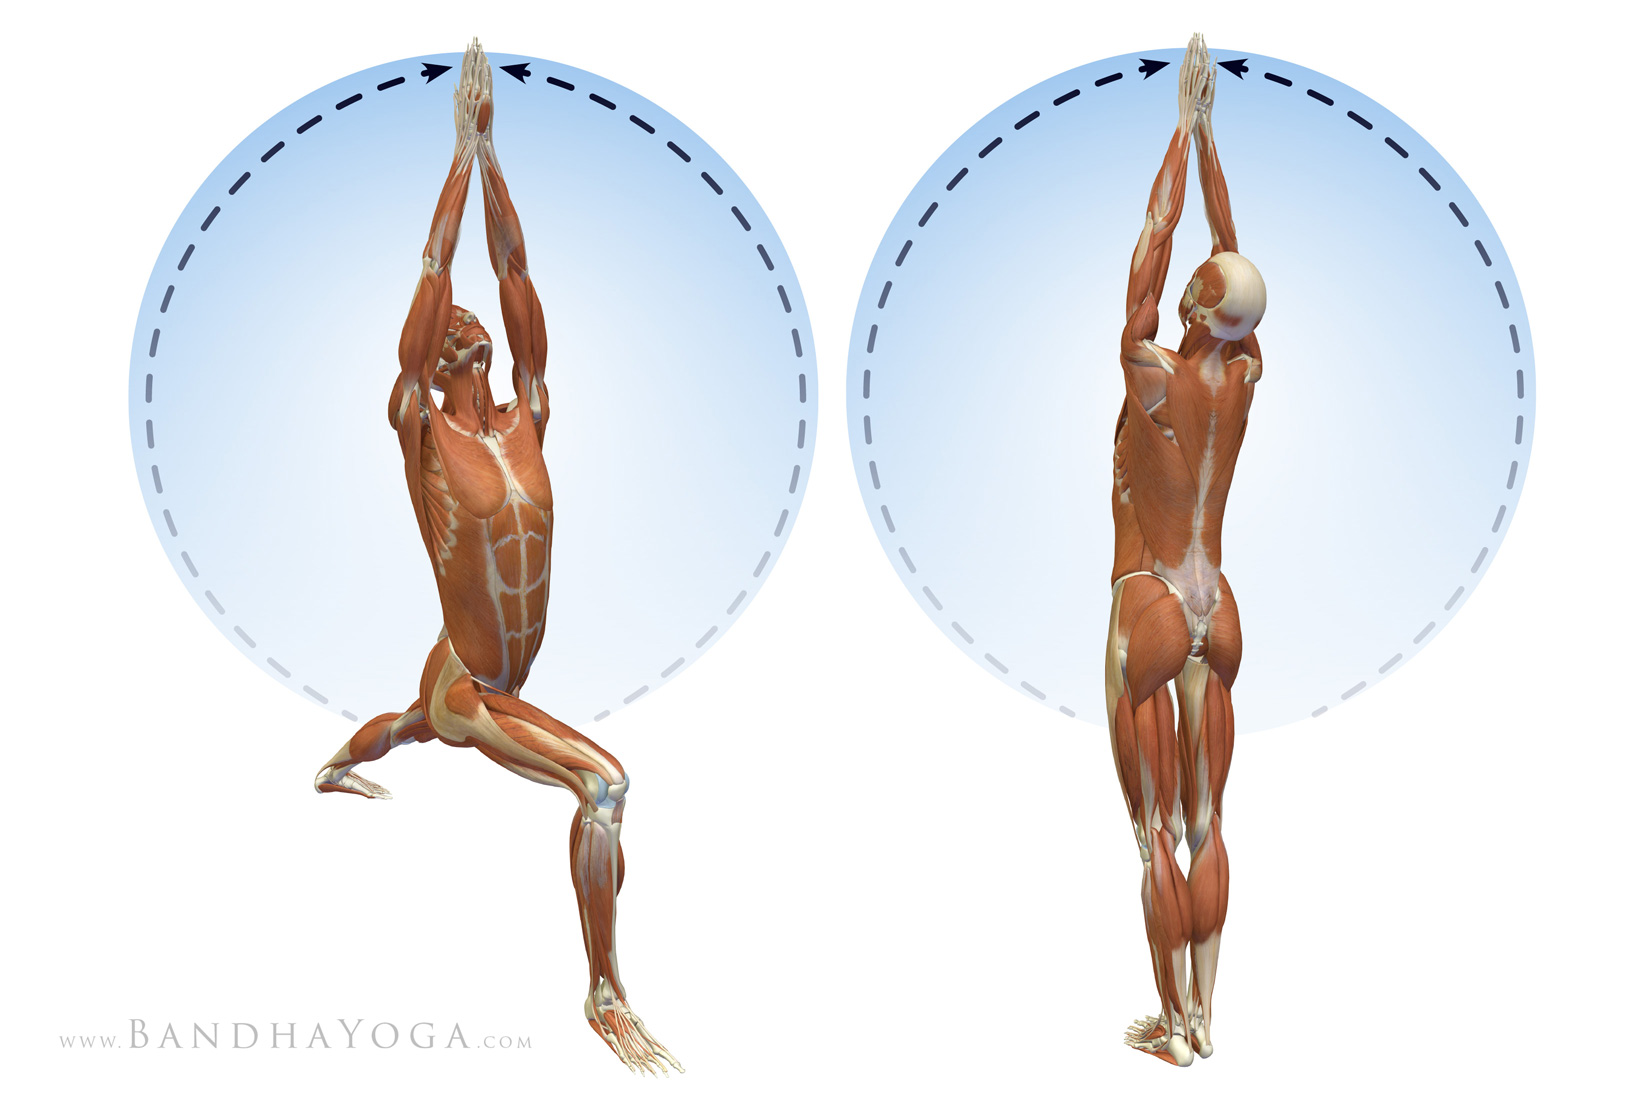
Injury to the rotator cuff, such as a tear or inflammation can lead to less efficient stabilization of the humeral head in the socket. As a consequence, when the deltoid contracts, instead of levering the humeral head off the glenoid, the force of the deltoid contraction causes the head of the humerus to shift upwards into the subacromial space. This can lead to impingement of the rotator cuff on the undersurface of the acromion, thus exacerbating the condition. To compensate, the body uses abnormal movement of the scapula in an attempt to stablize the humeral head in the socket. This abnormal movement of the scapula on the chest wall is known as “scapulothoracic dyskinesia”. I examine for this by comparing the movement of the normal and injured side from the back while having the patient raise the arms overhead.

Figure 4 - Raising the arms over the head in Warrior I and Tadasana.

I hope this post helps you build your fund of knowledge regarding shoulder biomechanics. Stay tuned for my next post where I discuss some of the yoga poses that can be used to stretch and strengthen the rotator cuff. Learn more about anatomy, biomechanics and physiology for your yoga in “The Key Muscles of Yoga”, “TheKey Poses of Yoga” and the Yoga Mat Companion series. Click on any of these books to page through.

Thanks for stopping by--look forward to seeing you for my next post!

Ray Long, MD

среда, 17 января 2018 г.

ГЛАВНАЯ МЫШЦА АНТИСУТУЛОСТИ: РОМБОВИДНАЯ МЫШЦА.


АНАТОМИЯ
Ромбовидная мышца располагается под трапецией и соединяет лопатку с позвонками верхней части спины. Совместно со средними волокнами трапециевидной мышцы, ромбовидная мышца соединяет лопатки. Она также поднимает лопатку наряду с мышцей, поднимающей лопатку. Следовательно, ромбовидная мышца удерживает лопатки, сводит лопатки сзади.

Одной из мышц, отвечающих за красивую осанку, является ромбовидная мышца. Это одна из самых главных мышц, которые стабилизируют лопатку сзади. Ромбовидная мышца идёт от остистых отростков верхних грудных позвонков и до внутреннего угла лопатки, в направление сверху вниз (от позвонков к лопатке). Кроме того она делиться на две части: на малую ромбовидную мышцу и большую ромбовидную мышцу. Малая начинается от остистого отростка шестого шейного позвонка. Большая ромбовидная мышца идёт от первого по пятый остистый отросток грудного отдела позвоночника туда же к углу лопатки.

ПРОБЛЕМА
Мышца склонна к слабости, обычно сразу с двух сторон. При этом происходит смещение плеч вперед и формируется сутулая осанка. Антагонист мышцы: Малая грудная мышца, при слабости ромбовидной мышцы будет укорачиваться. Что еще больше будет усиливать смещение плеч вперед. Укороченная малая грудная мышца может поддавливать сосудисто-нервный пучок, что будет приводить к мурашками в руках.

Также второй признак ее укорочения: поворот кисти тыльной стороной вперед (если опустить руки вниз стоя). Ослабев, ромбовидная мышца смещает и лопатку, и весь плечевой пояс вперёд, что вызывает укорочение малой грудной мышцы. Вслед за плечами вперёд смещаются голова и шея, так как длинный разгибатель шеи крепится так же, как и ромбовидная мышца к верхним грудным позвонкам. А при слабости ромбовидной мышцы возникает их фиксация и смещение и длинный разгибатель шеи не может нормально функционировать.

Ромбовидная мышца имеет тенденцию к ослаблению, особенно когда большая грудная мышца на передней поверхности груди переутомлена или очень напряжена. Большая грудная мышца — мускул в груди, который придает этой части тела красивый вид. Многие тяжелоатлеты и культуристы переутомляют грудные мускулы и в результате получают сутулую фигуру, Сила перегруженной работой грудной мышцы тянет плечи вперед, а последовательная нагрузка на ромбовидную мышцу ослабляет их и развивает болевые зоны. Любой вид работы, при которой приходится наклоняться вперед с округленными плечами, подвергает ромбовидную мышцу опасности появления точек напряжения.

Эта мышца, отвечающая за обеспечение красивой и ровной осанки, очень часто бывает слабой. Случается так, что слабеет либо малая, либо большая ромбовидная мышца. Тогда, оставшаяся дееспособной мышца берет на себя двойную нагрузку и пытается компенсировать это, пытается одна удержать лопатку и, поэтому, начинает укорачиваться и болеть. Но чаще всего происходит слабость всей ромбовидной мышцы одновременно. Именно при слабости ромбовидной мышцы и возникает сутулость, потому что она удерживает лопатку сзади.

Находясь в таком неудобном положении, человек хочет выпрямиться. Но он начинает выпрямляться не за счёт того, что у него начинают работать разгибатели, фиксирующие лопатку сзади. Он выпрямляется за счёт того, что чрезмерно напрягает разгибатель спины в области поясницы. При этом у него формируется гиперлордоз (слишком сильный прогиб в пояснице). Боль в пояснице во время гимнастики и появляется, как раз, из-за того, что стараясь встать прямо, гимнастика не может расправить грудной отдел позвоночника и делает это усилием в пояснице.

Далее, перестаёт нормально работать малая грудная мышца. Она пытается скомпенсировать слабость ромбовидной мышцы и укорачивается. Поскольку малая грудная мышца крепится к клювовидному отростку лопатки и к третьему, четвёртому и пятому рёбрам это доставляет очень много проблем.
Дело в том, что это дыхательная мышца. А из-за того, что она укорачивается и происходит фиксация третьего, четвертого и пятого ребер, возникает ограничение подвижности в третьем, четвертом и пятом позвонках и происходит укорочение вдоха. Мышца подтягивает ребра вверх и грудная клетка находится всё время в как будто на вдохе, она всё время приподнята. А ромбовидная мышца это мышца выдоха, она сокращается на выдохе, во время выдоха лопатка перемещается ближе к позвоночнику.
Сложный комплекс мышечных изменений при сутулости получил название верхний перекрестный синдром.

ДИАГНОСТИКА
Боль, возникающая при этом в мышце, чувствуется по внутреннему краю лопатки. Она не зависит от движения — ее можно почувствовать и во время отдыха. В структуре боли участвует не только ромбовидная мышца. Но ее участие вы почувствуете только тогда, когда устраните точки напряжения в трапециевидной мышце, мышце, поднимающей лопатку, и в подостной мышце. Если вы услышите щелчки или хруст, когда двигаете лопатками, или почувствуете боль в верхней части поясницы, это значит, что, возможно, точки напряжения есть и в ромбовидной мышце.

РАСТЯЖЕНИЕ И СТАТИЧЕСКИЕ УПРАЖНЕНИЯ
1. Самый легкий способ устранения точек напряжения в этой мышце состоит в том, чтобы лечь на пол и расположить мяч между лопаткой и позвоночником. Возможно, для комфорта нужно будет положить голову на тонкую подушку. Куда поместить мяч, вы поймете тогда, когда ляжете на него и испытаете болезненность от нажатия на точку напряжения. Поскольку вы лежите на полу, позвольте телу расслабиться , дышите глубоко. Сила тяжести вашего тела и сжатие мяча сделают всю работу по расслаблению мышцы.
2. Растяжка: сядьте на стул, наклонитесь вперед и опустите голову. Перекрестите руки так, чтобы схватить противоположные колени. Удерживайте это положение в течение 20 секунд. Также можно практиковать боковые скручивания грудного отдела позвоночника, они также задействуют ромбовидную.
3. Сведение. Одно из самых простых и эффективных упражнений для того, чтобы привести ромбовидную мышцу в здоровее состояние является сведение лопаток вместе. Можно делать сведение лопаток на животе (упражнение Лодочка) + наша любимая планка.
Отлично помогает асана «Поза воина».

ДИНАМИЧЕСКИЕ УПРАЖНЕНИЯ
В нашем теле существует около 650 мышц, но мы почему-то тренируем не все 650, а лишь самые важные, те, которые складывают основу и в процессе которых преобразуется все тело. Ромбовидные как раз относятся к тем мышцам, которые не нужно целенаправленно тренировать, так как они развиваются пассивно при выполнении упражнений на спину. Практически в каждом упражнении задействованы данные мышцы, а потому не стоит волноваться о их развитии - они в некоторой степени самостоятельные.

Самое главное – это сводить лопатки перед началом упражнения, чтобы напрячь ромбовидную мышцу. Иначе она будет просто пассивно перерастягиваться, а не тренироваться.
Отжимания на брусьях. Становая тяга. Тяга штанги в наклоне. Тяга верхнего блока. Подтягивания.

воскресенье, 14 января 2018 г.

БОЛЬ В ПЛЕЧЕВОМ СУСТАВЕ?


Повреждения вращательной (ротаторной) манжеты плечевого сустава

Вращательная (ротаторная) манжета плеча

Выше всех в ротаторной манжете расположена надостная мышца, при этом ее сухожилие проходит в узком пространстве между акромиальным отростком лопатки и головкой плечевой кости, что определяет склонность к травмированию сухожилия.

Причины заболеваний и повреждений ротаторной манжеты

Сухожилия мышц вращательной манжеты плеча, как и все другие сухожилия, имеют относительно плохое кровоснабжение. Недостаточное кровоснабжение сухожилий вращательной манжеты приводит к частому развитию дегенеративных изменений: возникает так называемая тенопатия. Стоит отметить, что развитию тенопатии способствует не только недостаточное кровоснабжение (ряд ученых вообще отрицают роль кровоснабжения в развитии тенопатии). Еще одна причина развития тенопатии - наследственная патология соединительной ткани. Сухожилия в основном состоят из особого белка - коллагена, который бывает 4 типов. При ненормально высоком процентом содержании коллагена 3 и 4 типов тенопатия развивается чаще. Вообще тенопатия может развиться в любом из сухожилий ротаторной манжеты (и в нескольких сухожилиях одновременно), что может приводить к боли в области плечевого сустава при движениях, в которых учавствует соответствующая мышца. Например, при тенопатии сухожилия надостной мышцы боль услиливается при отведении руки вбок, при тенопатии подлопаточной мышцы - при поднесении ложки или вилки ко рту, при причесывании, при заведении руки за спину. Часто эти тенопатии называют плечелопаточным периартритом, но это абсолютно неграмотный диагноз, от которого во всем мире уже отказались несколько десятилетий назад. "Плечелопаточный периартрит", проявляющийся болью в плече, может являться на самом деле не только тенопатией того или иного сухожилия вращательной манжеты, но и рядом других заболеваний, что заслуживает рассмотрения в отдельной статье. Кроме того, развитию тенопатии способствует прием некоторых антибиотиков (фторхинолонов).

Наиболее частая причина, способствующая развитию тенопатии - хроническая травматизация сухожилий, которая возможна при двух принципиальных вариантах:

Многократные движения, сопровождающиеся напряжением сухожилий вращательной манжеты. Часто тенопатия развивается у учителей, которые пишут мелом на доске, подняв руку вверх, у маляров, красящих стены, при сверлении дрелью и т.п.
Тенопатия, возникающая на фоне хронической травматизации может долгое время никак себя не проявлять, а может проявляться болью в плечевом суставе, усиливающейся при движениях. Когда происходит разрыв, то боль значительно усиливается. Разрыв может произойти как при напряжении сухожилий, например при слишком долгой работе или при необычно высокой физической активности, так и без какой-либо заметной травмы.

Анатомические особенности. В некоторых случаях пространство между головкой плечевой кости и акромионом достаточно узкое, что приводит к постоянной травматизации сухожилий ротаторной манжеты (особенно часто - сухожилия надостной мышцы). К этому может привести перелом большого бугорка плечевой кости, который сросся со смещением или индивидуальная анатомическая форма акромиального отростка плечевой кости: у некоторых людей кончик акромиона имеет форму крючка, который трется о сухожилие, а еще на кончике акромиона бывает и добавочная кость - os acromiale, которая тоже может травмировать сухожилия вращательной манжеты.

С возрастом дегенеративные изменения в сухожилии прогрессируют, тенопатия становится все более выраженной, сухожилие ослабевает и может произойти его разрыв. Наиболее часто разрыв сухожилия встречается в возрасте 35-55 лет. Однако при достаточно сильной травме (переломы большого бугорка плечевой кости, другие переломы проксимальной части плечевой кости, вывихи в плечевом суставе и т.д.) разрыв может произойти и без предшествующей тенопатии, т.е. у относительно молодых людей.

Симптомы

Как мы уже отмечали, чаще всего разрыв сухожилий вращательной манжеты плеча из-за травмы происходит на фоне предшествоваших дегенеративных изменений (тенопатии). Разрыв характеризуется резким усилением боли и ослаблением руки, вплоть до полной невозможности подвигать рукой. Разрывы бывают частичными или полными, когда сухожилие той или иной мышцы полностью отрывается от места прикрепления к плечевой кости. Интенсивность боли зависит от объема разрыва - как правило, чем больше разрыв, тем сильнее боль, и тем больше огранничение движений. При частичных разрывах возможность движений рукой сохраняется.

Локализация боли зависит от того, какое сухожилие вращательной манжеты повреждено. Чаще всего повреждается сухожилие надостной мышцы, что обычно проявляется полной неспособностью отвести руку вбок (при полном разрыве) либо усилением боли при отведении руки вбок в амплитуде от 30 до 60 градусов. Многие пациенты отмечают, что не могут спать на стороне больного плечевого сустава.

Диагностика

Для постановки диагноза доктор расспросит Вас о механизме травмы, о давности повреждения, о характере болей в плече, о том,болело ли и как долго плечо до травмы. Еще раз напомним, что при значительной тенопатии разрыв сухожилия может произойти вообще без травмы.

Далее врач проводит осмотр, в ходе которого он проводит специальные тесты (двигает вашу руку или просит пациента сделать особое движения), в ходе которых уже с высокой долей вероятности можно выяснить, какое именно сухожилие повреждено.

Как правило, при полном разрыве сухожилия (или отрыве его от места прикрепления к кости) движение, за которое отвечает эта мышца, невозможно.

При частичных разрывах способность двигать рукой сохраняется, но движения болезненны.

Обязательно выполнение рентгенографии, на которой при разрывах сухожилий вращательной манжеты можно обнаружить характерные признаки на нижней поверхности акромиального отростка - так называемый субхондральный склероз. Он образуется как защитная реакция кости от многократного соударения головки плечевой кости и нижней поверхности акромиона (импинджемент синдром), и эти соударения приводят к повреждению сухожилий вращательной манжеты, вызывают их тенопатию, и, в конечном итоге, разрыв. Конечно же, отсутствие на рентгенограмме этих признаков не говорит о том, что сухожилия вращательной манжеты не повреждены, но наличие этих рентгенологических признаков с высокой долей вероятности говорит о проблемах с сухожилиями ращательной манжеты. На рентгенограмме важно оценить и акромиально-ключичное сочленение: артрит этого сустава может служить причиной похожих болей.

Магнитно-резонансная томограмма, показывающая полный разрыв сухожилия надостной мышцы

Лечение

Начальное лечение при остром, случившемся недавно разрыве сухожилий вращательной манжеты состоит в уменьшении боли. Как правило, используются нестероидные противовоспалительные препараты, такие как аспирин, вольтарен, ксефокам и др. Также в остром периоде необходимо соблюдать покой для больной руки - руку обездвиживают на косыночной повязке или на специальной отводящей шине. Для уменьшения боли и отека эффективно прикладывание пакетов со льдом, завернутых в полотенце, к плечу.

Консервативная терапия. При тенопатиях и незначительных, небольших разрывах, когда движения в плечевом суставе сохранены, назначается консервативная терапия. После уменьшения боли назначаются легкие физические упражнения для разработки сустава. В более позднем периоде к этим упражнениям добавляются силовые упражнения, направленные на укрепление мышц верхней конечности. Это позволит постепенно возвратить больной руке прежний объём движений. Обычно длительность консервативной терапии составляет от 6 до 8 недель. В течение этого времени полностью прекращаются боли в плече, и происходит частичное восстановление силы в мышцах руки.
Оперативное лечение. При значительных разрывах консервативное лечение бесперспективно, поскольку разорванные концы попросту не могут срастись. Впрочем размер разрыва и сам факт наличия разрыва вовсе не являются критериями, по котороым оценивают необходимость операции, так как иногда даже при полных разрывах движения в плечевом суставе сохранены или практически безболезненны за счет того, что функцию разорванного сухожилия частично берут на себя соседние сухожилия. Однако, при полных разрывах такое встречается не часто.

Итак, операция показана, если:

имеется полный разрыв, который делает движения в плечевом суставе невозможными или ограничивает некоторые движения;
имеется частичный разрыв, который ограничивает движения, служит причиной боли;
консервативное лечение оказалось безуспешным.
В ходе операции оторванное сухожилие натягивают, возвращая его к месту прикрепления и подшивают его.

Реабилитация

После операции руку обездвиживают в положении отведения на несколько недель с помощью специальной шины, о которой мы уже писали ранее. Такая иммобилизация снижает натяжение сухожилий и уменьшает риск повторного разрыва. Длительность иммобилизации определяется хирургом, который выполнял операцию, так как только он может оценить состояние сухожилий и прочность выполненного шва. Обычно шину (ортез) накладывают на 3-5 недель.

После этого приступают к реабилитационным упражнениям, интенсивность и очередность которых вам подберет врач. В целом после операционный и реабилитационный период можно разделить на три периода:

1) период защиты сухожилий. Руку обездвиживают, чтобы разрыв сросся;

2) период восстановления амплитуды движений;

3) период восстановления силы.

Примерный перечень упражнений в режиме видеороликов вы можете посмотреть на нашем сайте (кликните мышкой, чтобы перейти к статье о реабилитации). Вам необходимо будет заниматься лечебной физкультурой в течение 2 или 3 месяцев, полная работоспособность обычно восстанавливается в течение 6 месяцев с момента травмы.

Статья предназначена исключительно для всестороннего информирования о заболевании и о тактике его лечения. Самолечение может навредить Вашему здоровью.