воскресенье, 30 июля 2017 г.

Simple Drills to Build Scapular Robustness

Check out The Movement Fix on Instagram @themovementfix
Simple Drills to Build Scapular Robustness | Week 71 | Movement Fix Monday
The idea of scapular instability is going away. Since the scapulothoracic joint is essentially floating on the rib cage contained within a sling of muscles, having it be 'unstable' would really depend on how you define stability.
The article 'A Critical and Theoretical Perspective on Scapular Stabilization: What Does It Really Mean, and Are We On the Right Track?'  by McQuade, et al. challenges the notion that the scapulothoracic joint can really be unstable. Here is a quote from the article:
Joint instability is characterized by mobility that exceeds physiological limits without adequate control. When applied to the STJ, this suggests that the orientation or trajectory of the articulation would not be recoverable following a perturbation. Because this foundational definition is difficult to apply directly to the scapula, the term scapula stability has come to imply “normal” scapula movement on the thorax during upperextremity motions.
Working on this premise, we could consider more about building robustness around the shoulder blade instead of 'stability' with robustness "[describing] a systems tolerance for uncertainty, allowing for degrees of movement variability.'
I want to build robustness.
This week I stopped by Metier to film a few videos with Chris Johnson and we thought many people would find it valuable to have a series of 3 easy to use drills that can be done throughout the day to work on scapular robustness and endurance of the muscles of the shoulder girdle.
If you are interested in getting one of the mini bands we use in the video, you can find that HERE.

Wall Slides for Pain-Free Pressing


Experiencing shoulder pain during overhead pressing? Use a foam roller and this simple warm-up to fix it.

Wall-slides-for-pain-free-pressing

The Foam Roller Wall Slide

Oftentimes, shoulder pain with overhead pressing is due to limited thoracic extension and improper scapular mechanics. If the thoracic spine doesn't extend enough and the shoulder blades don't rotate efficiently, this can be a recipe for a shoulder injury.
To perform the slide, stand at a wall with your arms on the foam roller. Brace your core to prevent spinal extension, then lean into the roller as you slowly slide it up the wall. At the top, while keeping your chin tucked, slowly press your head underneath the roller to achieve maximal thoracic extension and shoulder flexion.
By pushing your arms into the wall, you can really light up your scapular muscles and groove pain-free overhead motion. Do this for 10 reps, prior to your overhead pressing.
Remember, safe overhead pressing requires the coordinated action of three scapular muscles – the lower trapezius, the upper trapezius, and the serratus anterior. Fortunately, the foam roller wall slide nails all three.

Experiencing

Fix Your Overhead Squat


Most people can't even do one because of shoulder mobility issues. Here's how to fix them.

Fix-your-overhead-squat
The overhead squat is one of the most challenging exercises for the entire shoulder complex. Unfortunately, many people are unable to perform it correctly due to the high mobility demands. Here's one exercise to fix this.

The Band-Assisted Prone PVC Liftoff

One of the main limitations to performing an overhead squat is end range shoulder flexion. If you can't get your arms fully overhead, you won't be loading it anytime soon! While working on mobility in the standing position can be okay, many lifters compensate by excessively arching their backs. To truly work on shoulder mobility, try the banded-assisted prone PVC liftoff.
  1. To perform the liftoff, attach a light band to the top of a squat rack. Put a small PVC inside the band and hold it as you lie down on your stomach.
  2. Reach your hands overhead and, with the assistance of the band, reach your arms towards the ceiling.
This drill is perfect for those who have poor shoulder flexion mobility. The assistance of the band will help pull you into the correct overhead squat position. Do this for 10-15 reps prior to your overhead squat session because it's important to load after your mobility work to groove the new pattern.

COMMON MISTAKES WITH SHOULDER ASSESSMENT


SHARE THIS:   
Assessment in the health and fitness setting can be tricky, and rife with numerous (common) mistakes some fitness professionals make.
This is especially true when we start talking shoulders.
Mistake #1: the shoulder isn’t just the shoulder. 
As in: it’s not just one “thing.” We’re actually referring to a shoulder “complex” that’s, well, complex.
The “shoulder” is comprised of four separate articulations (glenohumeral joint, sternoclavicular joint, acromioclavicular joint, as well as the scapulothoracic joint), all playing nicey-nice together in order to perform a wide array of movement(s).
All deserve their time under the assessment microscope.
Mistake #2: However, while all areas are important, I do find that assessing and addressing scapular function/positioning is often the key to unlocking answers. Unfortunately, it’s often the area that’s least looked at with regards to shoulder pain/dysfunction.
Mistake #3: shoulder assessment can – and should be – attacked from a few different perspectives.
Far too often, I find, fitness professionals take a static view of what’s going on and that’s it. They’ll have an individual stand there in the middle of a room, utter a few “mmm’s and ahhh’s,” write a few fancy schmancy words like “internally rotated,” “kyphotic,” or “I have my work cut out for me,” and that’s that.
Assessment complete.
Lets go squat!
When in fact, shoulder assessment should be broken down into a few disparate – but not altogether separate – components: Static AssessmentIntegrative Assessment, and Dynamic Assessment.
Not to mention one’s ability to fill in a smedium t-shirt. Very important.
All three provide pertinent information that will help better ascertain the appropriate plan of attack when it comes to movement dysfunction, pain, and/or improved performance within the shoulder complex.

I Got 99 (Shoulder) Problems and….

…..My scapulae are the reason for all of them.
Sorry, I’m no Jay-Z. And I know I just butchered one of his classic hits.
But it was the only way I could think of to best articulate my point.
The scapulae (shoulder blades) are kind of a big deal when we begin to discuss shoulder health. It’s an arbitrary number I’m throwing out there with no research to back it up – so please, don’t quote me1  – but 90-95% of the “shoulder” issues I’ve helped address in the past when I was a coach at Cressey Sports Performance as well as the present (now that I am on my own), can be correlated back to scapular positioning and function.

Static Assessment

  • The scapulae should be in slight upward rotation. As you can see in the picture above, this individual is in slight downward rotation statically (both inferior medial borders (the two bottom x’s) of the scapulae are inside the superior medial borders.
  • Both scapulae should rest between T2-T7. The top middle “x” is T2 and you can see this person is below that point and in slight shoulder depression.
  • The medial borders themselves should rest between 1-3 inches from the spine.
If we only used static assessment it would be easy to assume this person is f****d. Many fitness pros would see this, hyperventilate into a brown paper bag, and immediately go into corrective mode.
But as Mike Reinold has poignantly noted time and time again:
“Statically, everyone’s shoulder blades start in a different position (elevated vs. depressed, internally rotated vs. externally rotated, abducted vs. adducted, anteriorly titled vs. posteriorly tilted, Autobots vs. Decepticons), and it’s moot to take static posture at face value.”
Besides, the above picture is of me, and when this was filmed/taken I presented with zero shoulder pain. This isn’t to imply I don’t have anything to work on, but it does showcase that static posture alone isn’t going to tell you all you need to know.

Integrative Assessment

Once we start adding movement – looking at scapulohumeral rhythm (the interplay between humerus and shoulder blade) or one’s ability to elevate arms above their head – sometimes, people self-correct really well.
What presents as “bad, “faulty,” or “shitty (<— depending on your rating system) statically, may very well be passable or very good once you add movement.
When looking at shoulder elevation/flexion, for example, does the scapula posteriorly tilt, upwardly rotate sufficiently (generally looking at 55-60 degrees of upward rotation), and does the inferior angle wrap around the thorax to the midline of the body?
This is something that can’t be determined if you’re only looking at static posture.

Dynamic Assessment

This is basically the part of the assessment where I ask the person to do stuff. Rather than boring someone to tears poking and prodding for an hour and making him or her feel like a patient, I prefer to get them moving and have them demonstrate certain exercises.
The push-up tells me a lot. Not only does it give me insight on their ability to move their scapulae (many times they’re “stuck” in adduction), but it also provides details on their lumbo-pelvic-hip control.
Because, something like this makes my corneas want to jump into a pool of acid:

Note: I understand the point of the video above was to purposely showcase a bad push-up. Mission accomplished.
More importantly, if someone comes to me with pain present, having them demonstrate how they perform certain exercises provides unparalleled understanding of what needs to be fixed.
A common theme I see amongst many trainees is allowing their shoulders to roll forward during execution of given exercises.
A Brief Review: when we elevate our arms above our heads the shoulder blades posteriorly tilt (hug the rib cage) and upwardly rotate. Reversing the action calls for scapular anterior tilt and downward rotation.
Many people “feed” into excessive downward rotation/anterior tilt by allowing the shoulders roll forward during common exercises like rows, push-ups, curls, and tricep press downs.

Stop It


I Said, Stop It!


The “fix” here is easy:
Me to Client: “Okay, show me how you’d perform a standing cable row and tricep press down.”
Client: “Um, okay.”
[Then proceeds to emulate technique from the videos above.]
“Yeah, that hurts.”
Me to Client: “Stop doing them that way.”
[Puts client in a better position…shoulders rolled back with posterior tilt.]
Client to Me: “Wow, that feels so much better. You’re so smart and attractive.”

That’s Not All

What’s described above is in no way an exhaustive approach to shoulder assessment, but I hope it at least opened your eyes to the notion that it’s more multi-faceted than many give it credit for.
And on that note, I’d be remiss not to point people in the direction of guys like Eric Cressey, Mike Reinold, and Dr. Evan Osar.
Functional Stability Training – Upper Body is an excellent resource for more insight on shoulder assessment and corrective exercise.
Likewise, Dr. Osar’s Integrative Corrective Exercise Approach is an excellent resource.
And, pimping myself up a little bit, I cover the above and many other shoulder related topics in mine and Dean Somerset’s Complete Hip & Shoulder Workshop coming to the Toronto area in a few weeks (1 week left to take advantage of the Early Bird Special), Seattle, and two stops in Europe in May.

понедельник, 24 июля 2017 г.

Присед со штангой над головой

⚡ Присед со штангой над головой ⚡
5 причин по котором вы все еще пытаетесь добиться успеха.

Умение превосходно, контролируемо, глубоко выполнять присед со штангой над головой достойно восхищения. Некоторые люди действительно одарены хорошим седом от природы, они даже на корточках красиво сидят. Эти счастливчики могут овладеть техническим аспектом этого упражнения чрезвычайно быстро и относительно легко, поймав равновесие и наслаждаясь процессом. Но, с другой стороны, существует огромное количество людей, которые по-настоящему борются с этим движением. Прежде чем начать изучать это движение, запомните, что усердная работа может победить талант!
Давайте разберемся с 5-ю вещами, которые могут служить причиной, по которой вы все еще боретесь с приседаниями со штангой над головой.

1. Еще раз: чтобы достичь успеха, нужно больше трудиться.
Планка, гуд монинги, махи гирей, тяги- все это, без сомнений, поможет вам в достижении цели. Но не забывайте про приседания со штангой на спине и фронтальные приседания, они научат вас держать равновесие в нижней точке.

2. Отсутствие контроля и стабилизации.
Люди постоянно сосредотачивают свое внимание на весе снаряда, вместо того, чтобы уделить больше внимания технике выполнения упражнения и контролю над собственным телом.
Когда вы начинаете работать с весом (даже если это пустой гриф), ваш центр тяжести изменяется. Вы держите дополнительный объект у себя над
Некоторые люди действительно одарены хорошим седом от природы, они даже на корточках красиво сидят
головой и вы должны стабилизировать свое тело вместе с грузом. Сосредоточьтесь на том, чтобы «срастись» с отягощением и поймать баланс.
Положите штангу себе на плечи и стабилизируйте свое тело. Теперь выведите ее в положение над головой и стабилизируйтесь снова. Поймайте баланс, найдите точку, в которой чувствуете себя уверенно, имеете контроль над весом штанги и собственным телом. Затем уменьшите вес снаряда и сделайте присед со штангой.
Не забывайте дополнительно работать над умением держать баланс.

3. Вы не достаточно сконцентрированы.
Вы должны сосредоточиться, абстрагироваться от всего, что происходит вокруг. Успокойтесь, сосредоточьтесь на поиске баланса и на овладении контролем над снарядом. Вы настолько сконцентрированы, что не слышите и не видите людей вокруг себя. Главная проблема, которую я вижу у людей, пытающихся овладеть приседом со штангой над головой- это не умение сосредоточиться.
Оверхэд приседание- это поиск баланса, вы должны почувствовать его. Почувствуйте движение, найдите баланс, прислушивайтесь к своему телу, обращайте внимание на его сигналы.

4. Плохая фиксация штанги в положении «над головой»
Вы уже знаете, что должны держать локти выключенными, плечи активными , а корпус вертикально. Но вес, удерживаемый вами, заставляет включиться в работу все тело .

5. Гибкость играет важную роль.
Не думаю, что заявление: «Я не достаточно гибок» является оправданием плохих оверхэдов. Напротив, присед со штангой над головой- хорошее упражнение, помогающее достичь надлежащей гибкости. Многие из нас часами сидят за компьютером, а в результате область верхней части спины и плечи затянуты, подвздошно-поясничная мышца постоянно сокращена, что уменьшает подвижность бедер. Тратьте немного больше времени на развитие гибкости своего тела. Возможно, это не поможет вам поднять больший вес, но совершенно точно будет способствовать сохранению здоровья и подвижности.

воскресенье, 23 июля 2017 г.

Болит плечо. Что делать?


Уверен, что наши читатели серьезно занимаются железом, с удовольствием подвергая организм различным нагрузкам в стремлении стать больше, сильнее, быстрее.

Каждое растяжение, каждая микротравма требует специфических изменений в тренировочном процессе, или, что еще хуже, перерыва. Но ничто так пагубно не влияет на тренировочный процесс, как боли из-за травм плеча.

Плечо, а точнее плечевой пояс, очень сложно устроенная часть нашего организма. Это не один сустав, как многие думают, этот целый комплекс суставов, состоящий из плечевого сустава, акромиально-ключичного сустава, грудинно-ключичного сустава, некоторые ученые также выделяют лопаточно-грудной сустав (который по сути своей суставом не является).

Более того, к одной только лопатке на разных ее участках крепится 17 мышц! В общем, плечевой пояс крайне сложно устроен.

Разумеется, каждый случай индивидуален, важно отметить, что существует множество причин болезненности. Но тем не менее в 95% случаев это явление оказывается следствием этих причин:

- чрезмерная нагрузка
- плохо составленная программа тренировок
- 3й тип акромиона
- плохая подвижность грудного отдела позвоночника
- неоптимальное положение лопаток
- слабо развитые мышцы плеча и капсула плечевогосустава

Чрезмерная нагрузка.​

Есть две вещи, от которых мне хочется повеситься. Первое – когда моя девушка, посмотрев романтический фильм, говорит мне о том, что нам стоит обсудить наши отношения. Второе – когда кто-то приходит в наш зал впервые, жалуется на боли в плече, а через 10 минут спрашивает, как я думаю, когда он сможет опять делать толчок и рывок.

Тягать железо, когда у тебя что-то болит, - плохая идея. Следует соблюдать простой принцип – «Если болит, не делай». Так что никакого конца света, если Вы несколько недель не поделаете жим или толчок, не случится. Даже и не думайте об этом.

Плохо сбалансированная тренировочная программа.​

Задумайтесь, что составляет основу тренировок верхней части тела у среднестатистического парня. Как правило,это 100500 вариаций жима лежа, и, если всё не так запущено, тяга вертикального блока.

Я помню, как просматривал программы своих клиентов, пришедших ко мне от другого тренера, и отметил, что у одного из них в дни, посвященный верхней части тела, включали всебя 16 сетов, по сути заключающихся во вращении плеча внутрь, но не было никаких вращений наружу и отведений. Более того, этот человек в жиме лежа мог поднять вес, в два раза больший собственного, несколько раз, но не мог подтянуться ни разу!

Естественно его плечи были убиты напрочь.

Как правило, при работе с проблемами с плечом мы берем соотношение тяги и жима 2:1 или даже 3:1. То есть на каждое упражнение с жимом (жим лежа, жим гантелей вверх в положении стоя и т.п.), человек выполняет 2-3 упражнения, где ему приходиться тянуть (тяга на низком блоке, тяга блока в положении стоя и т.п.)

В каком-то смысле такая несбалансированная структура тренировок внедряется для того, чтобы уравновесить тело, этот баланс потерявшее.

Давайте также рассмотрим сравнение жима лежа и подтягиваний (максимально три раза).

Буду использовать в качестве примера себя самого. Мой лучший жим лежа – 143 кг. Максимальный вес, с которым я могу подтянуться три раза – 136,5кг (вес тела + дополнительная нагрузка). И наверное не случайно, что за всю мою карьеру проблем с плечами у меня практически не было.

Хотя конечно мой конкретный случай и это соотношение (грубо говоря, один к одному) сами по себе ничего не значат, но я наблюдал аналогичный эффект у знакомых спортсменов и моих клиентов, которые стараються держать результаты жима лежа и подтягиваний близко.

Хотите здоровые плечи? Подтягивайтесь! А также включите в тренировочную программу упражнения с движениями аналогичными гребле.

3й тип акромиона.​

Это несомненно тот случай, когда мы ничего не можем проконтролировать. Вы родились с одним из трех типов вариаций плечевого сустава – тип 1, 2 или 3.

Тип акромиона равномерно распределяется в человеческой популяции – каждого типа примерно по 33%, и этот самый тип определяет сколько пространства для капсулы плечевого сустава у нас есть во время таких упражнений, как жим от плеч в положении стоя и другие.

Люди с 1 типом акромиона – поздравляю! Вы выбралиправильных родителей и можете весьма преуспеть в таких упражнениях как жим лежа, жим от плеч стоя, вертикальная тяга, отжимания на брусьях, в общем всё, что душа пожелает. З.Ы. – я Вас ненавижу.

Люди со вторым, а тем более третьим типом акромиона не настолько удачливы. Делая слишком много сетов неправильно подобранных упражнений, Вы ставите под угрозу нормальную работу плечевого сустава.

Поскольку единственным вариантом является хирургическая операция по укорочению акромиона (хотя этоуже конечно крайность), Вам лучше было бы отказаться от упражнений, уменьшающих подакромиальное пространство.

Начните с отказа от жима лежа. Жим лежа с прямым грифом способствует более амплитудному вращению внутрь, в результате чего уменьшается пространство под акромионом. Поэтому первый шаг – перейти на жим гантелей в различных вариациях.

Использовать жим лежа с гантелями обычным хватом следует также потому, что он дает бОльшую наружную ротацию и увеличивает пространство, тем самым давая возможность мышцам-вращателям плеча (которые в комбинации как раз-таки и образуют капсулу плечевого сустава) скользить более свободно.

Еще одним прекрасным вариантом являются отжимания с дополнительной нагрузкой. Они принесут много пользы и гораздо более дружелюбны по отношению к плечевому поясу по сравнению с жимом лежа.

Также я предостерегаю Вас от приседания с штангой с прямым грифом. Как и жим лежа, присед входит в «группу риска» по отношению к плечевому суставу. Впрочем этот упражнение легко заменить приседанием со штангой на груди или взять не прямой гриф, а гриф, специально предназначенный для приседаний.

Пониженная подвижность грудного отдела позвоночника.​

Для многих этот раздел может послужить отправной точкой в решении проблем, связанных с плечом.

Чтобы доказать свою точку зрения, давайте начнем снебольшой игры. Встаньте и «скруглите» верхнюю часть спины, а затем попытайтесь поднять руки – ладони должны быть обращены друг к другу, прямо над Вашей головой, для начала расположите руки перед собой, а потом попытайтесь как бы дотянуться до потолка.

Скорее всего, у Вас не очень хорошо это получится. И даже если Вам это удалось, скорее всего Вы достигли этого засчет дополнительного сгибания рук и выгибания поясничного отдела позвоночника.

Теперь выпрямитесь и постарайтесь принять наиболее оптимальное положение позвоночника, а затем повторите действия – попытайтесь дотянуться руками до потолка. Намного проще, не так ли?

В предыдущем случае, когда позвоночник был в согнутом состоянии, механика плеча нарушена, что может приводить к травмам, а также к более переднему положению лопатки («крылатая» лопатка), что может иметь различные негативные последствия в будущем.

Во втором случае, когда позвоночник был в более естественной позиции, лопатка больше «прислонена» к ребрам и опущена, что позволяет плечевому суставу функционировать без помех, что в итоге приводит к уменьшению травматичности при выполнении различных упражнений.

Когда у человека снижена подвижность грудного отдела позвоночника, например из-за чересчур сгорбленной осанки, такие вещи, как жим штанги от плечей в положении стоя, будут довольно проблематичными.

Я не имею ничего против этого упражнения, но учитывая тот факт, что многие люди делают его недостаточно правильно и качественно, то лучше вообще не рисковать.

К счастью,есть простые упражнения, которые помогут решить проблему:

Автор - Tony Gentilcore
Перевод - Цацулин Борис.

The Z Press: Advanced Overhead Pressing


The-z-press

Here's what you need to know...

  1. The Z Press is a press performed sitting flat on the floor.
  2. It requires trunk strength, hip flexor mobility, hamstring flexibility, and lumbar and thoracic spine health.
  3. If you expect to start out with 225 pounds, you'll be set straight real quick.
You see the headline all the time: "The best exercise you're not doing." Then it turns out to be a movement like overhead squats, Turkish getups, or another movement that you're actually quite familiar with.
The Z Press is a different animal, and it is an exercise that you should be doing.

The Benefits

Whereas a standing press allows the legs to stabilize the trunk, especially via a wider base, the Z press is performed sitting flat on the floor.
The knees are to be kept straight, and a slouch is strictly prohibited. If you try holding that position without any weight on the floor, you'll get an idea how uncomfortable and just plain hard it is to simply maintain the position.
In short, you'll need a whole lot of trunk strength, hip flexor mobility, hamstring flexibility, and lumbar and thoracic spine health to perform these bad boys well. And if you don't have every one of those things in check, the lift will suffer.
Remember, you have absolutely nothing to lean back against, and you have nothing to drive into since your feet aren't planted on the ground. That makes it one of those "no cheating" exercises similar to the guillotine press. Below you'll see me doing them with 165 pounds. Note that the emphasis is still on getting the head and chest "through the window" rather than overarching to compensate. Staying tall is key.

Proper Form

  • Maintain an upright posture. Don't slouch.
  • Attempt to sit on your hamstrings to make the low back stay tight.
  • Perform the movement like a standard overhead press in terms of bar path. Press the bar over the spine.
  • Keep the heels and backs of the knees glued to the floor. Try not to move them.

Improper Form

  • Don't attempt to sit on your butt. It'll translate to a round back and an injurious pressing position.
  • Don't lean back during tough reps. If you can't stay straight as an arrow, your set is done.
  • Don't start with the barbell on the floor. I once made the mistake of "cleaning" the bar from the floor while sitting on my butt, and I strained my rhomboids so badly I needed my chiro to take a jackhammer to them for the next few days. Set up the pins in the squat cage a couple of inches below shoulder level.

Modifications

This movement isn't easy. And just like any big movement, you'll fare poorly if you have mobility or flexibility restrictions. The most common area of weakness I've seen come from hip flexor mobility restrictions. Basically, the low back can't maintain its stiffness from a seated position with straight legs due to the aggressive hip flexion taking place.
There are two ways to overcome this. First, widen your foot position – open the legs further apart – and make room for the hips. This will usually place the femur in a better place in the acetabular socket.
If that doesn't work, the second alternative would be to simply reduce the degree of hip flexion. Place a step platform under your butt so you've got a slight elevation. Even a couple of inches can make a huge difference in having a desirable start and finish position.
A lack of trunk stability can also be the reason for a lowered strength output, especially when compared to your standing press. (If you can't Z press half of your standing press, you're in trouble). For that reason, I recommend keeping the load light and going unilateral in order to make the trunk muscles do more work to resist forces and keep the body straight. Here's coach Todd Bumgardner doing them:
You'll also notice that Todd possesses the ability to keep a narrow foot position, which makes a smaller base and requires more oblique activity. Above all, I like using dumbbells for the same reason I use them to bench press or shoulder press – you can modify the hand grip and elbow position. Switching to a neutral grip with a tucked elbow can act as a shoulder-saver since the head of the humerus gets to roll back.
If you're a guy with shoulder issues and joint discomfort, this modification is for you. Feel free to use a pair of dumbbells for a bilateral version, too.

Putting it Together

The Z Press doesn't need to take the place of regular pressing entirely. There are important components of having a floor drive and planted feet that the Z Press can't offer, and that's why you can lift more weight standing up. However, the Z press can be used as a tool to train for strength and mobility, along with overall health of your muscles and joints.
I like starting or finishing a press workout with Z Presses, but remember to stretch out those hips if you plan to move on to a hip-dominant movement like a back squat, leg raise, or leg press afterwards.

Hard As Hell

The Z Press is one of my favourite exercises because it's hard as hell and it has too many benefits to be overlooked. It's not always about lifting as much as you can "beast up" with poor form, and that's especially true with the Z Press.
Let the grinders have their place, but focus just as much on quality of movement. Having good quality movement starts with knowing how to move. If you can't do that, you'll fail miserably at this exercise.
If you expect to go into this moving 225 for reps, you'll be humbled quickly. It all comes down to whether or not you want to have a new window into your body's ability to move well and be mobile and strong, or whether you want to naively keep telling yourself you've got it all together. If you were waiting for a sign that you need to change it up, the Z Press is probably it.

четверг, 20 июля 2017 г.

MEDICAL MASSAGE vs SPORTS INJURY


In every issue of our journal you will find Case of the Month which we will select among submitted ones. Everyone who is using Medical Massage protocols in their practice may submit their cases for the review and we will share with our readers the best one in every new issue.
If you would like to share with our readers your account of professional success and participate in Case of the Month program click here.
This case of the month is submitted by Cory Fairchild, LMT. Cory specializes in sports massage, preparing young gymnasts for optimal performance. His submission illustrates the important point that differentiates sports massage from medical massage. Unfortunately, this issue is frequently misunderstood. Many times we read articles or Internet posts in which authors treat shoulder injuries or knee injuries with sports massage.
Sports massage is used to enhance training and athletic performance but only when the athlete or sports enthusiast is free from the injury. When an athlete is injured, a massage practitioner should switch gears and move to a completely different approach using the appropriate protocol of medical massage. For example: The rotator cuff damaged during a tennis game is similar to the rotator cuff injury of construction worker.
Cory shares a similar vision, and he is equipped with the understanding and the professional knowledge necessary to assist athletes in any possible way they need.
Dr. Ross Turchaninov, Editor in Chief

MEDICAL MASSAGE vs SPORTS INJURY

by Cory Fairchild, LMT

This case study deals specifically with the proper evaluation of an incident of shoulder pain in the sport of Men’s Artistic Gymnastics. The client athletes are 17- and 18-year-old gymnasts of the USA Gymnastics Junior Olympic and/or Junior Elite divisions. While not all of the athletes are JR. National Team members, it is important to note that their general physical preparation (GPP) is close enough to be considered a constant with the primary difference being the rate of progression through their conditioning. Technical skill varies, however, as it is not due to a difference in GPP, it is considered irrelevant to this study.
The athletes’ GPP consists of physical conditioning and mobility (defined as exercises that promote structural balance, joint integrity, or the ability of a muscle to express strength through its full of range of motion). The combination of GPP and technical training constitutes in excess of twenty-four to twenty-six hours per week. It is important for the purposes of this case study to note that general physical preparation is geared towards maximal contraction in muscles rather than muscular fatigue. In addition to their gymnastics training, each week the athletes receive a minimum of one full-body massage according to Russian Sport Massage protocols, with supplemental massage available on the third training day after.
To properly understand this case study, it is also necessary to address the relevant anatomy as relating to Men’s Artistic Gymnastics. While gymnastics as a necessity relies on the whole body to produce both isotonic and isometric contractions, the rings apparatus is unique in that the ability of an athlete to progress static holds depends entirely on the strength of the biceps brachii and brachialis tendons to keep the elbow locked and allow leverage from a fully straightened arm. As tendons heal at roughly 1/10th the rate of muscle tissue, great emphasis and care is placed on this particular structure. An improperly developed tendon will prevent an athlete from expressing the body shape needed for static strength elements on the rings apparatus. Inversely, strong tendons can at times bear additional load while an athlete is developing proper body shape on advanced static elements such as a Maltese cross (e.g., athlete cannot produce sufficient scapular protraction). Fig. 1 illustrates the anatomy of biceps brachii and brachialis muscles. Note the insertion point of the biceps brachii and brachialis in relation to the elbow joint.

Fig. 1. Anatomy of the biceps brachii and brachialis muscles
Fig. 1. Anatomy of the biceps brachii and brachialis muscles

Fig. 2 illustrates one of our athletes doing the Iron Cross. Clearly visible is the amount of stress elicited on the entire upper body, especially at the insertion of the biceps brachii and the brachialis muscles (depicted by the red arrow).

Fig. 2. Iron Cross on the rings
Fig. 2. Iron Cross on the rings


Client Complaints and Evaluation


The athlete experienced anterior shoulder pain during practice. Examination revealed that the pain was specifically at the attachment of the short head of biceps brachii and the coracobrachialis on the coracoid process. In addition, the athlete experienced restricted range of motion when putting the arm into internal rotation. At that time, the athlete was administered efflourage and PIR stretching and scheduled for specific treatment sessions. During the first specific treatment session, the athlete was evaluated for Musculocutaneous Nerve Neuralgia (MCN). This evaluation was chosen for two reasons: first, as the athlete had recently increased their ring-strength work and therefore involvement with the biceps brachii, brachialis, and coracobrachialis would be highly suspect. Secondly, upon prompting for a description of all related problems with the shoulder and arm, the athlete recalled experiencing forearm pain that matched the chart for C6 dermatomes. The tissue evaluation yielded tension in the pec minor, trigger points in the coracobrachialis, brachialis, and biceps brachia muscles, as well as hyperalgesia in the aforementioned dermatomes.

Treatment


Treatment was administered over the course of three specific sessions. The protocol for MCN was used from the Medical Massage Textbook (p.298) with regards to cutaneous reflex zones, Pectoralis Minor Muscle Syndrome inclusion, trigger point therapy, and Postisometric Muscular Relaxation (PIR). The most dramatic relief came from the initial session, with the two follow-up sessions reinforcing the elimination of the reflex zones.
The athlete was able to continue training without interruption during the period of specific treatments and reported a cessation of pain by the end of the last treatment.

среда, 19 июля 2017 г.

93% ЖЕНЩИН ОКАЗАЛИСЬ НЕ В КУРСЕ! А ВЕДЬ МОМЕНТ ИСТИНЫ НАСТАНЕТ ДЛЯ ВСЕХ


Не знаем, поможет ли продолжение статьи развеять мифы или только подольет масла в огонь про слабое женское “дно”, но призываю вас очень внимательно ее прочесть. Есть над чем задуматься, потому что я попала как раз в те 93% женского населения, которое ничего об этом не знает.
Татьяне вежливо и не очень указывали, что она ничего не понимает в женских тренировках; одобряет тех, кто толстеет на диване; запугивает почем зря спортивных девушек, хотя никакого вреда для здоровья женщин в грамотной работе с весом нет…
Поэтому Татьяна написала продолжение 
«Чтобы не казалось, что я всё выдумываю относительно тяжестей и дисфункции тазового дна у женщин, я снабдила текст ссылками на PubMed — это одна из самых больших в мире баз данных медицинских исследований.
Не уверена, что это защитит меня от дальнейших нападок, но здравомыслящим людям будет интересно.
ПРО ЖЕНСКИЕ ТРЕНИРОВКИ
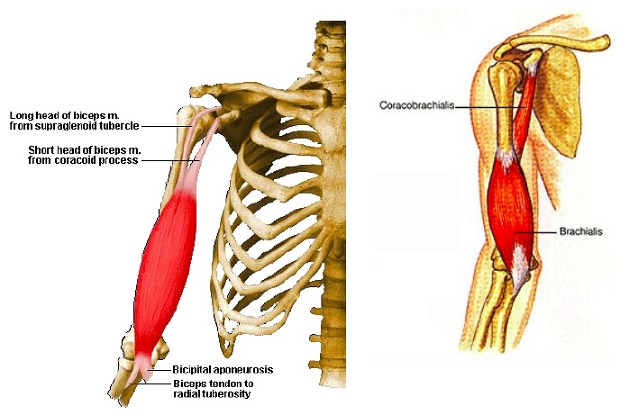
Выражение «слабый пол» появилось не потому, что женщина не способна носить тяжести, а в связи с тем, какие за этим следуют проблемы. Только с точки зрения анатомии нас правильнее было бы называть не слабый пол, а «слабое дно». Тазовое дно. У женщин в тазовой диафрагме есть расширение вокруг шейки матки (см.иллюстрацию). То есть мочевой пузырь, матка, яичники НЕ имеют мышечной поддержки снизу. В то время как у мужчин там плотное соединение мышц с фасцией, что логично: шейки матки и продолжения в виде влагалища у них нет.
1eu2ouysnwm

За то, чтобы органы находились на своих местах и нормально функционировали, отвечает не только этот мышечный гамак, но и связки. С их помощью матка, трубы, яичники и прочий ассортимент крепятся к костям таза.
Чтобы понять разницу между свойствами мышц и связок, представьте себе надувной шарик и полиэтиленовый пакет: один эластичный, может растягиваться и сокращаться, другой — только растягиваться.
Поэтому стоит иметь в виду, что упражнения Кегеля и другие системы укрепления интимных мышц воздействуют именно на мышцы. Связкам они не способны вернуть первоначальную длину и силу.
Как только вышеуказанная поддерживающая конструкция теряет свою упругость, начинается процесс опущения внутренних органов, или пролапс.
Это вообще не смертельно и даже не болезнь, но способно отравить жизнь. Возникают боли в нижней части спины, ноет живот или там появляется чувство тяжести; сложнее достичь оргазма, более того — женщины могут испытывать боль во время секса.
Кстати, попадающий во влагалище воздух в процессе близости или упражнений — один из признаков начавшегося ослабления мышц тазового дна (если это происходит не только во время овуляции, но и на протяжении всего цикла). Нарушается цикл, возникают сложности с тем, чтобы забеременеть…
Постепенно из-за смещенных органов начинается недержание мочи, стоит только чихнуть или покашлять. Еще из неприятностей — газы в кишечнике и вероятность не удержать это в себе не в самый подходящий момент. И наоборот, мучают запоры… Потом что-то настойчиво мешается во влагалище, а на последних стадиях пролапса влагалище и вовсе выпадает полностью.
Кстати, говорить об этом не принято. По одной из ссылок, указанных ниже, можно найти статью, в которой признается, что женское здоровье, весь этот дискомфорт — это «культура замалчивания»…
Почему происходит опущение? Я думаю, все началось, когда человек в ходе эволюции встал на две ноги. Млекопитающие ходят на четырех конечностях, и нагрузка на тазовое дно у них распределяется иначе, чем у homo sapiens.
В медицинской же литературе называются следующие факторы:
-врожденная дисплазия соединительной ткани. Под подозрение попадают люди с растяжками на коже, варикозным расширением вен, склонностью к образованию синяков, диастазом прямой мышцы живота, а также пупочной грыжей, гипермобильностью суставов.
-пол. Из анатомической справки выше нам известно, что у женщин тазовая диафрагма ослаблена в передней части. Поэтому процент пролапса у нас выше, чем у мужчин.
-беременность и роды. Это опять про женщин и тут чистая физика: одно дело держать маленькую матку, совсем другое — к девятому месяцу справляться с весом малыша, околоплодных вод, плаценты… В родах, чтобы шейка матки открылась, мышцы должны растянуться еще сильнее.
-ожирение. Лишний вес — это не только жир под кожей, но и вокруг внутренних органов, так называемый висцеральный. Это тоже лишняя тяжесть для тазового дна, и хотя бы поэтому важно следить за весом.
-малоподвижный образ жизни. Тканям не хватает питания, и они ослабевают.
-эстрогенная недостаточность. Возникает, например, в результате «бешеной сушки» или в период менопаузы. Без достаточного количества эстрогенов ткани нашего тела теряют эластичность. По данным различных исследований, в пожилом возрасте частота пролапса гениталий у женщин возникает в 50-75% случаев.
-систематическое повышение внутрибрюшного давления. Причиной его может быть и хронический запор, и кашель в результате бронхита или астмы, и регулярный физический стресс от тяжелой работы, и подъем тяжестей.
Про внутрибрюшное давление подробнее.
Мы так устроены, что неважно, взваливаем на себя мешок в картошкой или делаем становую тягу, — оно повышается. Систематическая работа с большим весом медленно, но верно выдавливает мышцы тазового дна и растягивает связки, на которых крепятся органы.
О вкладе тяжестей в возникновение пролапса говорится, во многих медицинских обзорах, вот для примера эта статья http://www.ncbi.nlm.nih.gov/pubmed/20433127

Ношение подрастающих детей на руках тоже создает риски пролапса. В исследовании «The effects of walking speeds and carrying techniques on intra-abdominal pressure in women» (Coleman TJ,Hamad NM,Shaw JM,Egger и прочие) женщинам внутривагинально устанавливались датчики. Приборы зафиксировали, что скорость ходьбы и ношение малыша на руках вносит значительные изменения во внутрибрюшное давление.
Только не спрашивайте меня «И что же, теперь не поднимать детей?» — это не ко мне вопрос, а к Творцу: он поставил нас на две ноги, выдал нам слабую диафрагму, организовал роды и детей, которых мы, в отличие от млекопитающих, носим на руках, — где справедливость?
И есть ли безопасный для женского здоровья вес?
Я задала этот вопрос американскому физиотерапевту Линн Шульте, которая занимается в том числе реабилитацией тазового дна после родов. По её мнению, в идеале женщине достаточно работать с собственным весом, избегая гантелей и штанги вообще.
Автора другой версии, про то, что это не более 5 кг (+/- , в зависимости от индивидуальных особенностей женщины), не подскажу, выяснить не удалось. Но этот взгляд основан на том, что мышцы тазового дна способны выдержать во время беременности вес растущего ребенка, околоплодных вод, плаценты, то есть в районе 5 кг.
Данные одного из исследований говорят, что существенное влияние на состояние мышц тазового дна оказывает вес от 10 кг: http://www.ncbi.nlm.nih.gov/pubmed/19384125
А в другом анализе у женщин детородного возраста, чья работа связана с ношением тяжестей от 20 кг, обнаружено опущение шейки матки по сравнению с контрольной группой легкой нагрузки.
«Расшатывают» тазовое дно у женщин не только тяжести и качание пресса, но и виды физической нагрузки, где приходится бегать и прыгать. Так называемая высокая отдача упоминается в статье link.springer.com/article/10.2165/00007256-200434070-.. , посвященной молодым нерожавшим спортсменкам. Согласно статистике, в зависимости от вида нагрузки — баскетбол, легкая атлетика и т.д., девушки страдают в той или иной степени недержанием мочи. Причем, у тех, кто играет в гольф, такой проблемы нет вообще, а вот у тех, кто занимается прыжками на батуте, она зашкаливает — до 80%.
Эта информация раздражает: вдруг выяснить, что собственноручно прокладываешь тропинку для дисфункция _тазового_дна, когда думала, что ведешь здоровый_образ_жизни и вызываешь восхищение спортивными формами… В качестве защитной реакции мне приводят в пример знакомых девушек, которые работают в зале с весом, и у них все в порядке. Верю! Только опущение внутренних органов — не моментальный процесс, вероятность и скорость его появления зависит от сочетания нескольких факторов: генетическая прочность соединительной ткани, количество беременностей, родов и травм в них, нагрузка, которая приходится на организм…
Моментом истины станет менопауза, когда ресурсы нашего тела уменьшаются. В одном из многочисленных исследований проблемы (http://www.ncbi.nlm.nih.gov/pubmed/20607975) упоминается, что распространенность опущения женских органов в будущем будет еще выше в связи с увеличением продолжительности жизни женщин.
Что делать с этой информацией — каждая из нас решит для себя сама. Когда на одной чаше весов современные стандарты красоты, на другой — женское_здоровье и комфортная старость, важно сделать информированный выбор.
Кстати, про это тоже есть исследования: молодых нерожавших женщин попросили оценить их знания относительно тазового дна. В общей сложности 93% женщин оказались не в курсе устройства собственного тела и рисков развития пролапса гениталий ( https://www.ncbi.nlm.nih.gov/m/pubmed/27313364/?i=1.. ). Поэтому в наших интересах не брезговать информацией.