пятница, 31 июля 2015 г.

DEVELOPING SPEED IN THE SNATCH AND CLEAN & JERK

http://boxlifemagazine.com/training/developing-speed-in-the-snatch-and-clean-jerk


If you’ve ever watched online videos of experienced Oly lifters you may have been amazed at how fast and explosive many of them look. It’s impressive, it’s as if you blink you’ll miss something. From experience, I can tell you that top coaches will develop quickness in their lifters. That speed is something everyone should strive to obtain. But what makes a lift look fast isn’t just how quickly the athlete propels the bar from their legs but rather how quickly they receive the barbell. It’s that ability to get under it with control that makes it all so mesmerizing. Here we’ll focus on three ways to develop speed in the snatch and clean and jerk: drill work, eccentric vs. concentric movements, and simply just learning to move quickly.
First, let’s talk basic anatomy. Each of us is born with certain types of muscle fibers each in certain amounts. Specifically, we’ll refer to what are called slow twitch (Type I) and fast twitch (Type II) muscle fibers. How much of each type of fiber each of us has can predetermine which workouts or even sports we may be better at. Slow twitch (Type I) muscle fibers are activated more in low intensity, long distance endurance movements such as running, biking, swimming, and other oxidative exercises like planks, or jumping rope. In contrast, fast twitch (Type II) muscle fibers fire when we perform high intensity, short burst movements such as sprinting, heavy lifting, high jumping, and other glycolytic exercises such as power cleans, tire flips, or split jerks. This is the realm within which we must operate in order to become quick and explosive in Oly lifting. Simple, right? Good, I’m done with science and ready for practical application….
The Drills
Certain drills help develop speed under the bar by creating the proper “hip-to-leg sequence” during the snatch and clean and jerk. This sequence consists of bringing the bar into the hips then immediately, without hesitation, letting the legs take over in the vertical jump. Keeping the sequence minimizes overextension of the hips and redirects the barbell vertically. Less hips equals more leg drive. Performing the Snatch and Clean & Jerk correctly will create weightlessness on the bar. It’s at that point when you should be on your way underneath it, with sharp speed, before gravity brings down the bar.
Snatch Balance
Start with the barbell behind the neck with a snatch grip. Jump or kick the bar off your traps and immediately dive under it, with arms locked out overhead, into the overhead squat position. Stand, reset and repeat.
Drop Snatch
This is an advanced version of the snatch balance where there is no jump. With the barbell behind the neck holding a snatch grip, fall as fast as possible into the overhead squat position, beating the bar to the ground. If done right, the barbell doesn’t even move, only you do.
Power Position Snatch
Greg Everett, of Catalyst Athletics, calls these dip snatches. Start with the barbell at your waist in a snatch grip. Jump the bar vertically and pull yourself under the bar into the bottom of the overhead squat position. Stand, reset and repeat.
Power Position Clean
Start with the barbell at your waist with a clean grip. Jump the bar vertically and pull yourself under the bar into the bottom of the front squat position. Stand, reset and repeat.
Power Jerks
Known in CrossFit as push jerks, power jerks begin with the bar on the shoulders in the rack position. Simply dip, drive, and re-dip to receive the bar. The difference is that there is a purposeful outward shifting of the feet to receive the bar. There is no split like in a traditional split jerk so the athlete can really focus on “catching” the bar overhead.
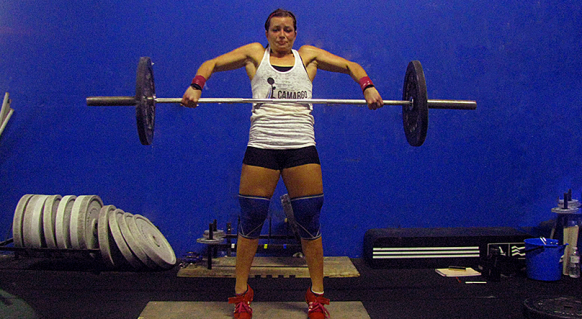
Snatch or Clean from Blocks
Elevated blocks are useful tools to develop strength and proper mechanics from varying heights off the floor. However, if you’re looking to develop speed the blocks must be set up high, about where the barbell (with plates of course) would fall above the knee.
 

These drills are just some ways to help you move quickly with the bar. You don’t have to use heavy weight when practicing them. In fact, the lighter the better. You can add weight as you progress so long as you maintain quickness. Heck, you can even include these drills in a WOD. The idea is to sequence these movements with velocity, not attempt 1RMs with them.
Note: To accomplish these drills you need to first be comfortable in low positions under the bar, otherwise the speed you’re trying to create will be slow to develop. Start by feeling comfortable and happy at the bottom of a squat, then progress with the drills. Drills are only as good as your ability to execute them.
Eccentric vs. Concentric movements
In squat, press and deadlift movements there are eccentric (slow, negative) motions followed by concentric (flex, contracting) motions. The way you execute these exercises can make a world of a difference in how you develop speed. Let’s take the back squat as an example. Once the weight is on the back of the neck, you have to make your way down to the bottom while resisting the weight, then redirect upward to stand. Beginners often move slowly in both directions. But what if I told you that you can become fast in the snatch and clean and jerk if you force the upward movement faster than going down? The idea is to move down with control but explode up as fast as possible. You’d have to execute it that way each and every rep, of every set, of every day, and every week. RDLs are executed the same way in my gym. Once the bar is set up at the waist to begin the rep, I teach my athletes to move downward toward the floor with ease and control, and when they redirect upward, they explode as quickly as possible back to the waist. They’ll then take a breath or two then repeat….slow down, fast up!
The idea of a slow eccentric motion followed by an opposite fast concentric movement will develop your overall speed. It will transfer beautifully to the snatch and clean. I apply this concept to the push press (from the overhead position, downward to the shoulders, then quickly explosion back to the overhead), front squats (same as back squats described above), even in the bench press. There’s nothing wrong with lowering the barbell with ease and control to the chest followed by a massive explosion back up.
Move Quickly
What’s yet another, easy step to develop speed? Move quicker. Yep, that’s it! You want to be fast? Then move fast…in everything. There’s a point where you don’t have to rely on drills or tricks to become fast. Just perform each rep quickly. If you think it isn’t easy, it actually is. If you switch your mindset to attack every rep of every exercise as fast as you can, you’ll find that you’re developing your fast twitch (Type II) muscle fibers. Whether it’s a butterfly sit-up or an air squat, whatever it is, just rep it as fast as you can. Your body, no matter your genetic makeup, has the ability of becoming more than what it is. Like a runner who trains long hours on the pavement, you can train your body to be faster, and more explosive. It’s all in how you approach the movement. So while you’re practicing some drills or focusing on the eccentric vs. concentric movements I mentioned above, also consider just executing fast. It goes without saying that to move fast you must already have proper technique.
Beginners out there, take your time learning the proficiency of the movement. When learning Olympic lifting, you should focus first on position, then movement, then speed, and lastly load. You should never skip any one step, which could take days or even months to achieve. For those who are ready for it and those who will be there soon, remember: the speed will come once you make it a priority, even over those 1RMs.

Daniel Camargo

ABOUT DANIEL CAMARGO

Daniel Camargo is a 20-year Olympic Weightlifting veteran. As an athlete, he represented Team USA in nine international competitions and set three American Records (Jr.). His latest accomplishment was promotion to U.S. International Level Coach, as well as being elected President of the Florida Weightlifting Federation. For a list of Seminars and Certifications visit altamontecrossfit.com. View all posts by Daniel Camargo →

воскресенье, 26 июля 2015 г.

Названия частей человеческого тела на английском


Повторите английские названия частей тела и выучите 10 забавных «телесных» идиом. А вы уже знаете, как на английском называется обратная сторона колена?.. 

Сегодня у нас вдвойне важная тема: мы изучаем английский и изучаем себя.
Представьте ситуацию: вы в заграничной поездке вдруг почувствовали себя неважно, переводчика рядом нет.  Знание названий частей тела на английском, ни много ни мало, может спасти вам здоровье, а то и жизнь: вы сможете объясниться с медицинским персоналом, рассказать, где и что у вас болит и получить адекватную помощь.
Не претендуя на полноту справочника по анатомии Г. Грея, мы приведем лишь названия основных частей тела и его органов (хотя известно, что только скелет человека состоит более чем из 200 костей, и каждая имеет свое название):

Скелет человека

bone – кость
jaw ['ʤɔ:] – челюсть
joint – сустав
rib – ребро
skeleton – скелет
skull – череп
spine – позвоночник

Органы человека

brain – мозг
gallbladder – желчный пузырь
heart ['hɑ:t] – сердце
kidney – почка
large intestine / colon – толстый кишечник
liver ['livə] – печень
lungs – легкие
pancreas ['pæŋkriəs] – поджелудочная железа
skin – кожа
small intestines [in'testins] – тонкий кишечник
spinal chord – спинной мозг
spleen – селезенка
stomach ['stʌmək] – желудок
urinal bladder – мочевой пузырь

Голова

cheek – щека
cheekbones – скулы
chin – подбородок
ear – ухо
eye ['aɪ] – глаз
eyebrow / brow [braʊ] – бровь
eyelid / lid – веко
eyelash / lash – ресница
forehead ['fɔrɪd] (BrE) / [for'hed] (AmE) – лоб
hair – волос, волосы
head – голова
iris – радужная оболочка глаза
lip – губа
mouth – рот
nape, back of the head – затылок
nose – нос
nostril – ноздря
pupil – зрачок
tongue ['tʌŋ] – язык
tooth (мнч.: teeth ) – зуб(ы)

Туловище

back – спина
belly – живот
breast – грудь (грудная железа)
buttocks – ягодицы
chest – грудь (грудная клетка)
genitals – половые органы
navel ['neɪvl] / belly button – пуп, пупок
neck – шея
pelvis – таз
shoulder – плечо
waist – талия

Руки

arm – рука (от кисти до плеча)
armpit – подмышка
elbow – локоть
hand – рука (кисть)
finger – палец (руки)
thumb ['θʌm] – большой палец руки
index finger – указательный палец руки
middle finger – средний палец руки
ring finger – безымянный палец руки
little finger – мизинец, маленький палец руки
fist – кулак
knuckle ['nʌkl] – сустав пальца
nail – ноготь
palm – ладонь
wrist – запястье

Ноги

ankle ['æŋkl] – лодыжка
calf ['kɑ:f] (множественное число: calves) – икра (ноги)
heel – пятка
hip – бедро, бок (наружная сторона таза и верхней части ноги)
foot (мн. ч.: feet ) – ступня, нога (ниже щиколотки)
knee ['ni:] – колено
leg – нога (от бедра до ступни)
thigh ['θaɪ] – бедро (от таза до колена)
toe ['təu] – палец ноги
big toe – большой палец ноги
little toe – мизинец ноги
shin / shank – голень

Кровеносная, нервная система

artery – артерия
blood ['blʌd] – кровь
nerve – нерв
vein – вена
vessel – (кровеносный) сосуд
Да, тема ответственная и серьезная. Но чтобы наша статья не вышла слишком сухой, внесем в нее свежую нотку английского сленга. Перед вами 10 самых популярных разговорных идиом, посвященных частям тела (сленг хоть и остроумен, но беспощаден, главное – ничему не удивляйтесь):

1. Muffin top – «верхушка маффина»

Складки жира в районе талии, выступающие из слишком узких юбок и брюк наподобие пышной, выпирающей из формы верхушки маффина. Особенно характерны для любительниц джинсов с низкой посадкой, которые не только не скрывают, а даже подчеркивают лишние килограммы.

2. Saddle bags – «седельные мешки»

Изначально, седельными мешками или подседельными сумками назывались мешки или тюки, свисающие на бока лошади по обе стороны от седла. В данном контексте речь идет об излишне пышных бедрах: в русском обиходе мы изобретательно называем такие бедра «галифе».

3. Bat wings или bingo wings – «крылья летучей мыши», «крылья Бинго»

Дряблые свисающие мышцы предплечья (как правило, у пожилых людей), которые при энергичных движениях рук колышутся, напоминая некоторым досужим шутникам крылья летучей мыши. Причем здесь «Бинго»? Это традиционная игра в домах престарелых, и победители, радуясь, размахивают поднятыми руками, демонстрируя bingo wings.

4. Moobs (man boobs) – «мужская грудь»

Комбинация слов man («мужской(ая)») и boobs (сл. «женская грудь»). Эта «часть тела» появляется при избыточном весе у мужчин.

5. Spare tire/tyre, donut – «запасное колесо» вокруг талии

Spare tire ['spɛː ˈtʌɪə] (AmE) или spare tyre (BrE) означает валик жира вокруг талии, похожий на надутую автомобильную шину. Эту же «часть тела» называют donut, «пончик» (а по-русски это называется «спасательный круг на талии»). 

6. Beer belly, pot belly – «пивной животик», «живот горшком»

Выражение, ставшее интернациональным. Такой животик, впрочем, может образоваться не только от злоупотребления пивом, но и от увлечения сладким. Pot belly (pot – «горшок») – еще одно определение этой «выдающейся» части тела.

7. Love handles – «бока»

Речь идет о жировых отложениях в тазовой области сзади (чуть выше, чем saddle bags). Слово love известно всем, слово handles означает «ручки, рукоятки»; перевод додумайте сами.

8. Chubby cheeks – пухлые щеки

Chubby означает «полный, пухлый, упитанный». Пухленькие щечки, особенно у детей, могут быть очень милыми, не правда ли? 

Prince George, Duke of Cambridge

9. Stovepipe legs – полные ноги

Идиома stovepipe [ˈstəʊvpʌɪp] legs описывает массивные полные ноги, напоминающие трубы дымохода (stovepipe – «дымоход, дымовая труба»).

10. Cankle = calf + ankle (икра + лодыжка)

«Исчезновение» лодыжки в результате ожирения: икры как бы сразу переходят в ступни. Слово образовалось в результате слияния английских слов calf и ankle.
Надеемся, вы не только усвоили важную информацию, но и немного развлеклись. А какие «телесные» идиомы известны вам? Ждем ваших ответов в комментариях.
И последнее: обратная сторона колена не имеет названия ни на одном языке мира. 

«Боль моя…»: учимся жаловаться на здоровье по-английски


Как рассказать о «наболевшем»: обязательный словарик медицинских терминов. Болезни, симптомы, лекарства – это должен знать каждый. 

Для чего мы учим английский? У каждого из нас своя причина. Кому-то знания английского языка нужны для успешной работы, кто-то любит путешествовать, и язык ему нужен для того, чтобы ориентироваться в незнакомой обстановке, а кто-то хочет понимать, о чем поет его любимая группа.
Наша сегодняшняя статья будет полезна каждому, но особенно тем, кто часто бывает за рубежом – ведь организм путешественников подвергается немалому стрессу и, к сожалению, может давать сбои...
Зная базовую медицинскую терминологию, вы при необходимости сможете описать свое состояние или понять того, кто нуждается в помощи сам. Также мы изучим несколько терминов из области фармации и типовые диалоги, связанные с оказанием медицинской помощи.

Боль, болезнь – терминология и идиомы

Заболеть (чем-л.)To get sick [sɪk] (with smth.), to become ill (with smth.)
Болеть (чем-л.)To be sick (with smth.), to be ill (with smth.)
БолезньSickness [sɪknɪs], illness [ɪlnəs], disease [dɪˈziːz]
Отпуск по болезни, «больничный»Sick leave [sɪk liːv]
БольPain [peɪn], ache [eɪk]
Острая больIntense [ɪnˈtɛns], severe [sɪˈvɪə], sharp [ʃɑːp], terrible [ˈtɛrɪb(ə)l] pain
Чувствовать больTo feel pain, to suffer [ˈsʌfə] from pain
Облегчить больTo ease [iːz], lessen [ˈlɛs(ə)n], relieve [rɪˈliːv], soothe [suːð] pain
Головная больHeadache [ˈhɛdeɪk]
Боль в спинеBackache [ˈbakeɪk]
Боль в животе/желудкеStomach ache [ˈstʌmək ˈeɪk]
Ушная больEarache [ˈɪəreɪk]
Зубная больToothache [ˈtuːθeɪk]
Боль в груди/сердцеChest pain [ˈtʃɛst ˈpeɪn]
Несколько распространенных идиом, связанных с болью (в переносном смысле):
pain (in the neck) – что-либо раздражающее или неприятное, невыносимый человек
She is being a real pain (in the neck)!  – Она невыносима!
to take great pains – стараться изо всех сил, «костьми лечь»
He had taken great pains to make the event unforgettable. – Он сделал все возможное, чтобы событие вышло незабываемым.
no pain, no gain – посл. «Под лежачий камень вода не течет»; «Без труда не вытянешь рыбку из пруда».
heartache [ˈhɑːteɪk] – «сердечная боль», тоска по ушедшей любви

Болезни, недомогания 

Abscess [ˈabsɪs], boil [bɔɪl]Абсцесс, нарыв
AIDS [eɪdz]СПИД
Allergy [ˈalədʒi]
I am allergic to penicillin. – У меня аллергия напенициллин.
Аллергия
Angina [anˈdʒʌɪnə]Стенокардия
Brain attack [breɪn əˈtak], stroke [strəʊk]Инсульт
Break [breɪk], fracture [ˈfraktʃə]Перелом
Bronchitis [brɒŋˈkʌɪtɪs]Бронхит
Burn [bəːn]Ожог
Cancer [ˈkansə]Рак
Chickenpox [ˈtʃɪkɪnpɒks]Ветряная оспа
Cold [kəʊld]Простуда, насморк
to catch a cold – простудиться
I have caught a cold.  – Я простудился(лась).   
Colitis [kəˈlʌɪtɪs]Колит 
Contagious disease [kənˈteɪdʒəs dɪˈziːz]Заразное заболевание
Diabetes [ˌdʌɪəˈbiːtiːz]Диабет
Dislocation [ˌdɪslə(ʊ)ˈkeɪʃ(ə)n]
to dislocate – вывихнуть
Вывих (сустава)
Disordered stomach [dɪsˈɔːdəd ˈstʌmək]Расстройство желудка
Dysentery [ˈdɪs(ə)nt(ə)ri]Дизентерия
Epilepsy [ˈɛpɪlɛpsi]Эпилепсия
Food poisoning [fuːd ˈpɔɪz(ə)nɪŋ]Пищевое отравление
Gastritis [gaˈstrʌɪtɪs]Гастрит
Heart attack [hɑːt əˈtak]Сердечный приступ, инфаркт
Hypertension [hʌɪpəˈtɛnʃ(ə)n]Гипертония
Inflammation [ɪnfləˈmeɪʃ(ə)n]Воспаление
Influenza [ɪnflʊˈɛnzə], flu [fluː]Грипп
Measles [ˈmiːz(ə)lz]Корь
Nephritis [nɪˈfrʌɪtɪs]Нефрит
Pharyngitis [ˌfarɪŋˈdʒʌɪtɪs]Фарингит
Pneumonia [njuːˈməʊnɪə]Пневмония
Rheumatism [ˈruːmətɪz(ə)m]Ревматизм
Smallpox [ˈsmɔːlpɒks]Оспа
Tonsillitis [tɒnsɪˈlʌɪtɪs]Тонзиллит
Tuberculosis [tjʊˌbəːkjʊˈləʊsɪs]Туберкулёз
Tumour [ˈtjuːmə]Опухоль
Ulcer [ˈʌlsə]Язва
Quinsy [ˈkwɪnzi]Острый тонзиллит, ангина
Медицинские термины на английском языке
Its not lupus. – Это не волчанка.

Симптомы и естественные проявления организма

Bleeding [ˈbliːdɪŋ]Кровотечение
Bloated [ˈbləʊtɪd] (stomach)Вздутый (живот)
Blood [blʌd]Кровь
Blood pressure [ˈblʌd ˈprɛʃə] (low/high)Кровяное давление (низкое/высокое)
Burp [bəːp], belch [bɛltʃ]Отрыжка
Congestion [kənˈdʒɛstʃ(ə)n]Отек, заложенность
Nasal [ˈneɪz(ə)lcongestion – заложенность носа
Constipation [kɒnstɪˈpeɪʃ(ə)n]Запор
Defecation [ˌdɛfɪˈkeɪʃ(ə)n]Дефекация, «стул»
Diarrhea [ˌdʌɪəˈrɪə]Диарея (понос)
Drowse [draʊz]Сонливость
Fever [ˈfiːvə]Жар, лихорадка
To fart [fɑːt]«Пускать газы»
Hiccup [ˈhɪkʌp]Икота
Rash [raʃ]Сыпь, покраснение
Short wind [ʃɔːt wɪnd]Одышка
Sleeplessness [ˈsliːpləsnɪs], insomnia [ɪnˈsɒmnɪə]Бессонница
Temperature ['temp(ə)rəʧə]
to take one's temperature – измерятьтемпературу
Температура
Urination [jʊərɪˈneɪʃ(ə)n]Мочеиспускание
To vomit [ˈvɒmɪt]Тошнить, рвать
Weakness [ˈwiːknəs]Слабость

Лекарства

Medicine [ˈmɛds(ə)n], drug [drʌg]Лекарство
Adverse effects [ˈadvəːsɪˈfɛkts]Побочные эффекты
Antipyretics [ˌantɪpʌɪˈrɛtɪks]Антипиретики (жаропонижающие)
Analgesics [ˌan(ə)lˈdʒiːzɪks], painkillers [ˈpeɪnkɪləz]Анальгетики, болеутоляющие
Antibiotics [ˌantɪbʌɪˈɒtɪk]Антибиотики
Antihistamines [antɪˈhɪstəmɪnz]Антигистаминные средства (средства от аллергии)
Antiseptics [antɪˈsɛptɪks]Антисептики
Cardiac [ˈkɑːdɪak] medications, cardiacСердечные препараты
Contraindications [kɒntrəˈɪndɪkeɪʃ(ə)n]Противопоказания
Dosage [ˈdəʊsɪdʒ]Дозировка
Tranquilizers [ˈtraŋkwɪlʌɪzəs]Транквилизаторы

В аптеке

АптекаChemist’s, Pharmacy, амер.Drugstore
У вас есть что-нибудь от головной боли?Have you something for a headache?
Можно мне болеутоляющее?Can I have a painkiller?
Сколько раз в день это принимать?
Принимайте это 3 раза в день перед едой / после еды.
How much per day should I take it?
Take it 3 times a day before/after meals.
Полезные фразы: как попросить медицинской помощи
What's the trouble? – На что жалуетесь?

В больнице

БольницаHospital
Как вы себя чувствуете?  —
Спасибо, хорошо.
How are you feeling?  —
Thank you, I’m fine.
Я неважно себя чувствую.I don’t feel well. I am feeling not well.
Мне плохо.I feel bad.
Мне нужно к врачу.I need to see a doctor.
Вызовите мне «скорую помощь», пожалуйста.Сall an ambulance, please.
Отвезите меня в больницу, пожалуйста.Take me to the hospital, please.
У меня жар/высокая температура.I have a fever.
У меня простуда.I have a cold.
Меня тошнит.I am feeling nauseous [ˈnɔːsɪəs].
У меня кружится голова.I feel dizzy.
Я кашляю и чихаю.I am coughing and sneezing.
У меня болит горло.I have a sore throat.
У меня заложен нос.I have a stuffy nose.
У меня насморк.My nose is running. / I have a runny nose.
У меня болит здесь.I have a pain here.
У меня болит голова.My head hurts. I have a headache.
У меня болит спина.My back hurts. I have a backache.
У меня болит желудок/живот.My stomach hurts. I have a stomach ache.
У меня болит ухо.My ear hurts. I have an earache.
У меня болит зуб.My tooth hurts. I have a toothache.
Я порезал(а) палец.I have cut my finger.
Я сломал(а) руку.I have broken my arm.
Я вывихнул(а) лодыжку.I have dislocated my ankle.
У меня низкое/высокое кровяное давление.I have low/high blood pressure.
У меня больное сердце.I have a heart condition.
У меня 1 группа крови (0), резус положительный.My blood group is 1 (0), positive.
У меня 4-я группа крови (AB), резус отрицательный.My blood group is 4 (AB), negative.

ВЫВИХ ПЛЕЧА


Вывихи плеча встречаются часто, составляя 50-60% всех вывихов. Сравнительно редко они наблюдаются в возрасте до 18 лет. У мужчин эти вывихи бывают в 5 раз чаще, чем у женщин. Частота вывихов плеча обусловливается частотой травмы верхней конечности, особенно при падении, и анатомо-физиологическими особенностями плечевого сустава.

Вывих плеча в большинстве случаев происходит при непрямой травме, падении на вытянутую вперед или отведенную руку. Вывиху способствует одномоментный форсированный поворот плеча кнаружи. Рука при падении на нее представляет собой двуплечий рычаг; бугор или шейка плеча упирается при этом в задневерхний край суставной ямки лопатки или в акромиальный отросток. Длинное плечо рычага составляет дистальная от упорной точки часть руки, а короткое – центральная от этой точки часть тела. Значительно реже вывих плеча происходит в результате прямого действия силы на ту или иную поверхность плечевого сустава.

В зависимости от направления действующей силы происходит смещение головки, которое определяет вид вывиха. Различают передний, нижний и задний вывихи плеча.

Как распознать?

Больные жалуются на сильные боли в плечевом суставе. Нередко они указывают, что такие вывихи бывали и раньше (привычный вывих плеча).

Функция в суставе нарушена. Активные движения невозможны, а пассивные - болезненны. Больной старается создать покой поврежденной конечности, бережно поддерживая ее здоровой рукой. Конечность находится в положении большего или меньшего отведения. Верхняя часть длинной оси плеча при переднем вывихе сдвинута вверх и к переди. Плечо поврежденной руки кажется удлинившимся при подкрыльцовом вывихе и укороченным – при подклювовидном. Область плечевого сустава уплощена по сравнению со здоровой стороной. Акромиальный отросток резко выдается, а под ним пальцем удается определить суставную впадину. Головка плеча чаще всего прощупывается под клювовидным отростком при передних вывихах и в подмышечной впадине при нижних вывихах.
При попытке поднять руку больного, привести или отвести ее ощущается характерное для вывиха плеча пружинящее сопротивление. Локтевой сустав невозможно привести к туловищу. Ротационные движения, вызываемые поворачиванием локтя кнаружи, передаются на головку, прощупываемую под клювовидной областью или в подмышечной впадине. Мышцы, окружающие плечевой сустав, напряжены, особенно дельтовидная.

Задние вывихи плеча часто не распознаются.

При вывихе плеча чаще всего повреждается подкрыльцовый нерв. Поэтому следует обратить внимание на чувствительность участка кожи, покрывающего дельтовидную мышцу, и на функцию пальцев и кисти. Вывих плеча может сопровождаться повреждением кости, переломом края суставной поверхности лопатки, клювовидного отростка, большого или малого бугорка плечевой кости, всей головки и шейки плеча. Чаще всего наблюдается отрывной перелом большого бугорка.

Лечение: вправление и чем быстрее, тем лучше. Не пытайтесь вправить самостоятельно!!
 

4 Exercises to Build Unbreakable Shoulders

https://www.onnit.com/academy/4-exercises-to-build-unbreakable-shoulders/?a_aid=gmb&utm_source=GMB+Posse&utm_campaign=a4d68c0dc6-Unbreakable_and_Van&utm_medium=email&utm_term=0_8172152055-a4d68c0dc6-96602905


AUTHOR:

Ryan Hurst
Ryan Hurst is the Program Director for GMB Fitness, with over 20 years of experience in strength and movement coaching....

It’s a rare person that hasn’t experienced some shoulder issues in their life. Whether in training or in other activities, tweaks in our shoulders can stop us from progressing and getting the most out of our workouts. Also, it’s no fun to be in pain!
These are four of my go to exercises to keep my shoulders healthy and strong to both enhance my performance and help prevent injuries. Work diligently and consistently on these unconventional exercises and build your unbreakable shoulders!

4 Exercises to Build Unbreakable Shoulders

The trick to keeping your shoulders healthy is challenging their strength and mobility from various angles. These 4 exercises work the shoulders with different stresses from all directions.
It’s a bit different than the “push” and “pulls” of basic calisthenic exercise, and that’s how these will help bulletproof your shoulders. Work on them one at a time to get some reps and practice in, then chain them together for an efficient and effective shoulder program.

1. Shoulder Swings

Hang from a bar or rings (or other suspension device) and with a firm grip, swing your body back and forth. You should do two variations, one with the shoulders drawn down as you swing, and another where you are in a more relaxed hang. Both variations affect the shoulders in different ways and both are important for shoulder health.

2. High Froggers

This fundamental locomotive pattern loads the shoulders in a different way than lifting weights. In this closed-chain exercise, you have to create a stable base through your arms and shoulders to support the rest of your body.
Practice “stacking” your elbows over your wrists, your shoulders over your elbows, and your hips over your shoulders. Push hard through the ground the entire time and you’ll strengthen your shoulders in this important alignment.

3. Plank Position Walks

Here you are in a stable plank position and moving your body laterally back and forth. This encourages the shoulders to be strong while supporting your body in motion. The goal here isn’t speed, but coordinated and stable motion in a variety of patterns.
Shuffling to the side, crossing hands over, and changing where you place your hands in relation to your body are all great variants to practice and will stimulate multidirectional shoulder stability.

4. Crab Walks

Another familiar “playground” movement, crab walks place your shoulders in an unconventional position to receive stress. Start slowly and push down hard the entire time you are “walking” and you’ll build significant strength in a short amount of time.

Learn to Flow and Bulletproof Your Shoulders

4 Exercises to Build Unbreakable Shoulders

Once you get the hang of each of these exercises by themselves, you can combine them into a flow, moving smoothly from one exercise to the next. This continuous change of angles and stresses around the joint will help make your shoulders more adaptable to strains and forces encountered in all your training and daily activities.
The flow sequence I show in the video is just one example. Play around with different sequencing, changing the speed and position as you see fit and as you feel your body can handle.

суббота, 25 июля 2015 г.

The V-Taper Workout


Build Your Shoulders and Burn Body Fat in One Workout

The-v-taper-workout
LEAD PHOTO CREDIT: ROBERT HARRIS

Here's what you need to know...

  1. The two best ways to look dramatically bigger? Lose fat and build your shoulders.
  2. These workouts pair the muscle snatch with the overhead carry, then finish things off with bodybuilder pump work.
  3. Besides building muscle, these workouts are metabolically challenging and will shred you up fast.
  4. The muscle snatch is one of easiest Olympic-style lifts to learn. Instead of complex technique, you muscle the weight up. It's also easy on the wrists.
  5. The overhead carry builds muscle via occlusion and the micro-oscillation effect.
  6. Perform these workouts twice per week.
T Nation Poll

2 Ways to Get "The Look"

The look. You know it when you see it.
It doesn't matter if it's a 140 pound guy or a 220 pound guy. Doesn't matter if it's a short woman or a tall woman. It's that look of symmetry and power, that coveted V-taper that screams athleticism.
The two main things that add to this look? That's easy:
  1. Keep your body fat relatively low.
  2. Have fantastic shoulders.

Shoulders Define the Physique

Ripped Body
Delt development has the greatest impact on how your physique is perceived:
  • If you're lean with a little extra muscle you'll look "fit." But if you add 5 pounds of additional muscle in just the right places, like the delts, you'll go beyond merely fit and graduate to "jacked."
  • What if you have good traps but small delts? Well, you'll look like a traffic cone. Bring up the delts though and you'll look beastly.
  • How about a thick waist but small shoulders? You'll look like a box. In a shirt you might even look fat. But a thick, muscular waist with well-built delts? You'll look like a powerhouse.
  • A fit female without good shoulder development might just appear skinny. But if she brings up her delts she'll look like a top CrossFitter or figure competitor.
The only problem? Most people can't build decent shoulders, even when they do everything "right."

Bodybuilding Lies

Building delts should be easy. Overhead presses, lateral raises, front raises, etc. The same generic workouts you've seen in magazines for years. You know them all, you've probably tried them all, and yet you still have lagging shoulders.
What's going on here?
Those exercises are good, but unless you have just the right genetics, they won't build your shoulders by themselves.

2 Missing Shoulder Exercises

Barbell
We've worked with numerous athletes and regular gym-goers, and two exercises have made the biggest difference when comes to the V-taper.
  1. The muscle snatch
  2. The overhead carry
The program below includes both. As a side effect, it nails the core musculature in a whole new way, and it's metabolically challenging, leaving you sucking wind and burning fat.

Workout Overview

Here's what you're going to do:
  1. Muscle-snatch a barbell and hold it at the top.
  2. Walk with that bar, performing an overhead carry.
  3. Finish off and fine-tune the delts with traditional hypertrophy exercises.
Let's break it down.

Muscle Snatch: The Bodybuilder's O-Lift

The muscle snatch is the Olympic-style lift for people who just aren't interested in doing the full Olympic lifts. The muscle snatch is, essentially, the bodybuilder's Olympic lift.
With the muscle snatch, we get rid of all the things that turn many people off from Olympic lifting. There's no "catch" with the wrists bent backward and there's no complicated technique required, like squatting deeply under the bar as it rises.
You simply yank the bar from the floor or from the hang or blocks. As it gets to your neck you quickly whip the elbows under the bar while it's still moving and overhead press it. In other words, you muscle it up.
  • Phase 1: Explosive high pull to the neck, focusing on keeping the bar as close to the body as possible.
  • Transition: When it reaches its target (neck/clavicle), make a lightning-fast switch to...
  • Phase 2: The fastest overhead press you can do.
Unlike other Olympic lifts, you don't explode up with the legs – your feet don't leave the floor. You push hard with the legs, but there's no jumping to create momentum.
Mistakes to avoid:
  1. Letting the bar drift away from your body. If the bar is too far away from you there's no way you can be in a good position to press it up after the turnaround.
  2. Pulling it too high (face level instead of neck/clavicle) and finishing the movement as a loaded external rotation instead of as a press.

The Overhead Carry

Overhead Carry
Remember, we're learning the muscle snatch because when we get that down pat we're going take a little walk once the bar is locked out.
Most people think of the overhead carry as a conditioning exercise, core developer, or work capacity builder, and it certainly does those things. But it's also very effective for increasing strength and building muscle.
The overhead carry builds muscle mostly via the occlusion effect.
Because the muscles are contracted continuously for a fairly long period of time, and also because of the limb position (higher than the heart), it's hard for your body to send blood to the shoulders and arms – that's the occlusion effect.
Your muscles are both deprived of oxygen (hypoxic state) and unable to get rid of the accumulating metabolic waste (lactate hydrogen ions). This increases the release of local growth factors which can stimulate hypertrophy.
The overhead carry can also increase strength via enhanced motor unit recruitment. Walking with the bar overhead creates a form of micro-oscillation.
The motion of the loaded bar created by walking forces your body to constantly and rapidly change its fiber recruitment. You can actually feel this as a "twitchiness." Over time, this will make your more efficient at recruiting a wide array of muscle fibers.
It also increases rate coding and recruitment speed. In short, you get stronger.

Overhead Carry: 10 Meters = 1 Rep

Female Overhead Carry
One guideline when planning loading parameters with the overhead carry is to equate walking 10 meters with doing one rep in a regular lift. (One meter = a little over three feet.)
For example, a set of 6 reps on a major lift would mean walking 60m with the bar overhead to get the same type of effect. By "type" we mean what quality we're developing – strength, size, etc.
If you combine the overhead walk with an overhead lift to get the barbell up – like the muscle snatch – you count both as reps. So, if you do 3 muscle snatches followed by a 50m of overhead walk this equates to a set of 8 reps.
If your main goal is to build muscle mass using overhead carries it means that your total "rep" count should be between 6 and 10. Using 10 "reps" as a goal, you can do this several ways:
  • 6 muscle snatches, then walk 40 meters with bar overhead
  • 3 muscle snatches, walk 20 meters, then repeat
  • 4 muscle snatches, walk 60 meters
  • 2 muscle snatches, walk 80 meters
  • 1 muscle snatch, walk 90 meters
Use a challenging load and you'll stimulate a lot of muscle growth. If your goal is mostly strength then you'll want to shoot for 2 to 5 "reps" using various combos as described above.

Overhead Carry for Time

Besides reps, you could also shoot for a specific time frame and cover the longest distance possible in that time.
Dropping the bar and bringing it back overhead during the set is permitted as long as you keep in mind that the ultimate goal is to do as much work as possible in the given time. If you're in a small space, you can use this method to turn around.
Note: Turning around with the bar overhead can be tricky and we don't recommend it once you work up to a heavier weight or feel very fatigued. Instead, put the bar down, turn around and muscle-snatch it back overhead. You can also walk slower or take smaller steps to increase TUT in a smaller space.
When working on resistance/strength-endurance, shoot for sets of 90-120 seconds. Sets of that duration also have a positive effect on posture if you focus on keeping the bar aligned behind your ears when it's locked overhead.
You can also alternate a close-grip muscle snatch with a more traditional wide-grip. If performing this workout twice per week, use the close grip one day and the wide grip the next.

Fine-Tune and Finish Off the Delts

Overhead Press
At this point, you've muscle-snatched the bar overhead, getting all the benefits of that lift. You've also walked with the bar overhead, reaping all the benefits of that movement. Now let's finish things off with traditional hypertrophy exercises.

Related:  Growth Factor Shoulder Training

The goal in this part of the workout is to use higher-reps, isolation exercises, time under tension, multiple angles of attack, and good old "pump 'n burn." Lactate accumulation is maximized when the muscle is under tension for 45-70 seconds.

Example: Triple Tri-Set

Lateral Raise
For this tri-set, move from one exercise to the next without rest. Choose weight so that you fail or come close to it somewhere in the 10-12 rep range.
A1. Lateral raise
A2. Front plate raise
A3. Seated rear-delt dumbbell raises
Repeat the whole tri-set 3 times.
The options for this part of the workout are endless: overhead press using the "21's" rep pattern, cable lateral raises, etc. Just keep the tension constant for at least 45 seconds and go for the burn.

You Can't Go Wrong

Rear Delt Raise
There are many ways to put all this together. It's honestly hard to go wrong here. You'll get great results just following this basic outline:
  1. Practice the muscle snatch until you're good at it.
  2. Perform muscle snatches with the overhead carry.
  3. Complete the workout with a bodybuilder-style tri-set.
  4. Perform twice per week with 2-3 days between workouts. Use a wide grip for the muscle snatches on day one and a narrower grip on day two.

Recommended Supplements For Best Results

Plazma
Use Plazma™ or Surge® Workout Fuel before and during these workouts to maximize the amount of anabolic nutrients in your blood and speed recovery.