суббота, 31 января 2015 г.

Мышечно-фасциальное единство


Мышцы и фасции неразрывно связаны между собой. Какие бы задачи не выполняла каждая отдельно взятая мышца, она работает внутри фасциальных пластов.
Без присутствия скелета мышцы и фасции образуют единый мышечно-фасциальный футляр. Таким образом, все мышцы нашего тела, распределены по 600 (и более) фасциальным карманам.
Скелетно-мышечная система представляет собой структуру сбалансированного сжатия-натяжения (или тенсегрити):
• Это структурная система, составленная из прерывистых элементов сжатия, связанных непрерывными кабелями напряженности, баланс между напряженными и сжимающими силами создает стабильность.
• Они действуют как целые системы так, чтобы любые внешние силы, действующие на них, были переданы ко всем элементам структуры одинаково, заставляя их симметрично изменяться, а не разрушаться.
• Вибрация в одной части структуры будет передаваться ко всем другим частям.
• Они имеют свойство совместных действий, что означает, что невозможно вывести функцию целого анализом частей.
• Эта структура очень эффективна, так как она требует меньшего количества материалов, чем ее эквивалент, построенный по классической модели, и хотя структуры могут быть легкими, они фактически очень сильны.
• Это самостабилизирующиеся структуры; как только внешняя сила удалена, они возвратятся к исходной форме.
Взаимодействие элементов мышечно-скелетной системы:
• Кости – это распорки, раздвигающие мягкие ткани.
• Миофасциальные цепи – линии, по которым напряжение переходит от одного участка к другому.
• Для достижения гармонии в теле необходимо создать сбалансированный тонус по этим цепям, чтобы элементы мышечно-скелетной системы находились в состоянии равновесия.

Простой эксперимент с мячиком


Основная идея книги Томаса Майерса, которую я недавно упоминал, заключается в том, что каждая мышца в нашем организе работает не сама по себе, а связана при помощи фасциальной ткани с другими мышцами, образуя вместе с ними так называемые "миофасциальные цепи", по которым в теле передаётся напряжение и расслабление. Например, излишне жёсткие мышцы голени и задней поверхностью бедра, болезненно напряжённая крестцово-бугорная связка, слишком сильный изгиб поясничного отдела позвоночника и устойчивое сверхвыпрямление в области верхних шейных позвонков бывают часто связаны с усталостью и перенапряжением стоп.
Вы можете в этом сами убедиться, если проведёте один эксперимент.
Нагнитесь вперёд, не сгибая коленей. Потянитесь пальцами рук к полу. Почувствуйте напряжение в задней поверхности тела - напряжение икроножных мышц, задней поверхности бёдер, поясницы...
Есть ли какая-нибудь разница в ощущениях с правой и левой стороны?
Теперь возьмите маленький мячик (например, теннисный или мяч для гольфа) и покатайте его одной из стоп. Продолжайте упражнение в течение, по крайней мере, пары минут, и проверьте, чтобы была задействована вся поверхность подошвы от основания пальцев до переднего края пятки. После этого снова наклонитесь вперёд, и обратите внимание на то, в чём теперь заключается разница между двумя сторонами тела. Ощущения будут довольно интересные...

Про моё плечо

http://kalashnikovdm.livejournal.com/85209.html

В анамнезе.

Лет 20 -25 назад, где-то в 80-е – 90-е, на пике своего увлечения бодибилдингом, несколько раз на жиме лёжа срывал плечо. Раза два-три, по-моему, может, и больше, не помню уже. Кроме этого, один раз заработал в плечевом суставе очень сильный бурсит, занимаясь виндсерфингом, тоже где-то в тот период. Был шторм, слишком сильный ветер, слишком большой парус. И бесконечные «водный старт» - начало движения – падение - «водный старт» - начало движения – падение - «водный старт»…. «Водный старт»  это когда ты, находясь в воде, одной рукой приподнимаешь над водой мачту с несколькими литрами воды в ней и в парусе. Плюс замёрз... Короче, острая боль в плече, руку поднять не мог, жена рукав рубашки надевала. Кололи в сустав кортикостероид, кеналог вроде. Воспаление «выключили». И я снова радостно побежал качаться. Но воспаление «выключили», а травма-то осталась. Короче, добил-таки сустав. Пришел к тому, что не мог ни жать, ни разводки делать, ни отжиматься ни с каким весом, даже с самым маленьким. И такое состояние осталось на годы. Единственное, что позволял делать сустав, – сведение рук в «пек-деке».

Диагноз на ту пору – импиджмент-синдром, как бы сейчас назвали. Тогда назвали как-то по -другому, типа, деформирующий артроз.

Суть проблемы можете посмотреть в видеоролике, с 12 минуты.


Если видео смотреть лень, то коротко проблема в следующем.Когда мы поднимаем руку вверх, через сторону или вперед (говоря анатомическим языком, отводим или сгибаем плечо), головка плечевой кости натыкается снизу на выступ лопатки – акромион или на связку, соединяющую акромион лопатки и клювовидный отросток. Эта «арка», ограничивающая движение плечевой кости вверх. А там, между плечевой костью и акромионом, клювовидно-акромиальной аркой или клювовидным отростком располагаются важные структуры: сухожилия надостной и подлопаточной мышцы, синовиальная сумка. Они зажимаются и, если упорствовать, работая с постоянным напряжением, перетираются, травмируются.

_2_tif


_1_png


Если продолжать упорствовать дальше, на лопатке вырастают вот такие бяки.


imp-artrosis[1]

Наросты-остеофиты при повторных поднятиях руки «клюют» и карябают сухожилия и бурсу, травмируя их еще больше. И все, «кончился» плечевой сустав.

В общем, убрал я из программы все жимы и отжимания, оставил только пек-дек. Почему от пек-дека не болело – не знаю, векторы сил как-то по-другому направлены, видимо, плечевая кость не прижимается так сильно к лопатке.
Но вот в отпуске маета. Я очень люблю плавать и еще играю в гольф. Набрасываюсь на отдыхе на то и на другое, плечо ноет, мажусь постоянно противовоспалительными. Да и в Москве нет-нет, да и разноется, бывает -  от гольфа, бывает – от кача.

Ну, думаю, а что я мучаюсь? Сейчас артроскопические операции так ловко делают, залазят в сустав через дырочку и аккуратно там все счищают, что наросло ненужного.

Думал-думал… Сустав с возрастом лучше не станет, только будет деформироваться все больше и больше. А восстанавливаться все хуже и хуже. Короче, решился.

Обратился к хирургу, который мне чинил коленный сустав. Принес ему снимок МРТ. Доктор «обрадовал»: кроме наросшего на лопатке остеофита, из-за которого щели между ней и плечевой костью почти не осталось, еще частичный разрыв сухожилия надостной мышцы и повреждение сухожилия подлопаточной.

Супер. Это, значит, нарост на лопатке клевал-клевал сухожилие надостной, да и надорвал его. Так и торчит там кусок сухожилия уже много лет. А в сухожилие подлопаточной, наверное, клевал клювовидный отросток, когда жал лежа.
Короче, надо ремонтировать. Прооперировался удачно, огромное спасибо доктору. Остеофиты счистили, сухожилия пришили. Дальше 5 недель в ортезе, затем реабилитация.

5 недель 24 часа в сутки в ортезе – это указание хирурга. Было сказано, что двигать нельзя категорически! Понятно – доктор подстраховывается. Сухожилия еще не восстановились, чуть дернешь ненароком (забыл, задел за что-то) - и все, кромсай сустав заново. Советую еще до операции поискать хорошего врача-реабилитолога, посоветоваться еще и с ним. Конечностью ведь двигать необязательно, а вот мышцы «включать» нужно как можно раньше, электростимуляцией или как-то еще…

Дело в том, что в качестве реакции на операцию, которую организм воспринимает как травму, мозг «отключает» все мышцы, которые этим суставом двигают. Любопытное состояние. Например, отключились, стали похожи на кисель те части мышц плечевого сустава, которые проходят через него и двигают руку: обе головки бицепса, длинная головка трицепса. И вместо них нагрузку на себя взяли односуставные мышцы локтевого сустава: латеральная и медиальная головки трицепса, локтевая, плечевая. Такой в них гипертонус образовался, окаменели, даже больно было. В покое, представляете?
Произвольно подвигать плечом  даже тогда, когда разрешили, вообще не мог. Мышцы – кисель, не слушаются. Обращаю внимание: это не результат атрофии от неиспользования, это мозг намеренно их отключил, чтобы они не могли двигать суставом с возможностью травмировать его.

Ну и еще, конечно, запускать с «разработкой» ни в коем случае нельзя, т.к. наперегонки с восстановлением развивается контрактура: в результате увеличения доли плохо-растяжимых волокон соединительной ткани мышцы теряют эластичность, сустав становится тугоподвижным. Ликвидировать это очень трудоемко, лучше противодействовать этому как можно активнее.

Короче, живу в ортезе, учусь все делать левой рукой. Освоил ловкое бритье, например, и другие разные движения. Потом на работу вышел, на лекции выхожу в ортезе, пишу левой рукой на доске, в офисе, скрючившись на левую сторону, сижу, печатаю кое-как. Даже машину вожу в ортезе, левой. Хорошо, хоть коробка-автомат.

Плечо, конечно болит, особенно ночью. Кто делал такие операции, сказали, что это надолго, полгода может восстанавливаться. Ну ладно, потерпим. Хотя противно, конечно, состояние депрессивное.

Потом мало-помалу начал ездить на реабилитацию. С реабилитацией, как мне показалось, у нас беда. Два центра, в которые я, по рекомендации доктора, ходил, произвели, как бы это помягче сказать, неоднозначное впечатление…
Реабилитация организована так. Сначала физиотерапия: токи, магниты и т.п. Затем сажают на аппарат для пассивной разработки сустава, для восстановления диапазона движения. Аппарат сам двигает руку по той амплитуде, по которой я могу. Доктор или ассистент каждый следующий раз амплитуду немного увеличивают. Потом ко всему этому добавляется ЛФК.

Общие впечатления такие. Во-первых, нигде не увидел системы. Сегодня одно, завтра, безо всякой связи с предыдущими упражнениями, совсем другое, то, что сегодня пришло в голову доктору или ассистенту. Какое оборудование сейчас свободно, на том и позанимаемся. Во-вторых, отсутствовал контроль над правильной техникой, над формированием правильных паттернов, двигательных стереотипов. Какой смысл стараться поднимать руку повыше, если с самого начала движение подхватывается и продолжается за счет подъема и поворота лопатки. А получается, что просто закрепляется неверный двигательный стереотип, который потом «прилепится» намертво и создаст в дальнейшем серьезные проблемы. В-третьих (во втором центре), странная ситуация, когда каждый мой визит меня после физиотерапии и тренажера для пассивных движений передавали каждый раз другому инструктору. И тут уж кто во что горазд!

Короче, как практически во всех областях, нет единых стандартов, технологии, ощущение какого-то шаманства. Это непаханое поле для тех, кто захочет серьезно развить тему реабилитации, инвестировать, организовать серьезный центр. За основу, как мне кажется, нужно взять какую-то серьезную зарубежную, например, немецкую школу. Наверняка у них уже существует «золотой стандарт», опирающийся на доказательную медицину. Зарубежную потому, что они сильны именно технологиями, прописанными и проработанными регламентами и технологическими цепочками. Впрочем, может, и у нас это есть такая работа по золотому стандарту, не знаю.

Если говорить о моем случае, со времени операции прошел год, плечо в целом восстановилось, не беспокоит. Тем не менее, сильно не нагружаю его, берегу.

Так что, друзья мои, берегите плечевые суставы. Они не получают большой нагрузки уже миллион лет, с момента, когда большая обезьяна решила, что ходить на задних лапах прикольнее (передние высвобождаются для разных полезных дел: кинуть камень, нести пищу, выбрать программу на тачскрине) и превратилась в Хомо Эрректуса. И плечевые суставы адаптировались, заплатив прочностью за подвижность, за способность выполнять руками разнообразные сложно-координационные, амплитудные движения. Проще говоря, жимов в природе нет! И крупные дельтовидные и грудные у не спортсменов имеют, в основном, декоративную роль, имейте это ввиду.

Поэтому будьте предельно осторожны, соблюдайте идеальную технику, разогревайтесь, никогда не работайте на пределе сил продолжительное время, обязательно циклируйте нагрузку.

Удачи!

Supercharge Your Chest

With Bodyweight Barbell Floor Flyes


Supercharge Your Chest
By Stephen E. Alway, Ph.D., FACSM
Looking for a new movement to hammer your chest? Try bodyweight flyes with barbells to inject some life into your workouts and supercharge your chest training.
SUPER CHARGE YOUR CHEST - With Bodyweight Barbell Floor Flyes

ANATOMY LESSON

The pectoralis major is a large, thick, fan-shaped muscle that makes up most of the bulk of the anterior chest wall.1 It covers the upper (superior) part of the chest and its outside (lateral) border forms the front (anterior) wall of the arm pit (axilla). It is important to note that the pectoralis major muscle has two heads. The clavicular head begins from the anterior surface of the clavicle (collar bone).1 The second and larger head is the sternocostal head. It takes its origin from the manubrium (the top portion of the sternum), the upper six costal cartilages (cartilages at the ends of the ribs that attach to the sternum) and from the tendinous-like portion of the superior part of the external oblique muscle of the abdominal wall. The clavicular and sternocostal heads converge on a groove near the head of the humerus (intertubercular groove on the humerus (upper arm bone) near the shoulder joint.1
The arrangement of fibers of the pectoralis major makes it a multi-functional muscle because the angles of pull on the humerus differ considerably across the muscle. This means that various angles and exercises are needed to achieve full activation of every fiber in this broad muscle, and some exercises can be used to specifically activate a particular muscle region while minimizing activation in another. For example, the inner and middle parts of the sternocostal head of the pectoralis major are preferentially activated by bodyweight flyes with barbells on the floor.
The pectoralis major muscle adducts the humerus bone (draw the arm towards the midline of the body). This is the primary activation pattern of the bodyweight flyes with barbells. The pectoralis also flexes the humerus by drawing the arm forward.1 The clavicular head flexes the humerus by moving the humerus bone of the upper arm forward.
In addition to the pectoralis muscles, bodyweight flyes with barbells on the floor will cause contraction in the anterior deltoid muscles. These muscle fibers invoke a strong flexion of the humerus at the shoulder (bringing the humerus bone of the upper arm forward).1 The medial fibers primarily produce abduction of the humerus (raising the humerus away from the side of the body)1; however, they are also active to support the humerus during the lift upwards.1 The posterior fibers produce strong extension (bringing the humerus bone posteriorly) of the humerus and are only active to stabilize the shoulder joint.
SUPER-CHARGE-YOUR-CHEST-INS1

THE EXERCISE: BODYWEIGHT BARBELL FLOOR FLYES

1. Position two equally loaded barbells on the floor and parallel to each other. Make sure that they are able to roll on the floor freely.
2. Place yourself between the bars in a push-up position. Your body should be straight, one hand on each bar (near the center of the bars). Support your weight on your toes and hands.
3. Extend your elbows to a straight position, keep your body straight and your elbows close to your ribs. This is your starting position.
4. Using a slow and very controlled motion, slide your hands away from the midline of your body (abduction), by rolling the bars apart. Keep the elbows flexed slightly but keep them at this angle.
5. Slowly lower your body towards the floor as your arms and barbells move farther apart. Inhale as the bars are moving apart.
6. After moving the barbells as far apart as you can (keep control of your body), pause for a second, then start your return to the starting position by rolling the bars back together to the starting position. Exhale as the arms are adducted towards the midline of the body.

RX TIPS

– Maintain control of your body movements at all times. Any fast movements or jerks in either direction could strain the tendon insertions of the pectoralis on the humerus bone. Thus, you must control the barbell rolling— do not let it control you.
– You will get a superb stretch across the pectoralis major as the arms are moved out to the sides, and stretching is a wonderful stimulus for muscle growth.3,4 On the contraction phase, the pectoralis muscles are activated very strongly as they shorten by pulling the arms towards the body and rolling the barbells together.
– If you find that your wrists get a bit sore from this exercise, perform this exercise with an E-Z bar.

References:

  1. Moore, K.L. and A.F. Dalley. Clinically oriented Anatomy. Fourth edition. Baltimore, Lippincott Williams & Williams, 1999; 685-720.
  2. Senna G, Willardson JM, de Salles BF et al: The effect of rest interval length on multi and single-joint exercise performance and perceived exertion. J Strength Cond Res 2011;25:3157-3162.
  3. Alway, S.E., W.J. Gonyea and M.E. Davis. Muscle fiber formation and fiber hypertrophy during the onset of stretch-overload. Am. J. Physiol. (Cell Physiol) 1990; 259: C92-C102.
  4. Wang, C. H., P. McClure, N. E. Pratt, et al. Stretching and strengthening exercises: their effect on three- dimensional scapular kinematics. Arch.Phys.Med.Rehabil. 1999; 80: 923-929.
- See more at: http://fitnessrxformen.com/health/muscle-form-function/super-charge-your-chest/#sthash.m7lR4SW5.dpuf

The Ultimate Upper Body Exercise

The Ultimate Upper Body Exercise
The Ultimate Upper Body Exerciseby Stephen E. Alway, Ph.D., FACSM
If you have a busy schedule and want to improve your upper body shape and hardness, it doesn’t make sense to do multiple versions of an exercise to fully activate your upper body when a single movement will fully activate the same muscles. The exercise? Pull-ups.

ANATOMY LESSON

Many muscles are involved in the pull-ups, which makes it a difficult but extremely productive exercise. This includes everything from the intrinsic muscles of the hand to grip the bar, to the forearm and upper arm muscles that help in the pull upwards, to the host of deltoid and upper back muscles that are strongly activated in this exercise.

Back

The Ultimate Upper Body ExerciseThe latissimus dorsi is a major upper back muscle that is activated by pull-ups.1 This muscle connects the vertebrae in the thorax and lumbar regions and the iliac crest of the hipbone to the humerus bone near the shoulder.2 Together, the muscle fibers of the latissimus dorsi adduct the humerus (bring the arm towards the center of the body), and extend the humerus (pulls the arm backwards). The upper fibers of the latissimus dorsi muscle are most completely activated when the hands begin above shoulder height and they are pulled towards the armpits (axilla), during the pull-up exercise. The teres major muscle begins on the inferior angle of the scapula (shoulder blade), and it attaches to the humerus bone of the upper arm. It assists in arm extension, and adduction of the arm at the shoulder joint when the arms are over the head in pull-ups.2

Biceps

The Ultimate Upper Body ExerciseThe short head of the biceps brachii muscle begins on the front part of the scapula bone.3 The long head of the biceps brachii muscle attaches on the scapula near the shoulder joint. The long head sits on the lateral part of the arm, and its fibers mesh with the short head on the medial side of the arm to insert into the bicipital tendon, which attaches to the radius bone of the forearm. Both heads of the biceps flex the elbow joint.3 The brachialis muscle begins on the distal half of the humerus and it inserts on the ulna bone of the forearm. It helps to flex the elbow joint during pull-ups.3

Chest

Even the pectoralis major muscle of the chest has a role in pull-ups.1 The sternocostal head of the pectoralis attaches from the manubrium (the top portion of the sternum or “breast bone”), and the upper six ribs and converges near the head of the humerus.3 The pectoralis major muscle adducts the humerus, and when the arms are over the head (as in the start of the pull-ups), the sternocostal head of the pectoralis muscle helps to extend the arms. It is most active at the beginning of the pull-up, and it has less of a role as the bar gets close to the chest.

Traps

The Ultimate Upper Body ExerciseThe superior (upper) fibers of the large trapezius of the upper back attach to the base of the skull and along the midline of the vertebrae of the neck (cervical vertebrae). These fibers attach to the lateral part of the clavicle (collar bone) and along the spine of the scapula. They pull the clavicle upwards in the pull-up. The middle fibers of this muscle begin on the upper thoracic vertebrae, then run to the spine of the scapula. They pull the scapula towards the vertebrae at the top of the pull-up.4

THE EXERCISE: MEDIUM GRIP PULL-UPS

  1. Grip the handles of a pullup bar with a medium, the hands directly below the shoulders in a pronated position (palms facing away from you).
  2. Pull yourself up until the handles are at the upper part of the chest (just below the chin). Attempt to arch the upper back and get your body as high as possible, bringing your upper chest to the bar, to ensure a complete contraction of the upper and intermediate back muscles (i.e. trapezius and small scapular muscles).
  3. Slowly lower yourself until your upper back is completely stretched at the bottom position. Hold the stretch position, then pull upwards.

SETS & REPS

Perform 3-5 sets of 8-10 reps, at the beginning of your workout.

RX TIP

The pull upward extends the humerus bone and activates the latissimus dorsiteres major, part of the pectoralistrapezius and deltoid muscles1.,2 The elbows, however, must flex so the biceps brachii and brachailis muscles are activated.2,3
If you can’t do pullups, start out on the assisted pullup machine. After a couple of weeks, you will be able to reduce the amount of weight on the assisted machine, and in a few months you will be ready to tackle the real deal.

References:

  1. Youdas JW, Amundson CL, Cicero KS et al: Surface electromyographic activation patterns and elbow joint motion during a pull-up, chin-up, or perfect-pullup rotational exercise. J Strength Cond Res 2010;24:3404-3414.
  2. Tucker WS, Bruenger AJ, Doster CM et al: Scapular muscle activity in overhead and nonoverhead athletes during closed chain exercises. Clin J Sport Med 2011;21:405-410.
  3. Moore, K.L. Clinically oriented Anatomy. Third edition. Baltimore, Williams & Williams, 501-553, 1992.
  4. Signorile JF, Zink AJ and Szwed SP. A comparative electromyographical investigation of muscle utilization patterns using various hand positions during the lat pull-down. J Strength Cond Res 16: 539-546, 2002.
  5. Cunha RM, Jardim PC: Subacute blood pressure behavior in elderly hypertensive women after resistance exercise session. J Sports Med Phys Fitness 2012;52:175-180.
- See more at: http://fitnessrxformen.com/training/the-ultimate-upper-body-exercise/#sthash.VEEPxN3W.dpuf

Shoulder Kinematics in Yoga, Part I

The shoulder is the most mobile joint in the body. It is a combination of several articulations: the glenohumeral, scapulothoracic, sternoclavicular, and acromioclavicular joints (click here to see these). Each of these contributes to shoulder and arm movement via a process known as joint “coupling.” For example, when you raise the arms over the head in Urdhva Hastasana, the clavicle pivots on the sternum (breastbone), the scapula rotates on the chest wall, and the head of the humerus moves within the shoulder joint. All of these work together simultaneously in what is known as scapulohumeral rhythm. In general, 60 degrees of this action comes from movement of the shoulder blade on the chest wall (scapulothoracic motion) and 120 degrees from the ball and socket of the shoulder (glenohumeral motion). During this process, the clavicle rotates on its long axis approximately 25 degrees and the humerus externally rotates about 45 degrees. Scapulohumeral rhythm is illustrated in the video below.


So we can see that the shoulder is a complex structure, with many factors contributing to movement, or potentially restricting it. It’s easier to understand a complex structure by breaking it down into its component parts and then reconstructing them into the whole. This gives a new understanding of their function. For the shoulder, we’ll begin by focusing on the skeletal anatomy of the glenohumeral joint.

Here’s the Anatomy . . . 

The glenohumeral joint comprises the humeral head and the glenoid fossa of the scapula, which together form a shallow ball and socket joint. The proximal humerus also has two protuberances to which the muscles of the rotator cuff attach. These are the greater and lesser tuberosities. To see the anatomy of the rotator cuff, click here

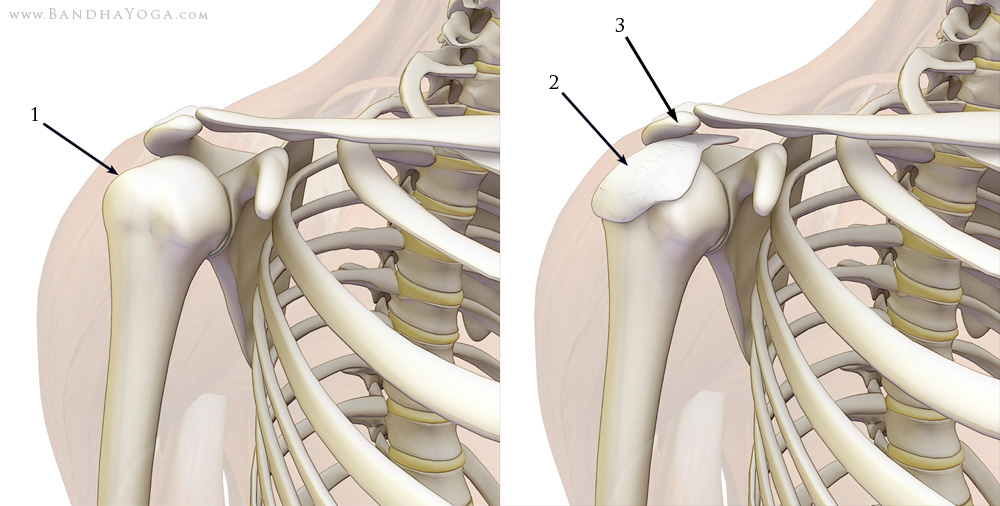
Another important structure of the scapula is the acromion process. This shelf-like projection of bone forms a roof over the top of the glenohumeral joint. It is also the attachment site for the deltoid and part of the trapezius. The subacromial bursa lies between the acromion and the proximal humerus (the humeral head and the greater tuberosity). It is a sac-like structure that facilitates gliding of the greater tuberosity and tendons of the supraspinatus and infraspinatus muscles on the undersurface of the acromion. 

subacromial bursa of the shoulder
                               The greater tuberosity (1)                                             The subacromial bursa (2) and acromion process (3)

This Brings Us To Subacromial Impingement . . . 

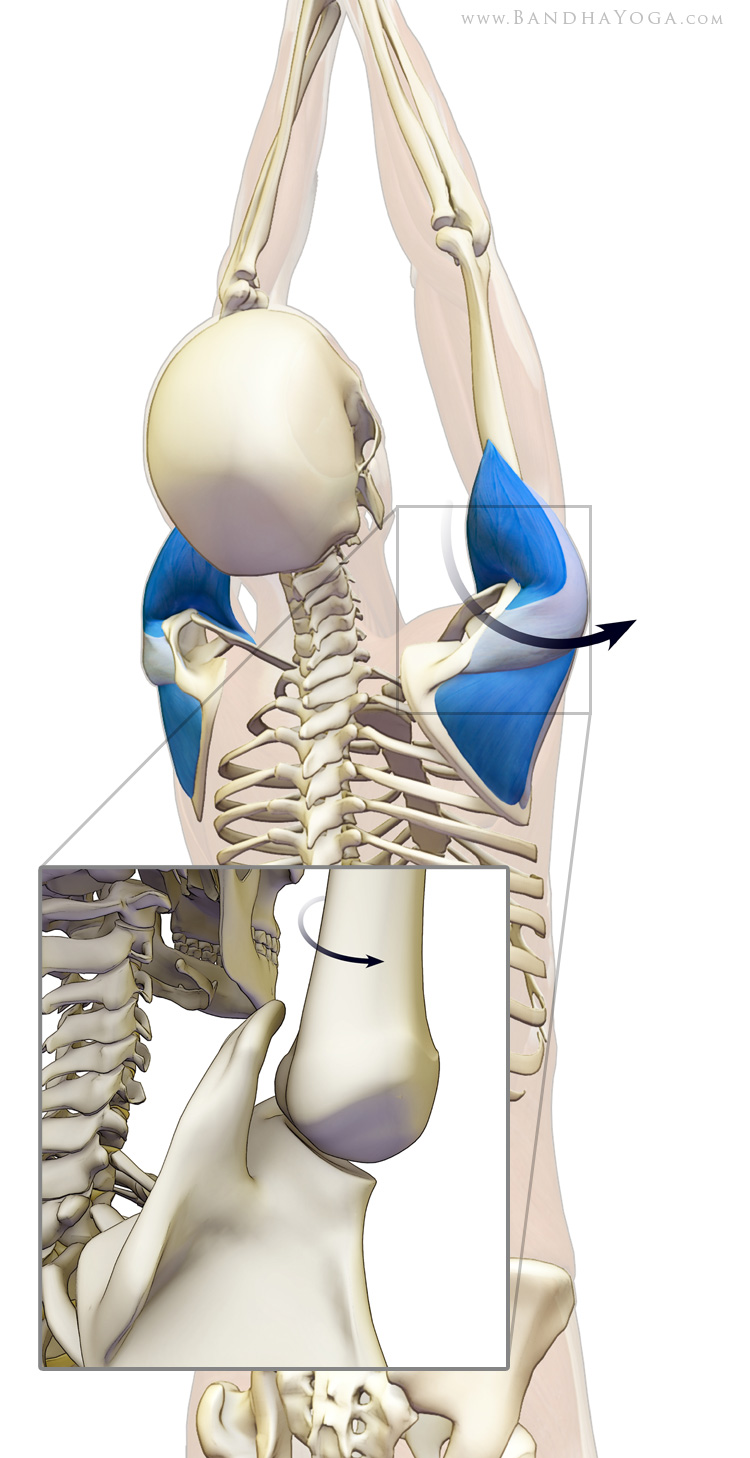
When the arm is raised, either to the side or in front of the body, the greater tuberosity can “impinge” on the undersurface of the acromion, compressing the subacromial bursa and irritating the supraspinatus tendon. This is most likely to happen if the humerus is internally rotated. Externally rotating the upper arm bone draws the greater tuberosity out of the way of the acromion and aids to prevent impingement. The acromion comes in several different shapes, ranging from flat to curved, with curved acromions being associated with a greater incidence of subacromial impingement. 

shoulder impingement
The first image shows impingement of the subacromial bursa with the humerus internally rotated.
The second image illustrates external rotation of the humeral head preventing impingement 

So What Does This Have To Do With Yoga . . . 

The question has been raised as to whether persons with a curved acromion are limited in their ability to perform certain asanas. For example, the inference that appears to have entered the yogic nomenclature is that if you cannot bring your arms vertical in a pose like Urdhva Dhanurasana, you must have a curved (not a flat) acromion. This is incorrect. First, it is well-established through many studies that a curved acromion does not affect the functional range of motion of a healthy shoulder. People with curved acromions can raise their arms overhead just as far as those with a flat acromion. Second, it is impossible to tell the shape of someone’s acromion process by observing them in a yoga pose. Acromial morphology is something that is determined with a specialized X-ray.

So to answer the question, “In a healthy shoulder, do curved acromions affect the ability to raise your arms overhead in a pose such as Urdhva Dhanurasana?” The answer is no. A curved acromion does not affect range of motion in a healthy shoulder and thus is not the reason why someone cannot bring their arms to vertical in Upward Facing Bow. There are many possible explanations for this limitation, including tightness in various muscles or ligaments about the shoulder, but a curved acromion is not one of them.  

How Do We Prevent Impingement?

externally rotate the shoulders to avoid impingement

Now let’s consider how this relates to actual practice. Particularly in Vinyasa, there is a tendency to do the same movement many times, which can lead to repetitive stress injury, such as inflammation of the subacromial bursa and supraspinatus tendon—“rotator cuff syndrome” in the orthopedic nomenclature.  You can help to avoid this by engaging the infraspinatus and teres minor muscles and, to a lesser extent, the posterior third of the deltoid. These muscles act to externally rotate the humerus and bring the greater tuberosity away from the undersurface of the acromion. We illustrate this movement here in Urdhva Hastasana. To read about the anatomy and to see this concept in action in Dog Pose and Full Arm Balance, click here


Thanks for checking in. We’ll see you for the next post when we go over the muscles that move and stabilize the scapula. Be sure to download volume two of our free interactive eBookAlso, don’t forget to tell your friends about our blog and to visit us on Facebook for your free chakra poster.

Shoulder Kinematics in Yoga Part II: The Lower Trapezius and Serratus Anterior

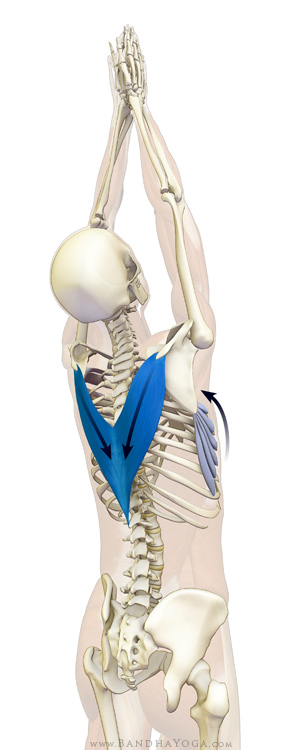
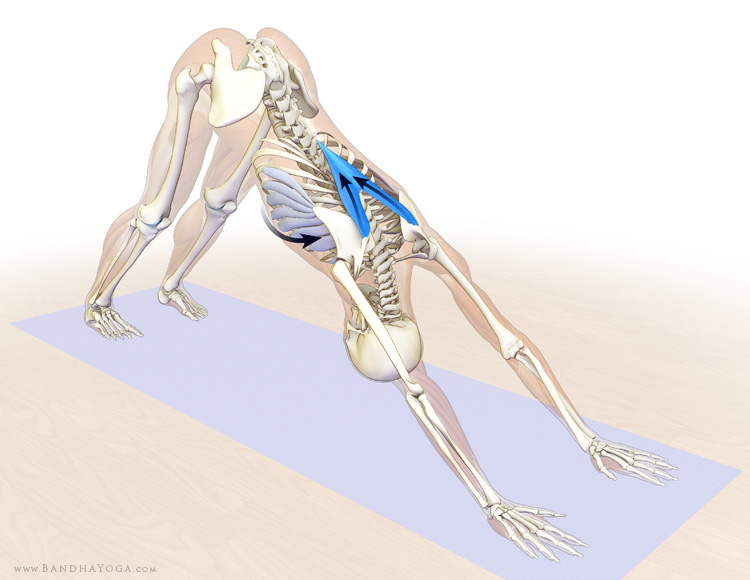
Our last blog post used a video to illustrate shoulder kinematics in 3D and reviewed how to externally rotate the humerus to protect against impingement. This week we look at the scapular motion on the ribcage and the role of the lower third of the trapezius in drawing the shoulders away from the neck. This motion is called scapular depression, and it is frequently used in yoga, especially when the arms are overhead. Scapular depression helps to maintain freedom of movement in the cervical spine, either to lift the head and look up (in Urdhva Hastasana) or to relax the head down (as in Dog Pose).

lower trapezius and serratus anterior - tadasana

Here’s the Anatomy . . . 

When you raise the arms overhead, the scapulae elevate, protract, and rotate. This is through the action of several muscles, including the upper trapezius and the levator scapulae. Scapular rotation occurs through sequential actions of the upper, middle, and lower thirds of the trapezius and the serratus anterior. Protraction is mainly through the work of the serratus anterior.

Now, let’s focus on the lower third of the trapezius and its interaction with the serratus anterior when the arms are overhead. This part of the trapezius both depresses and retracts the scapulae. Thus, you can use it to draw the shoulders away from the neck and towards the midline. Retraction opposes the action of the serratus anterior in drawing the scapulae away from the midline. So combining these movements aids to stabilize the shoulder blades. Once the scapulae are fixed in place, the pull of the serratus anterior can be directed to expanding the thorax. In this manner, the serratus anterior becomes an accessory muscle of breathing and augments the diaphragm for inhalation. 

Now the Cue . . .

It is fairly easy to depress and adduct the scapulae. Do this by drawing the shoulders down the back and towards the midline. Activating the serratus anterior to expand the thorax requires more training, but it can be learned quickly using the tips illustrated in Dandasana and Tadasana. Once you get the hang of engaging this muscle, use it to expand the chest while drawing the shoulders away from the neck. Try this first in Urdhva Hastasana, as shown. When you’re comfortable with drawing the shoulders down and expanding the chest in this pose, try it in Downward Facing Dog. Then combine these actions with engaging the wrist flexors and balancing the forearmsClick here to learn more about the anatomy and how to use this technique in Full Arm Balance as well.
lower trapezius and serratus anterior - downward facing dog pose
Thanks for stopping by. Check back next week for Part III of Shoulder Kinematics in Yoga, in which we’ll discuss a pathological condition of the shoulder. Be sure to download volume two of our free interactive eBook. Also, don’t forget to tell your friends about our blog and to visit us on Facebook for your free chakra poster.

A Cool Tip for Deeper Breathing in Yoga


First, heartfelt thanks for all of your “likes” and comments on our Facebook page. Enjoy the free e-book, Anatomy for Yoga, Tips and Techniques
Book 1
!
 We’ve heard from practitioners all over the world on how these techniques have enhanced their practice and teaching. This is music to our ears. To show my appreciation, I want to offer a tip that can help you dramatically expand the chest. This cue on engaging the accessory muscles of breathing can provide a quantum leap in the global effect of your yoga practice. First, a little background . . . 

As many of you know, I studied yoga for an extended period at the Ramamani Iyengar Memorial Yoga Institute in Pune, India. The Iyengars are true world experts in yogic breathing. During my time there, I was exposed to great teachings of pranayama from Yogacharya Iyengar, his daughter Geeta, and son Prashant. These classes were amazing; their effect would last for days. 

I continued to practice pranayama when I returned from India and gradually developed an understanding of the art. During this process, I used my medical training to analyze the breathing techniques. I found that I could use Western science to amplify the effects of pranayama. 

Now, part of pranayama involves breathing deeply. The body has a group of muscles that it recruits when we need to take deeper breaths, say after running a sprint. Recruiting these muscles expands the chest to a greater extent than when using the diaphragm alone. The result is increased inspiratory volume and improved lung ventilation (on the alveolar level). It occurred to me that intentionally engaging these breathing muscles would augment the volume of my inhalations during pranayama and asana practice. So I developed a series of cues to activate the various accessory muscles and incorporated them into my practice. The effect was immediate and amazing. After my practice was finished and throughout the day, my breathing felt effortless, leaving me energized.
How cool is that?

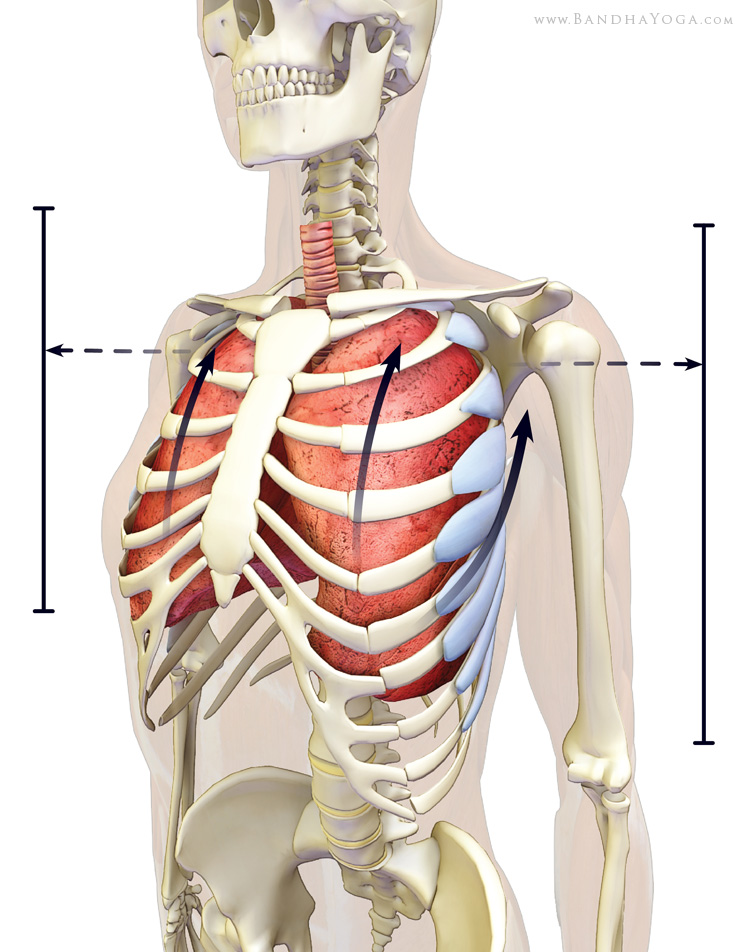
serratus anterior expanding the lungs
Activating the serratus anterior
to expand the lungs.
So, here’s a cue for activating one of my fave accessory muscles—the serratus anterior (SA) and his buddies, the rhomboids. Pause for a second. Rest your hands on your thighs. Now, exhale naturally and then gently draw the shoulders back to bring the scapulae (shoulder blades) towards the spine. As you inhale, imagine pressing the sides of your shoulders and upper arms against an imaginary wall, like a doorframe. Feel how this expands your chest. Repeat this cue two more times before reading on . . .

rhomboids and serratus anterior open the chest
Okay, Welcome Back . . . 

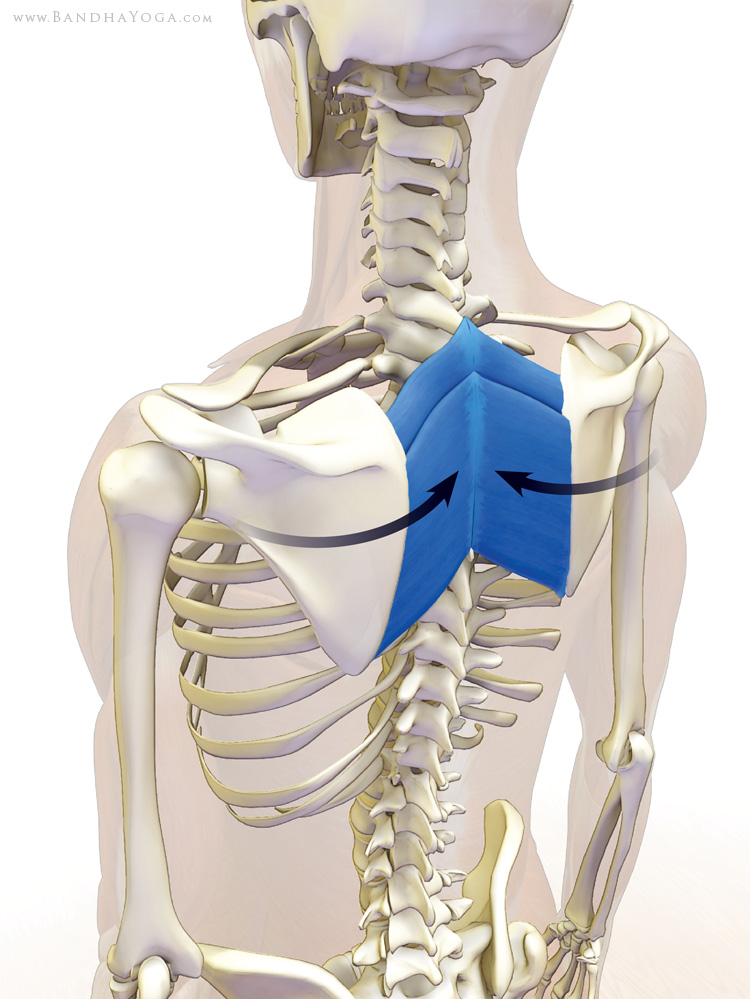
The rhomboids (major and minor) originate from the spinous processes of cervical vertebrae six and seven and thoracic vertebrae one through four. They insert onto the medial border of the scapula and act to stabilize and draw the shoulder blades towards the midline. The serratus anterior originates from ribs one through nine and inserts on the inside of the entire medial border of the scapula. If the scapula is fixed (by engaging the rhomboids) then contracting the serratus anterior lifts and expands the ribcage. Just focus on this action for the moment. (When the shoulder blade is released, the SA rotates and draws the scapula laterally—but that’s another blog postJ.) 

Ok, now repeat the steps from above—take a relaxed exhale, then draw the scapulae towards the midline and stabilize them there using the rhomboids (feel how this expands the chest forward). Then as you inhale, attempt to press the shoulders outwards against an imaginary wall. Take a relaxed exhalation and repeat two more times.

rhomboids stabilize the scapula
Rhomboids stabilizing
the scapulae.
Do you notice how it’s easier to engage these muscles the second time around? That’s why I asked you to take a break, read about the anatomy, and then try it again. During the brief period you were reading, your unconscious brain formed new circuitry to activate these important muscles more efficiently. To see this process of chest expansion in action, we’ve created a video that illustrates this concept with the rhomboids and another accessory muscle of breathing, the pectoralis minor. This will give you an idea of how the ribcage expands when activating the accessories.

Use this cue when you practice this weekend. For example, as you do Surya Namaskar, when you inhale to raise your arms overhead from Tadasana, imagine pressing the shoulders outwards against a wall. Try it in other poses as well, such as Up Dog, Down Dog, and so on. This technique is especially effective for Vinyasa Flow—you guys will be floating!

Life is for enjoyment, friends, so enjoy this technique. Keep the comments coming on Facebook and be sure to visit us for your free e-book and chakra poster!