
BY DR. QUINN HENOCH
The shoulder complex is an intricate network of muscles and joints working together to produce a substantial amount of motion. This network also works to stabilize the demanding movements and positions we ask of it in the weight room and in competition. 
In this article, we will focus on the muscle group common to many rehab and corrective protocols – the rotator cuff.
A couple of key points before we begin:
- Training shoulder ‘stability’ does not mean shoulder stiffness or tightness. It means that you possess appropriate control of the movement that you produce and resist movement that you do not want to produce.
- None of the drills that are outlined here will make any bit of difference if you are not putting first priority on ribcage position. The ribcage is the foundation for which the shoulder complex resides. If it is out of position, the shoulder complex and surrounding musculature will be out of position; which may result in faulty mechanics. If you have not already done so, read the following article first, which details this intimate relationship:

Click the picture, or this link: http://jtsstrength.com/articles/2014/05/01/the-scapula-and-thoracic-spine-a-classic-love-story-to-improve-your-overhead-position/
I Done Tore My Rotary Cup
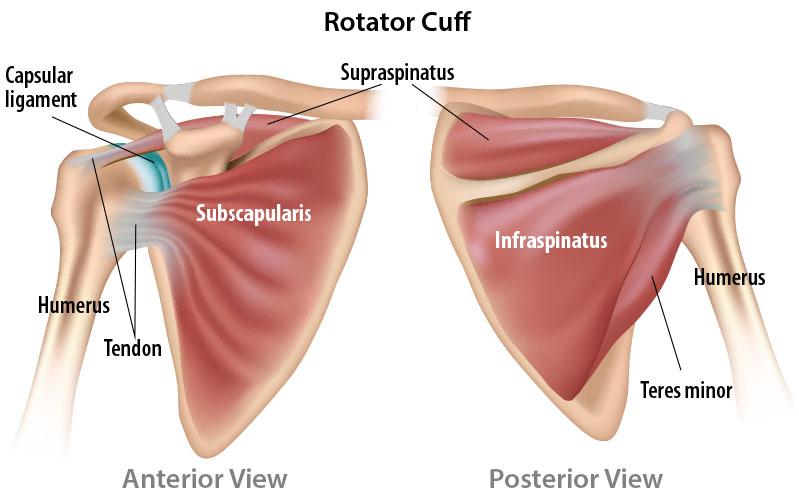
The rotator cuff is extremely important in regards to glenohumeral (shoulder) joint function. It is comprised of four muscles:
1) supraspinatus
2) infraspinatus
3) teres minor
4) subscapularis
Common rehab or ‘prehab’ protocols for rotator cuff training call for several reps of exercises similar to this:
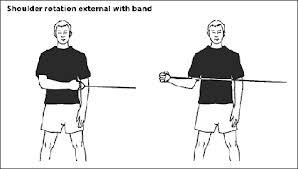

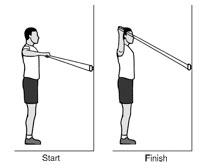
These types of drills have their place, especially early in the rehab process, to counteract any neural inhibition of the musculature and to increase blood flow to the healing area.
However, when taking a closer look at rotator cuff function, it becomes clear that its role is much more than simply producing rotation at the shoulder, and we need more in our arsenal to bridge the gap to performance.
The bony anatomy of the shoulder is similar to that of a golf ball sitting on a tee. Very little passive stability comes from the bony architecture.
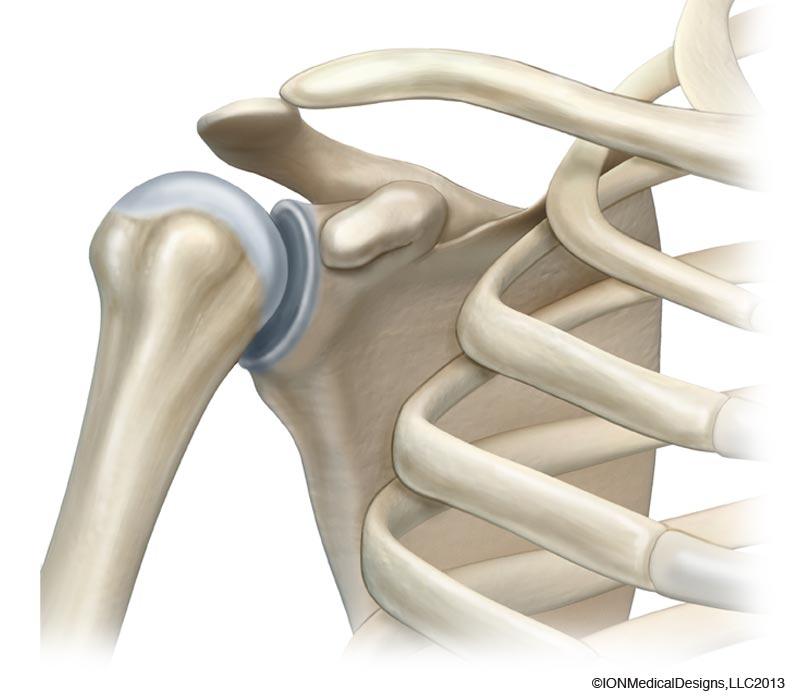
Stability must come from the soft tissue. A very important function of the rotator cuff is to keep the humeral head seated properly in the glenoid (socket), while assisting the bigger engines (pecs, lats, delts, etc) to move the humerus through whatever ranges you choose. So here in the Midwest, when someone tells me about his or her ‘rotary cup’ injury, the description is not that far off. The cuff acts as a ‘suction cup’ of sorts, for the shoulder joint.
If you are months into your rehab for a rotator cuff injury and looking to progress, or you simply want to add in some preventative work for your shoulder, shift your thinking a bit. Do not think of rotator cuff training as purely strengthening to create a stronger rotational force; rather, think of it as improving reflexive timing of the cuff’s contraction for proper glenohumeral position, while moving through the desired range of motion, or resisting unwanted range of motion. These reflexive benefits allow for the shoulder to do stuff like this without having thinking about it.
Here are three simple ways to train the rotator cuff to be their good ole’ reflexive self.
- Diagonal Patterns
The Proprioceptive Neuromuscular Facilitation (PNF) school of thought has provided us with several ways to manipulate the neuromuscular system. Working through diagonal patterns is one such tool, and is a great progression to the more traditional uniplanar rotator cuff exercises that were pictured above. These drills provide more carry over to performance, as our shoulders are rarely moving through isolated planes of motion in training or sport.
Initially, I recommend performing these movements in developmental positions such as supine and half kneeling, so that ribcage and pelvic position can be more effectively controlled. See these past articles discussing the utility and importance of developmental positions.
Perform the drills to follow with no load or very light load, and focus on your positions. The cue to reach is used frequently in the videos. “Reaching” with the shoulder complex (specifically referring to the glenohumeral joint and scapulothoracic joint) restores congruency between the shoulder complex and ribcage by facilitating the muscles that assist with scapular motion. This aids in clearing space for the shoulder complex to move freely against depressive forces that muscles like the lat can produce. The rotator cuff will be reflexively working to keep the humeral head properly seated on the glenoid as you are reaching. Rotator cuff and scapular stabilization are rarely mutually exclusive.
In the third video, the goal is to keep the lat relaxed and avoid using it to depress the shoulder complex and overtake the subscapularis. Keep the shoulder blade in mid-range, rather than packing it down and back. This allows the shoulder complex freedom to move in any direction, if need be.
Perform 2-3 sets of 6-8 reps. You may increase sets and reps as you wish, but do not sacrifice movement quality for quantity.
- Screwdrivers
No, not the drink – although that would potentially make rotator cuff training more fun. We are referring to moving the shoulder through internal and external rotation, while the arm is in a fixed amount of elevation. Performed in different positions, these drills are very effective in developing proprioception through the shoulder complex. When loaded, the compression through the long axis of the joint provides the feedback an athlete needs to learn what a proper shoulder position feels like versus a suboptimal position. Follow the cues in the video for the positions we are looking for.
The goal for these drills is for you to have the feeling that your golf ball (humeral head) is centered on the tee (glenoid). When performing them, try to avoid letting the front of the shoulder slip forward off the tee. This does not mean maximally packing the shoulder down and back; but rather, finding a mid range where the shoulder feels stable. Watch the videos for a visual of this.
Move through these movements with no weight initially, in order to feel the correct positions. Add load as you feel comfortable. I like the ‘bottom’s-up’ kettlebell position because it’s difficult to load it heavy enough to jack yourself up, but yet you still get a gnarly stability stimulus through the shoulder. When going bottom’s up, keep your hand as relaxed as possible (without dropping the bell on your face), and keep breathing.
Perform 2-3 sets of 10-15 full rotations
- Holds & Carries
This is a great way to build static strength and resiliency through the shoulder girdle, in a way that does not take away from your barbell or sport training. We are able to load these up a little heavier, which is why it is third on our progression. Carries and holds provide traction forces or compressive forces depending on where the arm is in space. These forces elicit the reflexive rotator cuff facilitation we are looking for.
There are several rehab specialists that I look up to who say deadlifting is the best rotator cuff training there is. This is due to the large traction force through the shoulder, in which the rotator cuff must oppose. So, moral of the story is that if you want a robust rotator cuff, go pull some heavy weights.
There are limitations to this obviously, as it is only accounting for the arm being at the side. For overhead athletes especially, we need to train that cuff in conjunction with arm elevation and scapular elevation and upward rotation as well.
For holds and carries that incorporate arm elevation, I also like the bottom’s up approach. Again, it is self limiting, and will only augment your strength training, not try to replace it.
A simple progression to work through over the course of a training cycle can look like this:
- Half Kneeling Holds – Partial or Full Arm Elevation
- Single or Double Arm Suitcase Hold or Carry
- For our purposes, you would hold or carry the weights at your sides, instead of simply deadlifting them as in the video.
- Single or Double Arm Hold or Carries – Partial or Full Arm Elevation


Make sure you are using a full, forceful exhale to set a neutral ribcage position , and lightly brace your abs throughout these drills. Breathe comfortably, without letting the weight pull you off axis.
Play with alternating between single and double arm, as they required different demands through the trunk. Once you can perform the static hold (either single or double arm), without losing position, progress to a carry. Try to maintain as upright and normal posture and walking mechanics as you can.
Perform 2-4 sets of varying distances. The distance should be long enough that you are challenged to keep position, but not too long that you must compensate to hold onto the weight.
Key Points
- Stay as relaxed as possible and breathe. You are not getting the benefits of reflexive stability if you are holding your breath and locking down every muscle you have during these drills.
- For the carries, obviously, the arm holding the weight will not move, but do your best to keep the other three limbs moving smoothly.
- For the partial elevation carry, hold the humerus (upper arm) just below 90 degrees, to keep the biceps tendon from getting pissy.
Programming & Summary
There is no right or wrong as far as where you put things in your program, as long as you are performing the movements correctly. These drills can be performed before training to prep motor patterns and facilitate neuromuscular systems, as a superset with other strength movements to grease the groove, or post training as a finisher to reinforce a desirable training stimulus. Switch it up every couple of weeks to see what works best for you.
It is not necessary to perform all three modes of training (diagonals, screwdrivers, holds/carries) every workout, but I would recommend incorporating a balance of the three throughout a training cycle. Progress weight slowly.
Remember, nobody cares how much weight you can screwdriver in the sidelying position. It is not about that.
Use this stuff to maintain or restore resiliency and stability to your shoulder, so that you can continue to do the things that you want to do. If at any time, any of these things cause discomfort, or you feel that they are taking away from your barbell or sport training, then they are not the drills for you or are being incorporated incorrectly.
This is clearly not an exhaustive list of options in regards to training the rotator cuff. There are countless drills, exercises, and variations out there. Pick and choose what you wish, but keep in mind the general concepts regarding position and execution that we discussed here, should remain the same.
Quinn Henoch has a Doctorate of Physical Therapy from the University of Indianapolis. He is the head of rehabilitation for Darkside Strength and Core Sports Performance in Louisville, KY. He also works for the Kentucky Orthopedic Rehab Team managing orthopedic and sports related dysfunction. Quinn played football at the Div 1-AA level at Valparaiso University as a defensive back. He has also competed in track and field, Crossfit, and powerlifting. Currently, he trains full time as an Olympic weightlifter, with the goal of breaking onto the national stage in 2014, as a 77kg lifter.
Комментариев нет:
Отправить комментарий